
550 shim tool
- shizzomynizzo
-
 Topic Author
- Offline
- User
- Posts: 71
- Thanks: 0
550 shim tool
13 Mar 2010 21:21
I'm about to check clearances on my 81 550. I know I will need a special tool to change the shims. I can only find tools for other bikes (750-1000cc models)
Is the motion pro tool the same one that I need?
Or if anyone can provide a link, it would be appreciated.
Thanks
Is the motion pro tool the same one that I need?
Or if anyone can provide a link, it would be appreciated.
Thanks
24 hours in a day...24 beers in a case
1981 KZ550 ***SOLD***
1982 KZ1100 A2
1981 KZ550 ***SOLD***
1982 KZ1100 A2
Please Log in or Create an account to join the conversation.
- Patton
-

- Offline
- KZr Legend
- Posts: 18640
- Thanks: 2099
Re: 550 shim tool
13 Mar 2010 21:39 - 13 Mar 2010 21:41
shizzomynizzo wrote:
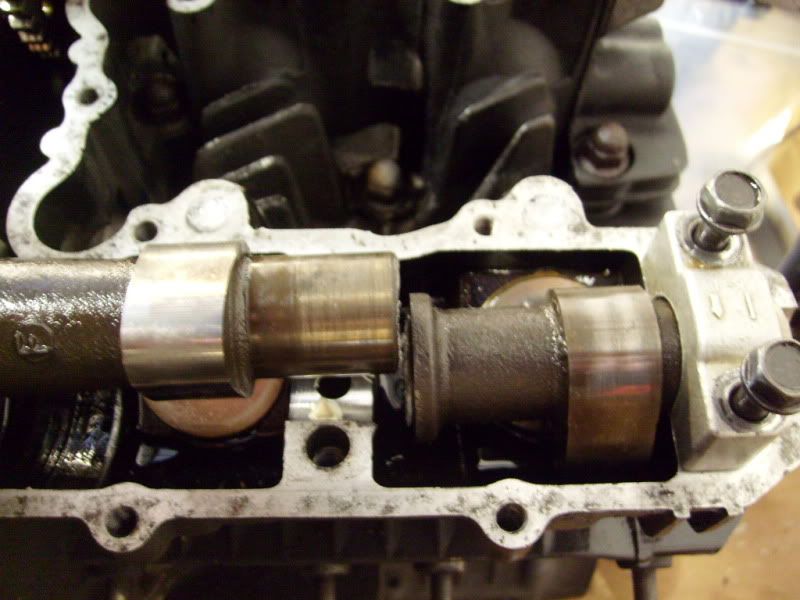
'81KZ550 has shims located under the bucket (under bucket shims), which requires cam shaft removal to access the shims.
The shim is "hidden" underneath the bucket, whereby the bucket must be removed to access the shim.
The MotionPro "batwing" tool (or Kawasaki "special" tool), is used when changing shims located on top of the bucket (over bucket shims), where the shims are visible under the cam lobe, and where cam removal isn't necessary to access the shims.
The tool holds the bucket down allowing space between the shim and cam lobe so the shim may be removed and replaced.
Good Fortune!")
I'm about to check clearances on my 81 550. I know I will need a special tool to change the shims. I can only find tools for other bikes (750-1000cc models)
Is the motion pro tool the same one that I need?
Or if anyone can provide a link, it would be appreciated.
Thanks
'81KZ550 has shims located under the bucket (under bucket shims), which requires cam shaft removal to access the shims.
The shim is "hidden" underneath the bucket, whereby the bucket must be removed to access the shim.
The MotionPro "batwing" tool (or Kawasaki "special" tool), is used when changing shims located on top of the bucket (over bucket shims), where the shims are visible under the cam lobe, and where cam removal isn't necessary to access the shims.
The tool holds the bucket down allowing space between the shim and cam lobe so the shim may be removed and replaced.
Good Fortune!
1973 Z1
KZ900 LTD
KZ900 LTD
Last edit: 13 Mar 2010 21:41 by Patton.
Please Log in or Create an account to join the conversation.
- Patton
-
- Offline
- KZr Legend
- Posts: 18640
- Thanks: 2099
Re: 550 shim tool
13 Mar 2010 21:53 - 13 Mar 2010 22:01
Here's a link to Z1E's Motion Pro tool.
Click > www.z1enterprises.com/detail.aspx?ID=152
which includes the following information:
Shim Changing tool - Motion Pro for Kawasaki
MP08-0019
Used to replace shims on Kawasaki Z1 KZ900 KZ1000 KZ1100 KL600 KL650 KLX650 KZ1300 ZN1300 KZ750 (twin)
Removing and replacing the cam shafts is a very exacting procedure, fraught with dangers of stripping cam bolt holes and bending valves due to incorrect reassembly of cam chain and cam sprockets.
Would urge using and closely following an FSM, and studying the several KZR articles previously posted on the subject.
Good Fortune!
1973 Z1
KZ900 LTD
KZ900 LTD
Last edit: 13 Mar 2010 22:01 by Patton.
Please Log in or Create an account to join the conversation.
- Patton
-
- Offline
- KZr Legend
- Posts: 18640
- Thanks: 2099
Re: 550 shim tool
13 Mar 2010 21:57 - 13 Mar 2010 21:57
Btw, it's easy to simply "check" the existing valve clearances by measuring with a feeler gauge.
Could be that the clearances are within specs without needing any shim changes.
Good Fortune!
Could be that the clearances are within specs without needing any shim changes.
Good Fortune!
1973 Z1
KZ900 LTD
KZ900 LTD
Last edit: 13 Mar 2010 21:57 by Patton.
Please Log in or Create an account to join the conversation.
- CoreyClough
-

- Offline
- User
- GPz550 Addiction
- Posts: 1094
- Thanks: 80
Re: 550 shim tool
14 Mar 2010 09:26 - 14 Mar 2010 10:09
Feeler gauges like this from Sears:

I use a 0.10 mm (.004") and a 0.20 mm (.008) blades to check the intakes. Exhaust, I use the 0.15 mm (.006") and 0.25 mm (0.10"), and if the smaller goes in, but the larger doesn't it's within specs for the 550, and I wouldn't change the shim if you're within. I do like to check with the remaining blades in between, just to see what the actual gap is, but with my experience changing shims, if it's not at the high or low measurement, I leave it. Measure, loosen the tensioner, zip tie the chain to the gears, remove cam, change shim, reinstall cam, do the same to the other cam if needed, tighten the tensioner, rotate engine a few times, recheck. . . See how much is involved, to try to get a closer clearance?
A noisy valve is a happy valve.
Use a magnet to remove the buckets, or work them slowly and carefully with a pair of needle-nosed vice grips. Twisting them slightly, before removing them if the buckets seem to be stuck.
Zip-tie the cams to the chain when removing one cam at a time, and mark the cam and chain where they meet with a little "white-out", just in case.
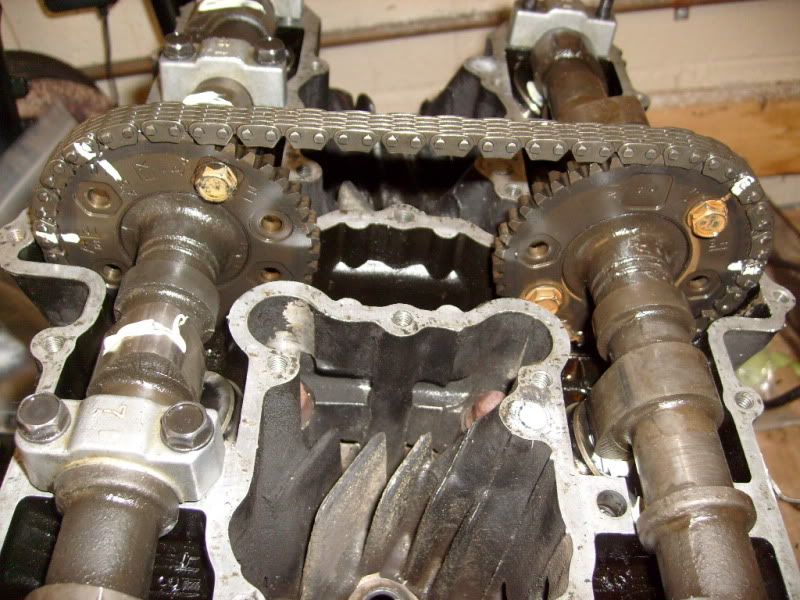
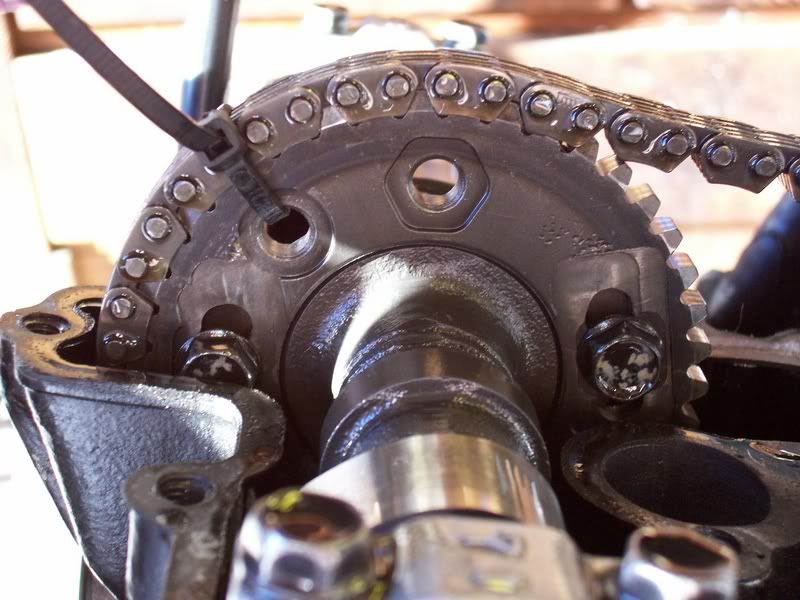
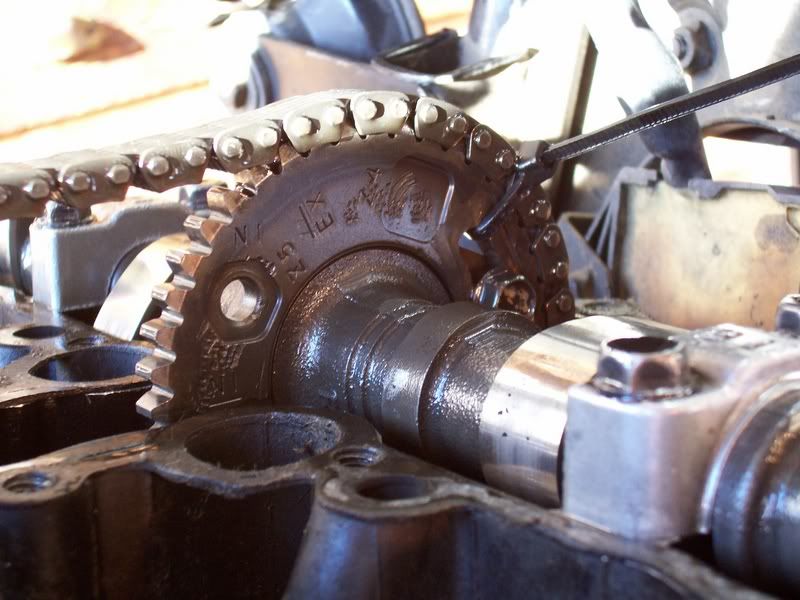
Loosen the cam chain tensioner, but don't rotate the engine with it loose. This makes getting the cams out and back in easier.
This, of course, is just some suggestions, and always work for me.")
I use a 0.10 mm (.004") and a 0.20 mm (.008) blades to check the intakes. Exhaust, I use the 0.15 mm (.006") and 0.25 mm (0.10"), and if the smaller goes in, but the larger doesn't it's within specs for the 550, and I wouldn't change the shim if you're within. I do like to check with the remaining blades in between, just to see what the actual gap is, but with my experience changing shims, if it's not at the high or low measurement, I leave it. Measure, loosen the tensioner, zip tie the chain to the gears, remove cam, change shim, reinstall cam, do the same to the other cam if needed, tighten the tensioner, rotate engine a few times, recheck. . . See how much is involved, to try to get a closer clearance?
A noisy valve is a happy valve.
Use a magnet to remove the buckets, or work them slowly and carefully with a pair of needle-nosed vice grips. Twisting them slightly, before removing them if the buckets seem to be stuck.
Zip-tie the cams to the chain when removing one cam at a time, and mark the cam and chain where they meet with a little "white-out", just in case.
Loosen the cam chain tensioner, but don't rotate the engine with it loose. This makes getting the cams out and back in easier.
This, of course, is just some suggestions, and always work for me.
'85 GPz550(ZX550-A2)
GPz550 Base Manual --> tinyurl.com/ze5b3qo
GPz550 Supplement Manual --> tinyurl.com/h34d2o6
GPz550.com --> www.nwsca.com/scripts/gpz_forum_2005/default.asp
First Race Win GPz550 --> tinyurl.com/o5y3ftp
GPz550 Base Manual --> tinyurl.com/ze5b3qo
GPz550 Supplement Manual --> tinyurl.com/h34d2o6
GPz550.com --> www.nwsca.com/scripts/gpz_forum_2005/default.asp
First Race Win GPz550 --> tinyurl.com/o5y3ftp
Last edit: 14 Mar 2010 10:09 by CoreyClough.
Please Log in or Create an account to join the conversation.
- shizzomynizzo
-
Topic Author
- Offline
- User
- Posts: 71
- Thanks: 0
Re: 550 shim tool
14 Mar 2010 13:03
Wow, I have to remove the cams to change the shims! Sound like fun!!
I knew the process was a little more tedious compared to the honda I have, but I didn't expect that.
Hopefully they are all within spec!
I take it I do not need a tool to remove them once the cams are out?
Thanks again
I knew the process was a little more tedious compared to the honda I have, but I didn't expect that.
Hopefully they are all within spec!
I take it I do not need a tool to remove them once the cams are out?
Thanks again
24 hours in a day...24 beers in a case
1981 KZ550 ***SOLD***
1982 KZ1100 A2
1981 KZ550 ***SOLD***
1982 KZ1100 A2
Please Log in or Create an account to join the conversation.
- timebomb33
-
- Offline
- User
- Posts: 4288
- Thanks: 10
Re: 550 shim tool
14 Mar 2010 13:16
usally just a decent magnet will break the oil stiction and they should just come right out.
1973 z1 2-1974z1-a,2-1975z1-b dragbikes1015cc+1393cc, 1977kz1000,1978kz1000,1981kz1000j, 1997 zx-11, 2000 z12r,1428turbo nitrous pro-mod and a shit load of parts thats all for now leader sask.,CANADA
I THINK MY POWERBAND BROKE
I THINK MY POWERBAND BROKE
Please Log in or Create an account to join the conversation.
- loudhvx
-

- Offline
- KZr Legend
- Posts: 10864
- Thanks: 1615
Re: 550 shim tool
14 Mar 2010 17:22 - 14 Mar 2010 17:31
I use a suction cup to pull the buckets.
Here are some important things to note:
#1 DO NOT REINSTALL THE VALVE COVER WITH TENSION ON THE CAM CHAIN. MAKE SURE THE TENSIONER IS RELEASED.
#2 It is way easier to reinstall the cams with the tach drive shaft removed. It is real easy to mess up a camshaft if you don't.
#3 Make sure you take a lot of time and patience when reinstalling the cams. If things start to bind and it seems as if the cams don't want to sit down in place as you tighten the cam caps, START OVER. Take a little more time now, or spend a lot more time and money later.
#4 Make sure all of the cam cap screw holes are cleaned out completely. No oil or sealant in the holes. Use a piece of paper towel rolled into a wick to absorb the oil. Oil and sealant don't compress, but they feel slippery and/or spongy which leads you to strip threads with little torque. This is probably the main reason for stripped cam cap bolts. (Even more so for the valve cover bolts. Get every bit of sealant out of those bolt holes! It's a pain, but way, way easier than retapping and installing helicoils.)
#5 Keep everything spotlessly clean, Especially when handling buckets and replacing shims. A piece of dirt can totally mess up the new clearances.
#6 The cam sprocket bolts are held in with locktight. Lay some paper towels around so the locktight crumbs don't fall into the motor. Clean all of the bolt threads with a wire brush to get all of the locktight off.
#7 Stay organized. Use egg cartons or some such to keep the parts arranged for each cylinder. Do not mix buckets, they are not 100% interchangeable. Some will swap, some won't depending on tolerances. And most importantly write down everything! Keep a legible record of every clearance (1 to 4 intake and exhaust.) Also write down every shim thickness as you pull it. (You probably want to get a good micrometer or at least a good caliper and practice reading it if you are new to it.)
Here is a link to a bunch of important cam-timing info for the 550's:
(Corey and I spent days getting this info together).
home.comcast.net/~loudgpz/GPZweb/CamsKZZ...KZZXZR550500400.html
Personally, I prefer the shim-under arrangement. The first time will take seemingly forever because it's a learning curve. Short cuts always result in more time later. By the second or third adjustment you'll beable to do the whole thing in an afternoon. (Because you will keep a record of every shim and clearance so you'll know what shims to order before you do it next time.)
1981 KZ550 D1 gpz.
Kz550 valve train warning.
Other links.
Kz550 valve train warning.
Other links.
Last edit: 14 Mar 2010 17:31 by loudhvx.
Please Log in or Create an account to join the conversation.
- CoreyClough
-
- Offline
- User
- GPz550 Addiction
- Posts: 1094
- Thanks: 80
Re: 550 shim tool
14 Mar 2010 20:24
Nice going there Lou.
I highly recommend NOT removing the gears from the camshafts unless you absolutely have to.
Here's one for suggestion #3. Binding Camshaft:
Yes, if it's binding, it's not lined up. :S No worries, I grabbed another camshaft.
I highly recommend NOT removing the gears from the camshafts unless you absolutely have to.
Here's one for suggestion #3. Binding Camshaft:
Yes, if it's binding, it's not lined up. :S No worries, I grabbed another camshaft.
'85 GPz550(ZX550-A2)
GPz550 Base Manual --> tinyurl.com/ze5b3qo
GPz550 Supplement Manual --> tinyurl.com/h34d2o6
GPz550.com --> www.nwsca.com/scripts/gpz_forum_2005/default.asp
First Race Win GPz550 --> tinyurl.com/o5y3ftp
GPz550 Base Manual --> tinyurl.com/ze5b3qo
GPz550 Supplement Manual --> tinyurl.com/h34d2o6
GPz550.com --> www.nwsca.com/scripts/gpz_forum_2005/default.asp
First Race Win GPz550 --> tinyurl.com/o5y3ftp
Please Log in or Create an account to join the conversation.
- loudhvx
-
- Offline
- KZr Legend
- Posts: 10864
- Thanks: 1615
Re: 550 shim tool
14 Mar 2010 23:30
I don't think I've ever been able to do it without removing at least one sprocket. Timing and everything else seems much easier that way because youre not wrestling with the chain while installing the cam. Maybe I need to play with it more and see if I can do it without sprocket removal next time.
1981 KZ550 D1 gpz.
Kz550 valve train warning.
Other links.
Kz550 valve train warning.
Other links.
Please Log in or Create an account to join the conversation.
- CoreyClough
-
- Offline
- User
- GPz550 Addiction
- Posts: 1094
- Thanks: 80
Re: 550 shim tool
15 Mar 2010 04:50
Give it a try Lou. I've never remover the gears from the cams, that's why I zip tie them.
Ride it to CA and I'll show you.
Ride it to CA and I'll show you.
'85 GPz550(ZX550-A2)
GPz550 Base Manual --> tinyurl.com/ze5b3qo
GPz550 Supplement Manual --> tinyurl.com/h34d2o6
GPz550.com --> www.nwsca.com/scripts/gpz_forum_2005/default.asp
First Race Win GPz550 --> tinyurl.com/o5y3ftp
GPz550 Base Manual --> tinyurl.com/ze5b3qo
GPz550 Supplement Manual --> tinyurl.com/h34d2o6
GPz550.com --> www.nwsca.com/scripts/gpz_forum_2005/default.asp
First Race Win GPz550 --> tinyurl.com/o5y3ftp
Please Log in or Create an account to join the conversation.
- shizzomynizzo
-
Topic Author
- Offline
- User
- Posts: 71
- Thanks: 0
Re: 550 shim tool
15 Mar 2010 08:08
This is all good info. I will try the zip tie method. I still needed that write up about timing, as I do plan on swapping in gpz cams for a little boost of power.
24 hours in a day...24 beers in a case
1981 KZ550 ***SOLD***
1982 KZ1100 A2
1981 KZ550 ***SOLD***
1982 KZ1100 A2
Please Log in or Create an account to join the conversation.