
Installing New Valve Guides
- beefsquasher
-
 Topic Author
- Offline
- User
-

Registered
- Posts: 112
- Thanks: 0
Re: Installing New Valve Guides
03 Nov 2009 09:29
FYI:
I plan on recutting my seats with a neway after installing the new guides.
It appears that the previous owner had the exhaust guides replaced at some point (they are bronze), and they screwed up the head when they installed them - the valve guide bores are oversize and marked.
Intake side is fine.
I cleaned up the bores with a master cylinder hone until they are smooth. It appears that I need +.004" guides.
I have ordered the appropriate guides from Kibblewhite, as well as valves and titanium retainers. (I get Kibblewhite at cost here at work)
Since I don't have a special fixture (although I do have a press), I'd rather not try to press them in. Is there and DISadvantage to heating the head to 350 in the oven and tapping them in?
-Dave
1977 KZ1000 Mutt - 1075, Kenny Harmon Cams .400", RS34, Kerker, Dyna S
1997 Honda XR250R
1977 Yamaha XS360
1972 BMW R60/5
1997 Honda XR250R
1977 Yamaha XS360
1972 BMW R60/5
Please Log in or Create an account to join the conversation.
- beefsquasher
-
Topic Author
- Offline
- User
-
Registered
- Posts: 112
- Thanks: 0
Re: Installing New Valve Guides
03 Nov 2009 09:50
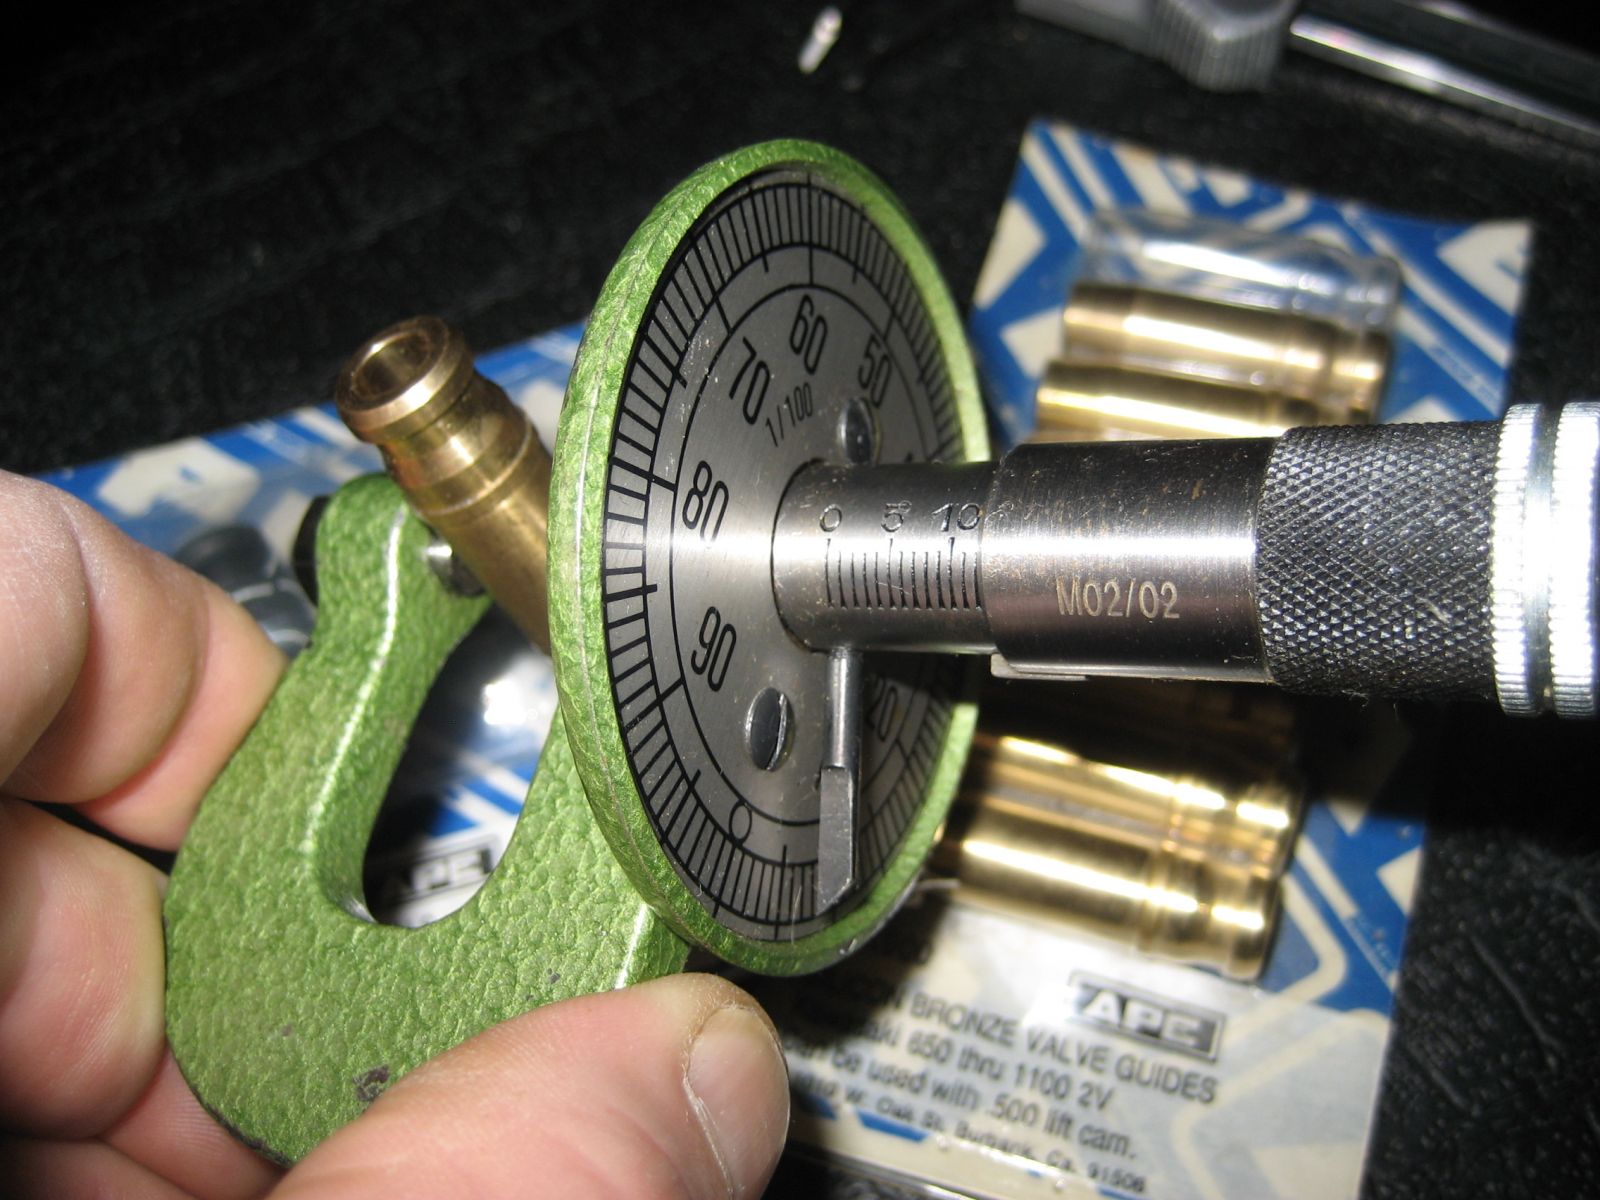
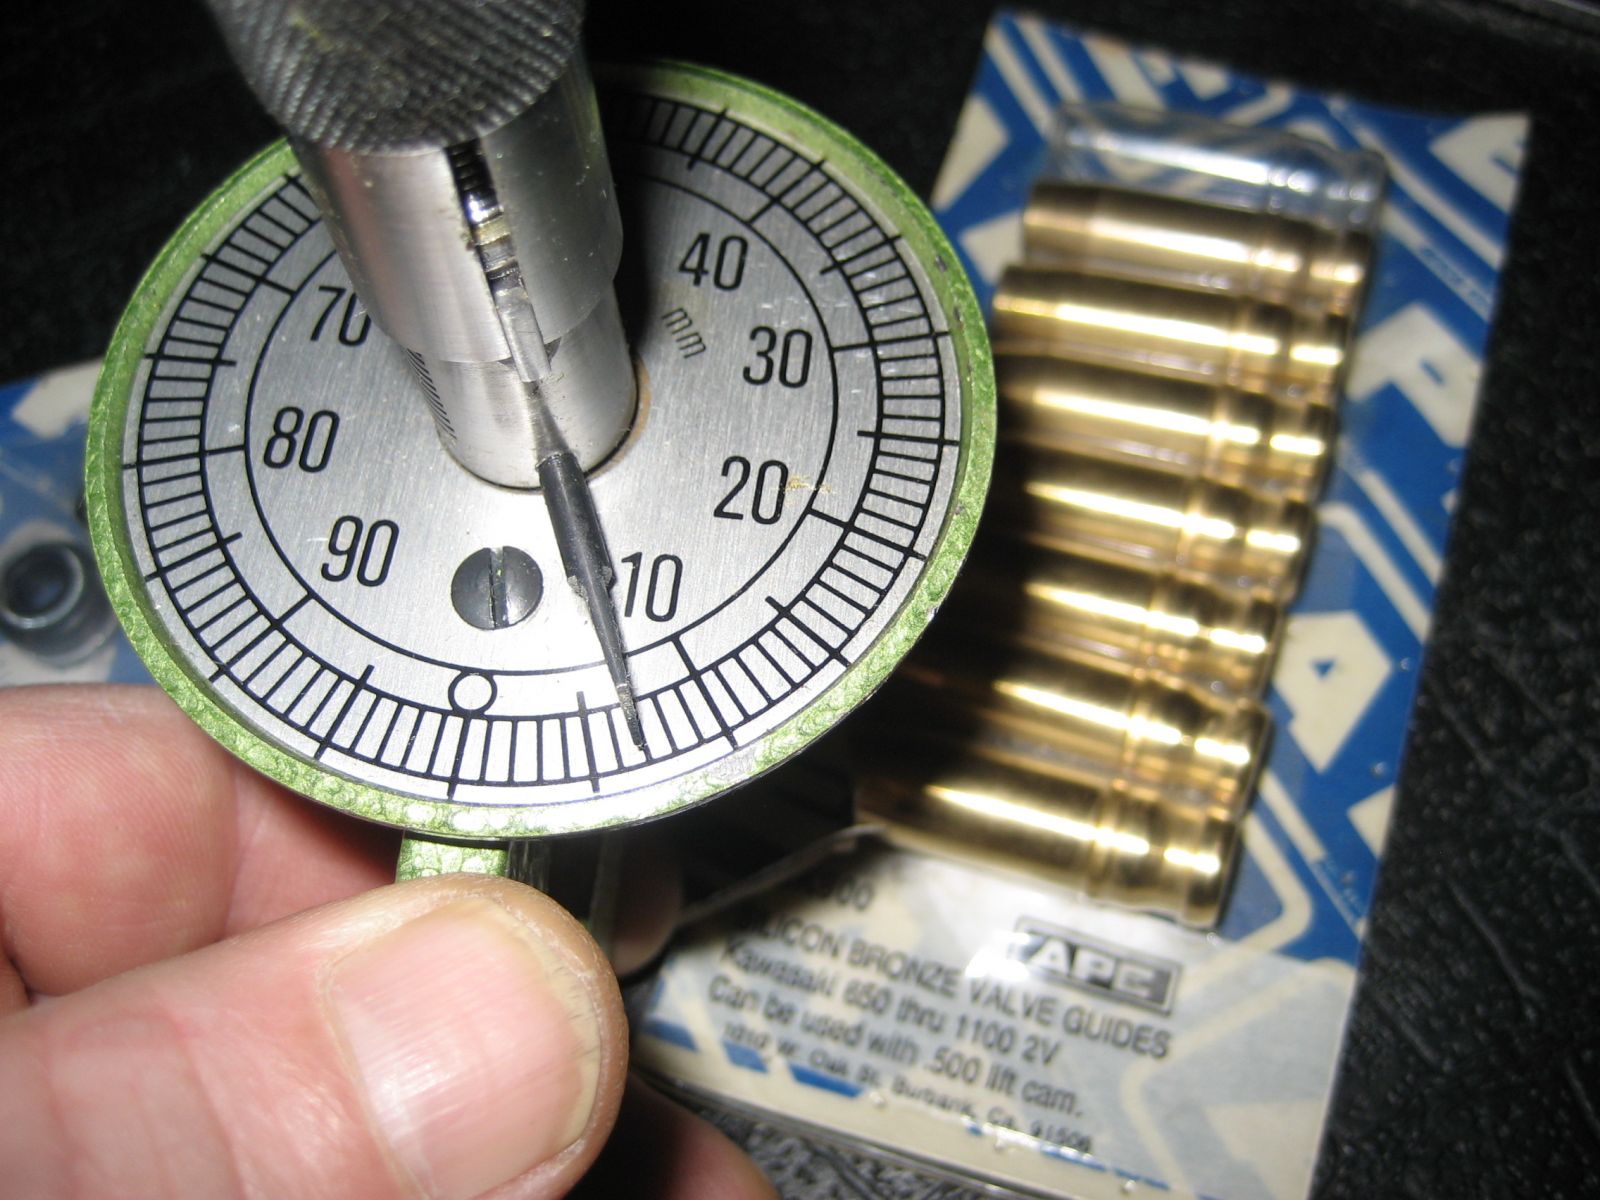
Some measurements:
intake guide bores:
1 - .4736"
2 - .4736"
3 - .4736"
4 - .4732"
exhaust guide bores:
1 - .4779"
2 - .4775"
3 - .4767"
4 - .4771"
kibblewhite guides:
intake - .4752"
exhaust (+.004) - .4792"
So my interference fits are:
intake: .0016" to .0020"
exhaust: .0013" to .0025"
So I assume I should open up the #3 exhaust guide bore just a touch with the hone to put it in the right range.
-Dave
1977 KZ1000 Mutt - 1075, Kenny Harmon Cams .400", RS34, Kerker, Dyna S
1997 Honda XR250R
1977 Yamaha XS360
1972 BMW R60/5
1997 Honda XR250R
1977 Yamaha XS360
1972 BMW R60/5
Please Log in or Create an account to join the conversation.
- BSKZ650
-

- Offline
- User
-
Registered
- Posts: 2061
- Thanks: 14
Re: Installing New Valve Guides
03 Nov 2009 12:26
I would agree with Jay, but with one exeption, I would freeze the guides and coat the inside of the guide bore with assembly oil and then drive the guides in, never had any issues.
I am not a big fan of the "new way" seat system, but thats just my 10 cents worth, price went up,,lol
I am not a big fan of the "new way" seat system, but thats just my 10 cents worth, price went up,,lol
77 kz650, owned for over 25 years
77 ltd1000, current rider
76 kz900, just waiting
73 z1,, gonna restore this one
piglet, leggero harley davidson
SR, Ride captian, S.E.Texas Patriot Guard Riders.. AKA KawaBob
77 ltd1000, current rider
76 kz900, just waiting
73 z1,, gonna restore this one
piglet, leggero harley davidson
SR, Ride captian, S.E.Texas Patriot Guard Riders.. AKA KawaBob
Please Log in or Create an account to join the conversation.
- APE Jay
-

- User
-
Public
- Thanks: 0
Re: Installing New Valve Guides
03 Nov 2009 23:37
You will find that if you freeze the guides in a freezer, then measure them, they didn't shrink as most freezers only get into the +20s.
To actually shrink them you need dry ice which is -100 degrees and will cause the guides to shrink. But really not worth the hassle.
Jay
To actually shrink them you need dry ice which is -100 degrees and will cause the guides to shrink. But really not worth the hassle.
Jay
Please Log in or Create an account to join the conversation.
- APE Jay
-
- User
-
Public
- Thanks: 0
Re: Installing New Valve Guides
03 Nov 2009 23:47 - 03 Nov 2009 23:50
beefsquasher wrote:
Pounding on a bronze guide can distort them. That's why we don't do it.
After you get them installed, you will need to hone them with a Sunnen guide hone for the proper clearance.
Careful with the Neways when the guides have been changed. If it is slightly off it can be hard to get it concentric with those. Some guys like Larry are artist with them.
Have your work contact us here; aperaceparts.com/dealer.html
Good luck.
FYI:
I plan on recutting my seats with a neway after installing the new guides.
It appears that the previous owner had the exhaust guides replaced at some point (they are bronze), and they screwed up the head when they installed them - the valve guide bores are oversize and marked.
Intake side is fine.
I cleaned up the bores with a master cylinder hone until they are smooth. It appears that I need +.004" guides.
I have ordered the appropriate guides from Kibblewhite, as well as valves and titanium retainers. (I get Kibblewhite at cost here at work)
Since I don't have a special fixture (although I do have a press), I'd rather not try to press them in. Is there and DISadvantage to heating the head to 350 in the oven and tapping them in?
-Dave
Pounding on a bronze guide can distort them. That's why we don't do it.
After you get them installed, you will need to hone them with a Sunnen guide hone for the proper clearance.
Careful with the Neways when the guides have been changed. If it is slightly off it can be hard to get it concentric with those. Some guys like Larry are artist with them.
Have your work contact us here; aperaceparts.com/dealer.html
Good luck.
Last edit: 03 Nov 2009 23:50 by APE Jay.
Please Log in or Create an account to join the conversation.
- larrycavan
-
- User
-
Public
- Thanks: 0
Re: Installing New Valve Guides
09 Nov 2009 16:25
Removing and installing valve guides is 100% about preperation. Do the prep work right, the guides go in right and the valve job doesn't fight you...
MV Agusta heats their heads for 1 hour in a specail oven. Then an automated machine slips the guides right in, dead nuts where they belong. Coolest thing I've ever seen!!")
MV Agusta heats their heads for 1 hour in a specail oven. Then an automated machine slips the guides right in, dead nuts where they belong. Coolest thing I've ever seen!!
Please Log in or Create an account to join the conversation.
- mach1charlie
-
- Offline
- User
-
Registered
- Posts: 3
- Thanks: 0
Re: APE Jay
12 Nov 2009 14:10
I am new to this board, I just want to thank you for sharing your good info.
I am one of those people that do all my own work and I have put guides in (harley), most shops act like its a trade secret.
When I need parts you will get my business.
And anybody that wants to do there own heads, there is good advice on this forum.
Charlie
I am one of those people that do all my own work and I have put guides in (harley), most shops act like its a trade secret.
When I need parts you will get my business.
And anybody that wants to do there own heads, there is good advice on this forum.
Charlie
Please Log in or Create an account to join the conversation.
- max57
-
- Offline
- User
-
Registered
- Posts: 2
- Thanks: 0
Re: Installing New Valve Guides
12 Nov 2011 15:17APE Jay wrote: It is about .002"
As for removing and installing guides, remember you have to remachine the seats when you change guides. If you are not equipped to do that, why not send the head to someone that can handle all of it.
As for removing and replacing. Having done this to probably over 1000 heads and the leading manufacturer of aftermarket guides, I offer these tips;
First, it is imperative that you blast the nose of the guides so there is no carbon on them. The carbon, especially on the exhaust guide is very hard and can damage the guide hole in the head if you remove the guides with it on it.
Next, to heat or not to heat. If the guides are oem steel, heat the head and drive them out. If the head has bronze guides, drive them out cold.
Radius or diameter?
When installing new guides, ignore the manual. Do not heat the head or pound on the new guides.
We use special fixtures in the press and coating the guide with assembly lube, we press them in cold. This helps keeping the guide from going in crooked, and won't damage the guide.
We do make oversize guides for people who screw these heads up trying to do it another way
Please Log in or Create an account to join the conversation.
- max57
-
- Offline
- User
-
Registered
- Posts: 2
- Thanks: 0
Re: Installing New Valve Guides
12 Nov 2011 15:20beefsquasher wrote: Some measurements:
intake guide bores:
1 - .4736"
2 - .4736"
3 - .4736"
4 - .4732"
exhaust guide bores:
1 - .4779"
2 - .4775"
3 - .4767"
4 - .4771"
kibblewhite guides:
intake - .4752"
exhaust (+.004) - .4792"
So my interference fits are:
intake: .0016" to .0020"
exhaust: .0013" to .0025"
So I assume I should open up the #3 exhaust guide bore just a touch with the hone to put it in the right range.
-Dave
Radius or diameter?
Please Log in or Create an account to join the conversation.
- Garn
-

- Offline
- User
-
Registered
- Posts: 265
- Thanks: 13
Re: Installing New Valve Guides
19 Jan 2018 15:54
Max57, when you pressed the old guides out did you ensure that there was no carbon crust on the guide tip.
I had the unfortunate experience that, as I knocked the old guide out, it slightly deformed the guide hole. This resulted in a skewed valve, once the new guide was pressed in!
RegardZ.
I had the unfortunate experience that, as I knocked the old guide out, it slightly deformed the guide hole. This resulted in a skewed valve, once the new guide was pressed in!
RegardZ.
1 x 73 Z1 (Jaffa), 74 Z1A, 76 Z900-A4
1 x 73 Yamaha TX500 & 98 fzx250 Zeal
Sydney Australia
1 x 73 Yamaha TX500 & 98 fzx250 Zeal
Sydney Australia
Please Log in or Create an account to join the conversation.
- SWest
-

- Offline
- Sustaining Member
-

Registered
- 10 22 2014
- Posts: 23482
- Thanks: 2934
Re: Installing New Valve Guides
19 Jan 2018 17:16
When I changed my valve guides I had a three angle seat grind done.
Steve
Steve
Z1b1000 1975 Z1b
kzrider.com/forum/11-projects/598262-kz-...-will-it-live#672882
kzrider.com/forum/2-engine/597654-poser?start=240#704229
kzrider.com/forum/11-projects/598262-kz-...-will-it-live#672882
kzrider.com/forum/2-engine/597654-poser?start=240#704229
Please Log in or Create an account to join the conversation.
- Scirocco
-

- Offline
- Premium Member
-

Registered
- Never change a running system
- Posts: 4420
- Thanks: 2269
Re: Installing New Valve Guides
19 Jan 2018 17:22
Valve guides are 0,05-0,08 mm over size to get tight press fit in the cylinder head valve guide bore.
If you don´t clean them (carbon) you will ream out the valve guide bore some hundredth of an millimeter and they will never been
tight enough without the pressure they need.
(you need over size guides then and have to ream out the bore to the correct tolerance).
Standard valve guides have 12,07 mm OD, the valve guide bore ID is 12,00 (+/- 0,01 mm).
Installing new guides i do heat up the head to 200° Celsius in a stove to expand the valve guide bore bore.
Put the new guides in a freezer with -30° Celsius and let them shrink.
You need a installer stem punch with 6,90/11,00 OD mm
After the installing i do a light reaming to give the guide a cylindric ID.
My 1975 Z 1 B 900 Project
www.kzrider.com/forum/11-projects/605133...ears-deep-sleep-mode
www.kzrider.com/forum/11-projects/605133...ears-deep-sleep-mode
Attachments:
Please Log in or Create an account to join the conversation.
Moderators: Street Fighter LTD