
Question on surface finishing of engine castings
- shighley
-
 Topic Author
- Offline
- User
- Posts: 98
- Thanks: 0
Question on surface finishing of engine castings
13 Jul 2008 10:05
I've got a '74 Z1-A and would like to restore the factory surface finish to the engine. I know that sandblasting and glass beading will not impart the "sheen" that the parts had when new, as I have tried them. I'm guessing the factory finish was the result of shot peening. Has anyone tried this or any other blasting media with success? Thanks from Lake Elsinore, Ride safe, Steve
\'74 Z1-A, Bought new, worn out 3 times, being ridden now
\'83 XVZ12TK, was daily driver until frame broke
\'78 KZ650SR-D1A, Son's bike, I'm the wrench (He's young)!
\'83 XVZ12TK, was daily driver until frame broke
\'78 KZ650SR-D1A, Son's bike, I'm the wrench (He's young)!
Please Log in or Create an account to join the conversation.
- Ilbikes
-

- Offline
- User
- Posts: 36
- Thanks: 0
Re: Question on surface finishing of engine castings
13 Jul 2008 11:25
I just finished my engine clean-up on a 1976 KZ900. Determined I was going to find a way to get them back without blasting and without clear coat. I was determined that I would have the shine finish or I would have to send these to England and let Stephen Smethurst do them for me. Mine were oxidized with white/gray scale, stained from years of neglect and oil leaks. I looked for something that would remove the scale.
I started by soaking them in $141 worth of NAPA's best 5 gallons of carb cleaner - nothing I soaked them in commercial, un-diluted aluminum cleaner acid would remove the scale - nothing but lots of foam and it turned the surface dark.
I soaked them in air conditioning coil cleaner - really strong stuff - same, still had the scale and the acid was turning it darker.
I used Purple Power, Greased Lightning - nothing would remove the stains and scale.
I called Stephen and during that conversation he mentioned that he has to put them into a "burnishing tumbler". This is not something you have at home. Unlike the vibrating polishers Eastwood (I have a small one), the burnisher is mechanically driven to rotate the part. I knew it was going to take something mechanical.
Determined that I was not going to blast them with beads, I looked for an assortment of wire brushes. I bought several different kinds and bristle type. I also bought several different round disc type to fit into my electric drill. In searching for one thin enough to fit into the fins and with long bristles, I found that the long, small diameter wire would easily go in between the fins and small areas of the cylinder, head, and cases. Once This cylinder was cleaned of grease, honed, gasket surfaces cleaned, then I spent 10 minutes with it on my bench, my son holding it for me and using an electric drill and that 5" fine-wire 1/4" think wire brush - I cleaned all of the scale and brought the original shine back to the finish. Use the right brush - not too still o it will gouge and you will simply be amazed at the speed and the nice shine that pops out. Every casting mark is left intact and the shine is probably better than new. Those wire disc are $4 each at many retailers like Lowes and Home Depot. I would imagine they are for paint removal. As a touch up, I would use a brass-bristle brush by hand to get any spots I'd missed. Those holes and small places? Wal-Mart sells universal gun-cleaning kits for about $10 which have 10 different steel brushes for small rifles and 12 gauge shotguns - those work perfectly chucked up into your drill.
Once you're done, wash the part in paint thinner or mineral spirits and then hot, soapy water, blow dry and lightly oil the bores and you're ready for assembly.
Hope this helps.
Regards,
Gordon
Attachments:
Please Log in or Create an account to join the conversation.
- shighley
-
Topic Author
- Offline
- User
- Posts: 98
- Thanks: 0
Re: Question on surface finishing of engine castings
14 Jul 2008 05:39
Hey Ilbikes; The results of your labor and stubbornness sure have paid off. That engine looks good! I did a little research at McMaster-Carr and they have the steel shot I spoke of earlier. We have a small blasting cabinet at work and I'm gonna try that method first. When I was in High School, I had a summer job at a brass foundry. They had this huge machine that shot peened the raw castings and they came out of the process looking like burnished gold. If it doesn't work I'll break out the brushes! Thanks for your good information and advise. Ride safe, Steve
\'74 Z1-A, Bought new, worn out 3 times, being ridden now
\'83 XVZ12TK, was daily driver until frame broke
\'78 KZ650SR-D1A, Son's bike, I'm the wrench (He's young)!
\'83 XVZ12TK, was daily driver until frame broke
\'78 KZ650SR-D1A, Son's bike, I'm the wrench (He's young)!
Please Log in or Create an account to join the conversation.
- violentvintagecycles
-
- Offline
- User
- Posts: 430
- Thanks: 1
Re: Question on surface finishing of engine castings
14 Jul 2008 06:15
You have the patience of a saint.. I gave up after, like you, every product known to man was tried on it.. The wire wheels for the dremel worked good, but too many man hours for me! :ohmy: I ended up painting it.. GREAT job, my hats off to you!
Please Log in or Create an account to join the conversation.
- Ilbikes
-
- Offline
- User
- Posts: 36
- Thanks: 0
Re: Question on surface finishing of engine castings
14 Jul 2008 07:24
Guys, that's where the pay-off is. I spent 10-15 minutes total on the head and no more than that on the cylinder block. After finding the right brush length, a thin/skinny disc width, and light stiffness (you want long, thin bristles that will deflect and deform easily). I had my son hold it on my bench and I applied the pressure so the bristles would go down into the recesses. I had the brushes doing the cleaning along their side/lengths - not their ends/tips.
The Dremel brushes are too small to reach into the fin areas, spin too fast, and don't deflect the wire. I've tried it and was also not happy with effect - even on flat surfaces. It's like trying to paint the house with a pinstriping brush.
Shighley, where are you? There is someone in England that is doing a fantastic job on these and his prices are reasonable. I just could not justify the freight from the US and worried about getting it all back in good shape with shippers involved. I want my original engine to stay with the bike.
Have a look at this link - it will confirm your burnishing method. It's what he uses and his is the best. Maybe when I do the full restoration of this bike a few years from now, I will send him all of the engine parts.
Warning, this will cause drooling and slobber to run all over your keyboards --
www.aloh.co.uk/Pages/sample.htm
Regards,
Gordon
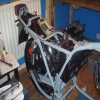
Here is a before photo of my head -

The Dremel brushes are too small to reach into the fin areas, spin too fast, and don't deflect the wire. I've tried it and was also not happy with effect - even on flat surfaces. It's like trying to paint the house with a pinstriping brush.
Shighley, where are you? There is someone in England that is doing a fantastic job on these and his prices are reasonable. I just could not justify the freight from the US and worried about getting it all back in good shape with shippers involved. I want my original engine to stay with the bike.
Have a look at this link - it will confirm your burnishing method. It's what he uses and his is the best. Maybe when I do the full restoration of this bike a few years from now, I will send him all of the engine parts.
Warning, this will cause drooling and slobber to run all over your keyboards --
www.aloh.co.uk/Pages/sample.htm
Regards,
Gordon
Here is a before photo of my head -
Attachments:
Please Log in or Create an account to join the conversation.
- harm
-

- Offline
- User
- Tom
- Posts: 681
- Thanks: 13
Re: Question on surface finishing of engine castings
14 Jul 2008 09:27
Ilbikes,
Could you post a pic of the brushes that you used?
Very nice work!
Tom
Could you post a pic of the brushes that you used?
Very nice work!
Tom
Tom
Holland, MI
1980 KZ550 ELR
2011 Concours14
2017 KX450 [/color]
Holland, MI
1980 KZ550 ELR
2011 Concours14
2017 KX450 [/color]
Please Log in or Create an account to join the conversation.
- Ilbikes
-
- Offline
- User
- Posts: 36
- Thanks: 0
Re: Question on surface finishing of engine castings
14 Jul 2008 09:52 - 14 Jul 2008 09:57
Like this - it has to be thin enough to fit in between the fins and soft enough not to dig/scratch the soft aluminum surface. I used 2 of them for the entire job. I will be buying so more as this step will become standard procedure for me on the fins from now on when/where paint is not originally used.
Here is a link to the best selection of brushes I've ever found.
www.spiralbrushes.com/wheel.html
Regards,
Gordon

Here is a link to the best selection of brushes I've ever found.
www.spiralbrushes.com/wheel.html
Regards,
Gordon
Attachments:
Last edit: 14 Jul 2008 09:57 by Ilbikes.
Please Log in or Create an account to join the conversation.
- SPARKY47
-
- Offline
- User
- 1980 KZ500 B2
- Posts: 415
- Thanks: 5
Re: Question on surface finishing of engine castings
14 Jul 2008 15:50
I tried REALLY hard but my effin fingers wore out first:silly:
1980 KZ500 B2
Location: Middle England[/b
Location: Middle England[/b
Please Log in or Create an account to join the conversation.
- ltdrider
-

- Offline
- User
- Posts: 1232
- Thanks: 17
Re: Question on surface finishing of engine castings
14 Jul 2008 16:07
There's a metal polish on the market called Mr. Buffer.
It's not sold in CA (so you know it's good), but you can order it on-line at mrbuffer.com.
I use it with a green scotchbrite pad on the cast surfaces, and with a soft cloth on the machined surfaces.
Wipe it on, it turns black, wipe it off, and buff. It leaves some kind of coating on the metal, and the shine lasts for months.
Here's a pic:
'76 KZ900 LTD (Blaze)
'96 Voyager XII (Dark Star)
'79 KZ650 Cafe Project (Dirty Kurt)
Greensboro, NC
'96 Voyager XII (Dark Star)
'79 KZ650 Cafe Project (Dirty Kurt)
Greensboro, NC
Attachments:
Please Log in or Create an account to join the conversation.
- shighley
-
Topic Author
- Offline
- User
- Posts: 98
- Thanks: 0
Re: Question on surface finishing of engine castings
15 Jul 2008 06:24
Ilbikes; I'm in SoCal and that link you provided did indeed cause salivation. I'll post picture when I'm done with my castings, if they merit it. Alot of people have access to blasting cabinets and if the process is simple enough. . . Thanks for your responses and ride safe, Steve
\'74 Z1-A, Bought new, worn out 3 times, being ridden now
\'83 XVZ12TK, was daily driver until frame broke
\'78 KZ650SR-D1A, Son's bike, I'm the wrench (He's young)!
\'83 XVZ12TK, was daily driver until frame broke
\'78 KZ650SR-D1A, Son's bike, I'm the wrench (He's young)!
Please Log in or Create an account to join the conversation.
- LeeLewis7
-

- Offline
- User
- Posts: 55
- Thanks: 0
Re: Question on surface finishing of engine castings
19 Jul 2008 14:11
Thanks for the great tip, but I've got a problem.
Found and purchased one of the 4" wire wheels at Home Depot. A Black and Decker 4" Fine Stainless Steel wheel. Works fast, but too agressive. Great shine but very fine barely visible scratches left behind. Trying to use the wheel in corners really looks bad.
I'm guessing that the wire is just too stiff, even though it says "Fine". I agree that wire length is critical, since it allows the wire to bend to the work without permanent distortion. A softer wire material seems to be in order.
Any thoughts on were a brass or bronze (which is softer?) 4" wheel might be found locally? (The link above looks like a great resource, but I was hoping to finish polishing the cases this weekend.) Not Harbor Freight,though. I have several brass/steel wheels from there and they are all too stiff. Gouge the heck outta the case.
Chattanooga, TN
1984 KZ1000 P3 (Blue Shift)
kzrider.com/index.php?option=com_kunena&...8353&catid=11#218353
1984 KZ1000 P3 (Blue Shift)
kzrider.com/index.php?option=com_kunena&...8353&catid=11#218353
Please Log in or Create an account to join the conversation.
- Ilbikes
-
- Offline
- User
- Posts: 36
- Thanks: 0
Re: Question on surface finishing of engine castings
20 Jul 2008 04:49
Lee, I'm glad to hear you've had some positive results. Yes, getting the soft bristles is key. I would think brass would softer. I also thought bronze was a cast metal, and not something you could make a brush out of.
The bristles need to be long, thin, and as soft (easy to bend) as you can get.
Regards,
Gordon
The bristles need to be long, thin, and as soft (easy to bend) as you can get.
Regards,
Gordon
Please Log in or Create an account to join the conversation.