
Missing exhaust gasket??
- IntroSpectre
-
 Topic Author
- Offline
- User
-

Registered
- Posts: 23
- Thanks: 0
Missing exhaust gasket??
02 Jul 2007 17:42
Hey everyone,
It's been a while since I was on here. I've been elbows deep in a project pickup and I was waiting for those vacuum gauges to show up. See post:
Carb sync tool thread
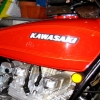
I was all set to sync the carbs today but found an exhaust leak in between my muffler pipe and header pipe. Was wondering if I am missing an exhaust gasket, or if you simply tighten down the lock ring. can't figure it out.
I'll keep searching the archive.
Thanks,
Andy
Post edited by: N0NB, at: 2007/07/03 13:47
It's been a while since I was on here. I've been elbows deep in a project pickup and I was waiting for those vacuum gauges to show up. See post:
Carb sync tool thread
I was all set to sync the carbs today but found an exhaust leak in between my muffler pipe and header pipe. Was wondering if I am missing an exhaust gasket, or if you simply tighten down the lock ring. can't figure it out.
I'll keep searching the archive.
Thanks,
Andy
Post edited by: N0NB, at: 2007/07/03 13:47
Please Log in or Create an account to join the conversation.
- RetroRiceRocketRider
-

- Offline
- User
-
Registered
- ...bring in the machine that goes PING!
- Posts: 1641
- Thanks: 29
Re: Missing exhaust gasket??
02 Jul 2007 18:57
If it's the original 4-into-2 exhaust system then yes, there should be a gasket there.
If Z1 Ent doesn't have them, most Kawi dealerships will since it's a fairly common item.
If Z1 Ent doesn't have them, most Kawi dealerships will since it's a fairly common item.
Covina, So Calif!
78 KZ650-B2 = SOLD
84 ZN700 LTD = SOLD
84 ZX750 GPz = SOLD
89 GSX1100F Katana = SLEEPING
20 VN1700 Vulcan Vaquero (the Blue Cowboy)
Looking for my next project KZ
78 KZ650-B2 = SOLD
84 ZN700 LTD = SOLD
84 ZX750 GPz = SOLD
89 GSX1100F Katana = SLEEPING
20 VN1700 Vulcan Vaquero (the Blue Cowboy)
Looking for my next project KZ
Please Log in or Create an account to join the conversation.
- IntroSpectre
-
Topic Author
- Offline
- User
-
Registered
- Posts: 23
- Thanks: 0
Re: Missing exhaust gasket??
02 Jul 2007 19:09
RetroRiceRocketRider wrote:
Right you are, RRRR.
There's a Clymer PDF manual for this bike here:
www.metrovationinc.com/christemple/KZ550.pdf
On page 166 of the manual (or 176 of the PDF), there's an exploded diagram of the stock 4into2 exhaust. Unfortunately, no part #s are listed, and I doubt if the Kawa dealer here in town has one on the shelf...I suppose I could wait but...
Is there an alternative material? Something from NAPA, etc, that could be used? A header-wrap-like material? Anybody have any suggestions? I already checked Z1. Nada.
Thanks, just want to get the bike running again ASAP.
Andy
Post edited by: IntroSpectre, at: 2007/07/02 22:10
If it's the original 4-into-2 exhaust system then yes, there should be a gasket there.
Right you are, RRRR.
There's a Clymer PDF manual for this bike here:
www.metrovationinc.com/christemple/KZ550.pdf
On page 166 of the manual (or 176 of the PDF), there's an exploded diagram of the stock 4into2 exhaust. Unfortunately, no part #s are listed, and I doubt if the Kawa dealer here in town has one on the shelf...I suppose I could wait but...
Is there an alternative material? Something from NAPA, etc, that could be used? A header-wrap-like material? Anybody have any suggestions? I already checked Z1. Nada.
Thanks, just want to get the bike running again ASAP.
Andy
Post edited by: IntroSpectre, at: 2007/07/02 22:10
Please Log in or Create an account to join the conversation.
- OKC_Kent
-
- Offline
- User
-
Registered
- Posts: 1719
- Thanks: 21
Re: Missing exhaust gasket??
02 Jul 2007 19:19
Call a dealer after you get the part number.Here, 11009-1667.
I just got one for my 750 and it's like $13. They had to order it but they are available, took a few days to get it.
Post edited by: OKC_Kent, at: 2007/07/02 22:23
I just got one for my 750 and it's like $13. They had to order it but they are available, took a few days to get it.
Post edited by: OKC_Kent, at: 2007/07/02 22:23
Cashion, OK
78 KZ650 B2 85,000+ miles
78 KZ650 B2 85,000+ miles
Please Log in or Create an account to join the conversation.
- RetroRiceRocketRider
-
- Offline
- User
-
Registered
- ...bring in the machine that goes PING!
- Posts: 1641
- Thanks: 29
Re: Missing exhaust gasket??
02 Jul 2007 19:25
You just might be able to get away with using exhaust wrap.
You'll want to make sure that you wrap it thick enough so that it seals adequately, but not so thick that you trash the back of your mufflers by using a BFH to force them on - measure twice (or more), cut once.")
I know you're dying to go riding, but I'd go with Kent's suggestion and just order one. It shouldn't take more than a couple of days to get it.
Post edited by: RetroRiceRocketRider, at: 2007/07/02 22:27
You'll want to make sure that you wrap it thick enough so that it seals adequately, but not so thick that you trash the back of your mufflers by using a BFH to force them on - measure twice (or more), cut once.
I know you're dying to go riding, but I'd go with Kent's suggestion and just order one. It shouldn't take more than a couple of days to get it.
Post edited by: RetroRiceRocketRider, at: 2007/07/02 22:27
Covina, So Calif!
78 KZ650-B2 = SOLD
84 ZN700 LTD = SOLD
84 ZX750 GPz = SOLD
89 GSX1100F Katana = SLEEPING
20 VN1700 Vulcan Vaquero (the Blue Cowboy)
Looking for my next project KZ
78 KZ650-B2 = SOLD
84 ZN700 LTD = SOLD
84 ZX750 GPz = SOLD
89 GSX1100F Katana = SLEEPING
20 VN1700 Vulcan Vaquero (the Blue Cowboy)
Looking for my next project KZ
Please Log in or Create an account to join the conversation.
- IntroSpectre
-
Topic Author
- Offline
- User
-
Registered
- Posts: 23
- Thanks: 0
Re: Missing exhaust gasket??
02 Jul 2007 22:32
Yeah... I suppose you're right. I like things done the way they should be, but this bike's had too much down time. I'm on the fence but I guess I'll just have to wait.
I had been riding it around before with the exhaust leak, but now I want to sync up the carbs I just rebuilt. I'm going off the theory that this leak at #3 header will affect the vacuum that the carb pulls. I'm trying to avoid having to sync them twice. Is this just a bad theory on my part or will the repaired leak read a different vacuum due to different back pressure?
Thanks for the part # Kent. By the way, where do you go about tracking down part #s for these older bikes? I've tried searching for online microfiche specific to this model but no luck.
One last thing. Will this number you gave (11009-1667) work for my 550 as well as your 750?
Thanks again
Andy
I suppose you're right. I like things done the way they should be, but this bike's had too much down time. I'm on the fence but I guess I'll just have to wait.I had been riding it around before with the exhaust leak, but now I want to sync up the carbs I just rebuilt. I'm going off the theory that this leak at #3 header will affect the vacuum that the carb pulls. I'm trying to avoid having to sync them twice. Is this just a bad theory on my part or will the repaired leak read a different vacuum due to different back pressure?
Thanks for the part # Kent. By the way, where do you go about tracking down part #s for these older bikes? I've tried searching for online microfiche specific to this model but no luck.
One last thing. Will this number you gave (11009-1667) work for my 550 as well as your 750?
Thanks again
Andy
Please Log in or Create an account to join the conversation.
- OKC_Kent
-
- Offline
- User
-
Registered
- Posts: 1719
- Thanks: 21
Re: Missing exhaust gasket??
03 Jul 2007 05:20
Andy, just go to
www.buykawasaki.com/home/home.aspx
Oh that part number is for your bike. As R4 said it is common, from 80cc to big 4 wheelers and bikes, all use these muffler gaskets and share the same part.
Using the Kawasaki Parts Diagram function
Riders of the older Kawasaki motorcycles often wish they had a diagram of the assembly they need to work with. Some of the manuals available have poor pictures, or don’t provide enough data to allow a rider to fix his own bike. This is more important to an owner of a vintage machine as many dealers have stopped working on motorcycles older than 10 years old.
The Kawasaki website Welcome to Kawasaki.com does provide diagrams for the motorcycles they manufactured, and also lists all the parts by name, part number, and quantity used. In many cases they are very good, clear diagrams. As they say, “A picture is worth a thousand words.”
Here is how to access those diagrams
1. Find the words “Owners Info” on the Kawasaki main page, mouse over them and click the link.
2. Find the words “Parts Diagrams” and mouse over it and click the link.
3. On this page select “Motorcycle” in the dropdown box and click “Continue”
4. On this page you can select all the items you know of to identify your bike. If you know the bike model only then choose that. As you choose and click data you will narrow the choices down, eventually arriving at the model you are looking for.
5. When you select your model a new window will open and it has an index of the parts. Choose the area you need and click it. Now a new window opens with frames: the diagram, a parts index for that diagram; and a master index. These all interact with each other; if you click a part number in one area it highlights the part in the other area. If you want a new diagram go to the master index and click what you need.
6. On some parts you will notice a black arrow pointing left, right, or both. By clicking the left arrow it will show you the part with an older part number; and the right arrow shows you what your part has been upgraded to.
7. There is the ability to add the part to a “Pick List” and print it out. It comes in handy having all the parts on a page for reference in ordering dealer parts or for Ebay searches.
8. The diagrams are easily printed out to your printer. I have found the parts index below the diagram will need to be left-clicked and held with your mouse to highlight everything and then Copied (or right-clicked and “Select All”); then save it to Notepad, WordPad, Word, or other text editor. You can then modify the text to look nice and readable. Once it looks nice save it to your hard drive in a new Folder just for this model bike.
How to make a Kawasaki Parts Diagram Manual
I wanted to be able to save the parts diagrams to my hard drive, but the Kawasaki website does not provide that ability. It does let you “Print” and that was the key. I found a free downloadable program called “Cute PDF” CutePDF - Create PDF for free, Free PDF Utilities, Save PDF Forms, Edit PDF easily. Cute PDF creates a new printer that just makes .pdf documents, and all you need to do is send any type of document to this printer and it happens automatically.
After you download and run the program a new printer will show up in your main “Printers” folder. This printer is just an outlet for the program to create the .pdf document. Now you can print the parts diagram to this printer and file them with the text file you created above in the new Folder just for your bike. All the Kawasaki’s I own have a folder with a .pdf diagram and text file of the parts for each sub-assembly. I back it up to a CD, and then print out the diagrams and text list. With these I’m able to make a manual in a loose leaf 3 ring binder, or something fancier in a spiral bound fashion. When pages get dirty just print them out again. I'm sure there are other programs that can arrange the pages into any order you want. You could even take the CD to Kinko's and have them make your manual too.
By the way, this is just for your own personal use; I'm sure it’s illegal to make manuals from this and sell them on EBay, it’s all copyrighted and owned by Kawasaki.
Post edited by: OKC_Kent, at: 2007/07/03 08:30
Cashion, OK
78 KZ650 B2 85,000+ miles
78 KZ650 B2 85,000+ miles
Please Log in or Create an account to join the conversation.
- IntroSpectre
-
Topic Author
- Offline
- User
-
Registered
- Posts: 23
- Thanks: 0
Re: Missing exhaust gasket??
03 Jul 2007 09:21
Kent~
You rock.") Thanks for the detailed response. Looks like you're right about that part #.
Thanks for the detailed response. Looks like you're right about that part #.
I have the factory service manual, which is pretty useless, honestly. I think someone with very poor translation skills wrote and edited it. No part numbers there or in the Clymer, so this is a gold mine.
Thanks again!
Andy
PS - any idea if the exhaust leak at #3 would affect the vacuum that the #3 carb pulls? I don't want to sync these things twice!
You rock.
Thanks for the detailed response. Looks like you're right about that part #.I have the factory service manual, which is pretty useless, honestly. I think someone with very poor translation skills wrote and edited it. No part numbers there or in the Clymer, so this is a gold mine.
Thanks again!
Andy
PS - any idea if the exhaust leak at #3 would affect the vacuum that the #3 carb pulls? I don't want to sync these things twice!
Please Log in or Create an account to join the conversation.
- OKC_Kent
-
- Offline
- User
-
Registered
- Posts: 1719
- Thanks: 21
Re: Missing exhaust gasket??
03 Jul 2007 10:39
IntroSpectre wrote:
I'm not sure if an exhaust leak would affect the readings on the intake side of an engine. My simple mind says "no" as they are separated by valves, and the vacuum is on the intake side, not exhaust
I would fix the exhaust leak, do a complete tuneup procedure including checking the valve clearances, clean air filter, good plugs....and then do the carb sync.
Good luck and write back.
Kent~
PS - any idea if the exhaust leak at #3 would affect the vacuum that the #3 carb pulls? I don't want to sync these things twice!
I'm not sure if an exhaust leak would affect the readings on the intake side of an engine. My simple mind says "no" as they are separated by valves, and the vacuum is on the intake side, not exhaust
I would fix the exhaust leak, do a complete tuneup procedure including checking the valve clearances, clean air filter, good plugs....and then do the carb sync.
Good luck and write back.
Cashion, OK
78 KZ650 B2 85,000+ miles
78 KZ650 B2 85,000+ miles
Please Log in or Create an account to join the conversation.
- N0NB
-
- Offline
- User
-
Registered
- Blue handles better
- Posts: 1811
- Thanks: 19
Re: Missing exhaust gasket??
03 Jul 2007 11:01
Anything that reduces the backpressure on a given cylinder should cause an increase in air flow. So, I would think that before and after vacuum values would be different. It would be an interesting exercise to check the vacuum on #3, replace the gasket, and check it again.
Here's your opportunity to perform an experiment and help all of our understanding.
Here's your opportunity to perform an experiment and help all of our understanding.
Nate
Nates vintage bike axiom: Riding is the reward for time spent wrenching.
Murphys corollary: Wrenching is the result of time spent riding.
1979 KZ650 (Complete!)
1979 KZ650 SR (Sold!)
1979 KL250 (For sale)
1994 Bayou 400 (four wheel peel )
)
Nates vintage bike axiom: Riding is the reward for time spent wrenching.
Murphys corollary: Wrenching is the result of time spent riding.
1979 KZ650 (Complete!)
1979 KZ650 SR (Sold!)
1979 KL250 (For sale)
1994 Bayou 400 (four wheel peel
)
Please Log in or Create an account to join the conversation.
- cafekz750
-

- Offline
- User
-
Registered
- Posts: 333
- Thanks: 0
Re: Missing exhaust gasket??
03 Jul 2007 11:41
Try Dennis Kirk, they're in stock and $1.99 each.
Dennis Kirk Exhaust Gasket for KZ550
Post edited by: cafekz750, at: 2007/07/03 14:41
Dennis Kirk Exhaust Gasket for KZ550
Post edited by: cafekz750, at: 2007/07/03 14:41
1981 KZ750H2 - V&H 4-1 pipe, pods, jetted, clubmans, homebrew rearsets, 18" rear wheel and more.
Parting out a 1982 KZ750H3 to fund future projects
2 other non-Kawasaki motorcycles
Parting out a 1982 KZ750H3 to fund future projects
2 other non-Kawasaki motorcycles
Please Log in or Create an account to join the conversation.
- IntroSpectre
-
Topic Author
- Offline
- User
-
Registered
- Posts: 23
- Thanks: 0
Re: Missing exhaust gasket??
03 Jul 2007 14:11
N0NB wrote:
True enough. I'll do the test with and without and let you know what I find.
Cafekz750: Thanks but those are the wrong gaskets. I'm looking for the cylindrical ones that connect the header pipe with the muffler pipe. Actually I ordered one today from my local dealer.
Anything that reduces the backpressure on a given cylinder should cause an increase in air flow. So, I would think that before and after vacuum values would be different. It would be an interesting exercise to check the vacuum on #3, replace the gasket, and check it again.
Here's your opportunity to perform an experiment and help all of our understanding.
True enough. I'll do the test with and without and let you know what I find.
Cafekz750: Thanks but those are the wrong gaskets. I'm looking for the cylindrical ones that connect the header pipe with the muffler pipe. Actually I ordered one today from my local dealer.
Please Log in or Create an account to join the conversation.
Moderators: Street Fighter LTD