
Frustrated.. Cam chain, valve shims, low compression
- AR15Ron
-
 Topic Author
- Offline
- User
-

Registered
- Posts: 359
- Thanks: 7
Frustrated.. Cam chain, valve shims, low compression
21 Mar 2007 08:06
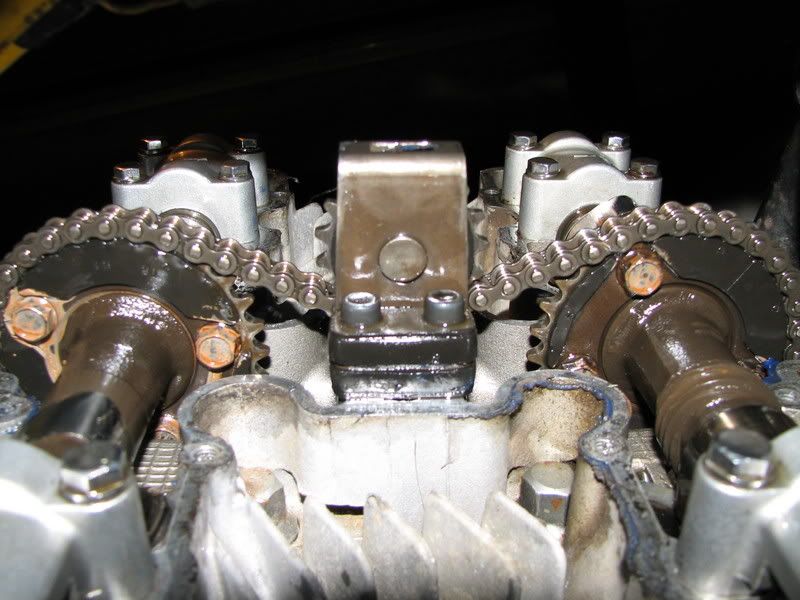
Ok, I've searched the forums, I'm not finding an answer to the specific question I need. First of all it's a 1978 KZ-1000 A2 with about 19,000 miles as far as I know, thats kind of a total unknown though. It runs but 2 cylanders were not getting very hot at the header. Checked had only 32 PSI on #3 all others a 149 PSI. Took valve cover off, I don't really have the right tools yet to check the shims but I can get the smallest one (.102mm) under in a few places BUT it doesnt seem to be when the marks on the exhaust cam are either straight up and down or straight side to side. It seems to be a little off. My biggest question is cam chain slack. It seems that in between strokes there is slack in the chain, then the slack is gone as the motor rotates again. I have taken some pics. See below. Is this normal? Where do I start to fix this thing?? I will be going to sears this weekend or ordering the proper feeler guages from Z-1. One or the other. In the meantime do I have bigger problems than valve shims?? PLEASE ADVISE!!
See slack:
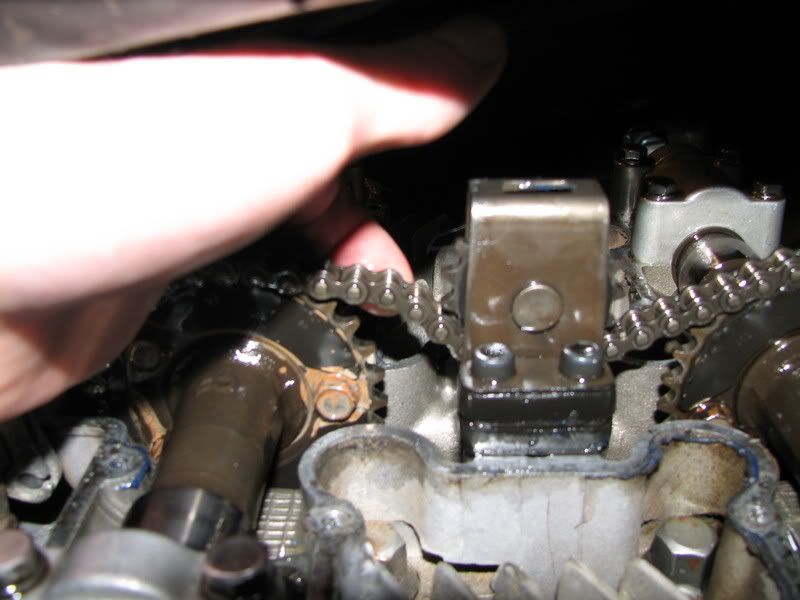
Slack without my finger in there:
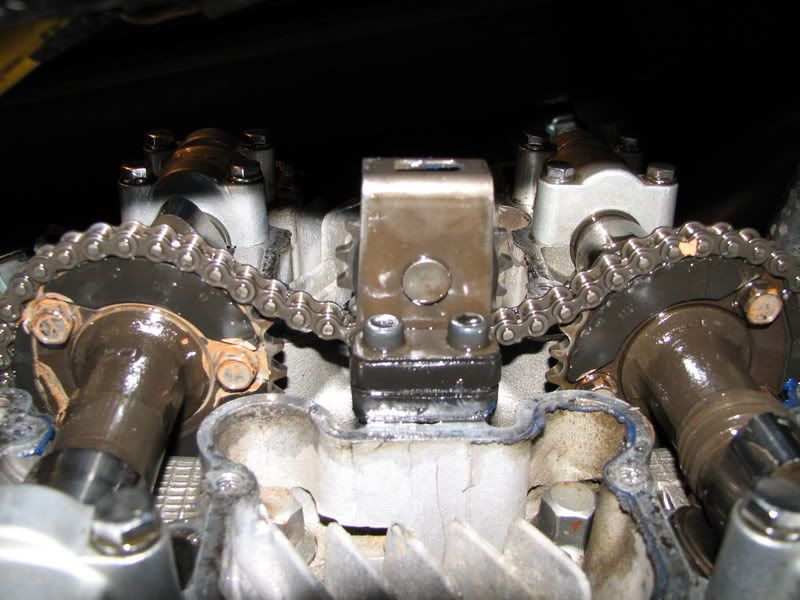
Now no slack:
I'm going to attempt to figure out if the cams are in time with the crank as soon as I can gather my wits about me again.. This is new territory for me.
Thanks much
Ron
See slack:
Slack without my finger in there:
Now no slack:
I'm going to attempt to figure out if the cams are in time with the crank as soon as I can gather my wits about me again.. This is new territory for me.
Thanks much
Ron
Please Log in or Create an account to join the conversation.
- KaZooCruiser
-
- Offline
- User
-
Registered
- Posts: 456
- Thanks: 7
Re: Frustrated.. Cam chain, valve shims, low compression
21 Mar 2007 08:22
I think your bike has some issues besides a slack chain.
My bike is maybe different from yours in adjustment procedure:
From my own experience, the crank is supposed to be rotated until 2-3 timing marks on the advancer unit are rotated past the window, until the high point just past them on the advancer is directly under the stationary pointer. Then the adjuster lock is slackened, allowing the tensioner to move forward. It is then re-locked with the anchor bolt.
I'd get the lobes up on cylinder three and try tapping the buckets on both intake and exhaust. Maybe there is some dirt on more likely the exhaust seat, preventing the valve from closing all the way. But in reading your post again, maybe the valve can't close all the way because the clearance is gone.
Please Log in or Create an account to join the conversation.
- AR15Ron
-
Topic Author
- Offline
- User
-
Registered
- Posts: 359
- Thanks: 7
Re: Frustrated.. Cam chain, valve shims, low compression
21 Mar 2007 09:24
Ok, here's what I've got now... Since I still don't have the right feelers I can't actually measure the gap but I do know this.. On the intake cam on #3 with the lobe up I can spin the bucket but the shim is not spinning with it so I think I have less than 0 clearance on that valve. I can't figure out the cam timing to crank it isnt making sense to me. The marks on mine don't seem to line up the way they should. I don't know if maybe it could have skipped a tooth? I did manage to get the slack out of the chain. I guess the next step will be to get the proper feelers and some thin shims and try to get that valve seated, see if I have compression again and then try to figure out the whole timing thing. If I had any hair I'd pull it out!
Just ordered the tool, feelers, and one of the smallest shims available (for testing) from Z-1. Guess we shall see what we see when we see it, or something. I think I'll have exhausted my positive thinking powers by the time this is done.
Post edited by: AR15Ron, at: 2007/03/21 12:40
Just ordered the tool, feelers, and one of the smallest shims available (for testing) from Z-1. Guess we shall see what we see when we see it, or something. I think I'll have exhausted my positive thinking powers by the time this is done.
Post edited by: AR15Ron, at: 2007/03/21 12:40
Please Log in or Create an account to join the conversation.
- Mcdroid
-

- Offline
- User
-
Registered
- Gone Kwackers
- Posts: 6837
- Thanks: 478
Re: Frustrated.. Cam chain, valve shims, low compression
21 Mar 2007 10:14
Ron:
If you haven't already done so, get a KHI Shop Manual (eBay will be the source). Expect to pay between US$10.00 and $45.00, depending on bidding demand. The one you need should have a KZ1000A3 on the cover. If you have no compression on #3, you will probably be seeing parts of your bike you never dreamed about. The KHI manual will greatly aid you.")
If you haven't already done so, get a KHI Shop Manual (eBay will be the source). Expect to pay between US$10.00 and $45.00, depending on bidding demand. The one you need should have a KZ1000A3 on the cover. If you have no compression on #3, you will probably be seeing parts of your bike you never dreamed about. The KHI manual will greatly aid you.
Michael
Victoria, Texas
1982 GPz750
1977 KZ1000A
1978 KZ1000A
1982 GPz1100
1975 Z2A
Victoria, Texas
1982 GPz750
1977 KZ1000A
1978 KZ1000A
1982 GPz1100
1975 Z2A
Please Log in or Create an account to join the conversation.
- AR15Ron
-
Topic Author
- Offline
- User
-
Registered
- Posts: 359
- Thanks: 7
Re: Frustrated.. Cam chain, valve shims, low compression
21 Mar 2007 10:21
I have both the Kawasaki KZ1000 Motorcycle Service Manual and the Clymers. Between the 2 of them I find the articles written by those such as WiredGeorge much more helpful and easier to understand.. The Kawa manual has great pictures though. I dunno, some good luck would go a long way
Please Log in or Create an account to join the conversation.
- wiredgeorge
-

- Offline
- User
-
Registered
- Posts: 5298
- Thanks: 45
Re: Frustrated.. Cam chain, valve shims, low compression
21 Mar 2007 12:10
Ron, the cam chain timing should be your first order of business. MAKE SURE IT IS RIGHT!
Here is what I suggest:
Remove your plugs.
Using the 17mm nut on the end of the crank by the mechanical advance, rotate the crank so that the T mark on your advance lines up with the mark on the engine cases. Look at the exhaust cam and see if the mark:
>
is pointed at the valve cover gasket to the front. If not, turn the engine over again till you get to the T and the mark on the engine cases and get them lined up again. The > should not be pointed to the front.
OK... now stick you pinky or a pencil down the #4 plug hole. You should feel the piston. This is TOP DEAD CENTER.
OK... remove the upper idler assembly. That is the sprocket up on top the cylinder head that guides the cam chain. Now, with the > pointed at the valve cover gasket pointed to the front, count the first link pin ABOVE the arrow. The arrow will point kind of between two links pins. Link pins are the the pins that link the plates. Anyway, start counted on the first one above the >. Count 28 link pins counterclockwise. You should be seeing an arrow on your intake came with 28T. It should line up pretty much with the 28th pin. If not, the chain has slipped.
If the chain has slipped, remove the cam chain tensioner (on back of block) and the cam caps. Pull the cams out while you hold the chain so it doesn't drop into the well. WIGGLE THE CHAIN and pull it to make sure it is ON repeat ON the sprocket on the crank. Give it a tug... it shouldn't slip any if it is on the sprocket. Then put your exhaust cam in with the > pointed at the valve cover gasket to the front. Stick the INTAKE cam back in and count 28 link pins and put the 28th over the arrow by the 28T.
Reinstall your idler assembly and the tensioner. To install the tensioner, loosen the locking bolt and push the tensioner into the body. Install the tensioner and release the locking bolt. You will hear the tensioner snap out into the cam chain. Don't forget to tighten the bolt and locknut. Then put the idler assmebly back on. At this point, if you have all that slack, you will need to put a new cam chain on.
Once you have the chain timing looked at, then the next step is the valve shim clearances. Bet that may fix your compression issue. Hope so!
Post edited by: wiredgeorge, at: 2007/03/21 15:11
wiredgeorge Motorcycle Carburetors
Mico TX
www.wgcarbs.com
Too many bikes to list!
Mico TX
www.wgcarbs.com
Too many bikes to list!
Please Log in or Create an account to join the conversation.
- AR15Ron
-
Topic Author
- Offline
- User
-
Registered
- Posts: 359
- Thanks: 7
Re: Frustrated.. Cam chain, valve shims, low compression
21 Mar 2007 21:53
You're the best WiredGeorge! It makes so much sense when you explain it
I'm pretty sure the arrow you speak of is lined up on the exhaust cam. My manual made ti seem as if it should have been on the other side, which had me very confused. I will check it all out when I get home in the morning. I think I will follow the procedure regardless and make SURE the intake cam is in time with the exhaust cam too. I really appreciate all your input! I really hope you're right about the valve shims fixing the compression. I am keeping my fingers crossed.
Ron
Please Log in or Create an account to join the conversation.
- AR15Ron
-
Topic Author
- Offline
- User
-
Registered
- Posts: 359
- Thanks: 7
Re: Frustrated.. Cam chain, valve shims, low compression
24 Mar 2007 09:44
Ok, I checked the cams according to the instructions, all lined up right. I got my tools and shim today so I tried that intake valve on #3 that had 0 clearance. It had a 260 shim in it, I put in the 200 shim I got from Z-1 it now has .35 for clearance. It also has 157 PSI on that cylander now!
I also found on the exhaust cam in order, less than .04, less than .04, .10, and less than .04. On the intake cam in order. less than .04, .20, was 0, and .010.
Looks like I have some work to do, but I do have compression again which is very encouraging.
Ron
I also found on the exhaust cam in order, less than .04, less than .04, .10, and less than .04. On the intake cam in order. less than .04, .20, was 0, and .010.
Looks like I have some work to do, but I do have compression again which is very encouraging.
Ron
Please Log in or Create an account to join the conversation.
- mark1122
-

- Offline
- User
-
Registered
- Keep twisting it
- Posts: 5359
- Thanks: 109
Re: Frustrated.. Cam chain, valve shims, low compression
25 Mar 2007 00:47
do you still have loose spots in the chain?Id say you missed a 0 in your #'s Should be .004"(4 thou )
76 KZ, frame gusset work,1200CC.Ported by Larry Cavanaugh, 1.5mm.over intakes, Carron Pipe, ZRX12 rear end, and seat,96zx9 front end.
01 CBR600F4i Track bike.
Cobourg, Ont. Can.
~ ~ ~_@
~ ~ _- \,
~ (k) / (z)
01 CBR600F4i Track bike.
Cobourg, Ont. Can.
~ ~ ~_@
~ ~ _- \,
~ (k) / (z)
Please Log in or Create an account to join the conversation.
- AR15Ron
-
Topic Author
- Offline
- User
-
Registered
- Posts: 359
- Thanks: 7
Re: Frustrated.. Cam chain, valve shims, low compression
25 Mar 2007 07:13
Nope, chain is good now. Not sure if I missed any 0's but I did do some shim-shuffling and got it down to only 2 valves that need new shims. These are MM readings but I dunno. Is now Exhaust: .09, .05, .127 (close enbough I think), .40 (200 shim in that one)
Intake: .05, .04, .10, .10.
Now that #3 is shimmed correctly compression has come down to 148.5. So I ordered shims for those 2 from Z-1 should be in business by Thursday. Oh BTW that $8 tool isnt that bad to use for removing the shims. Little touchy getting the holder lined up on the bucket edge but otherwise fairly easy. I did have the pry piece shoot out and hit me in the face but that was my fault. Luckily I wear glasses LOL.
Ron
Please Log in or Create an account to join the conversation.
- ronjones
-

- Offline
- User
-
Registered
- Posts: 565
- Thanks: 4
Re: Frustrated.. Cam chain, valve shims, low compression
25 Mar 2007 08:57
AR15Ron wrote:
Ron
Hey Ron, I'm glad you are having good luck w/that tool. I'm having a terrible time. The "lever" tool doesn't depress the valves low enough. It hits the head case before I can get the 'spacer" tool to make good contact. I'm thinking of bending it a bit or grinding a "chisle" end to get a better bit.... Oh BTW that $8 tool isnt that bad to use for removing the shims. Little touchy getting the holder lined up on the bucket edge but otherwise fairly easy. I did have the pry piece shoot out and hit me in the face but that was my fault. Luckily I wear glasses LOL.
Ron
Ron
'82 KZ750 CSR, M1 twin. Mac 2-1 exhaust, K&N pods, 17tooth drive sprocket, Mikuni BS-34 carbs w/#47.5 pilot jet and #125 main jet, Canadian XS650 needlejetjet needle, Wired George's coil mod.
Barrak, Nancy and Harry says: Welcome to the United Soviet States of America, Comrades
Barrak, Nancy and Harry says: Welcome to the United Soviet States of America, Comrades
Please Log in or Create an account to join the conversation.
- AR15Ron
-
Topic Author
- Offline
- User
-
Registered
- Posts: 359
- Thanks: 7
Re: Frustrated.. Cam chain, valve shims, low compression
25 Mar 2007 10:38
That's weird. The spacer tool has 2 different sizes, I had to use the smaller end on mine. The lever thing is kind of a pain, but I found gently tapping it in once it's in position with a rubber mallet didnt seem like it could hurt anything. Once its fully in it stays put just don't do like I did and not put it all the way in and think it would stay there I reached for a flashlight and ZING right accross my eye. Didnt scratch my glasses though thankfully. It's kind of a pain getting the spacer in the right place, it takes some trial and error to get it to just catch the bucket and not the shim. I had a few moments with a shim jacked up on one end and had trouble getting the lever back in there!
Ron
I reached for a flashlight and ZING right accross my eye. Didnt scratch my glasses though thankfully. It's kind of a pain getting the spacer in the right place, it takes some trial and error to get it to just catch the bucket and not the shim. I had a few moments with a shim jacked up on one end and had trouble getting the lever back in there!Ron
Please Log in or Create an account to join the conversation.
Moderators: Street Fighter LTD