
- Posts: 554
- Thank you received: 36
Why the KZ650 is so good
- faffi
-
 Topic Author
- Offline
- User
Less
More
11 Jun 2012 15:11 #528191
by faffi
1977 KZ650B1
1980 F1 engine
B1 3-phase alternator
B1 Points ignition
Why the KZ650 is so good was created by faffi
Now, before you think I wear thick, rose tinted glasses, let med tell you that I've owned 6 different brands and more than one bike from most manuf. Kawasaki really doesn't mean anything more to me than Honda or Suzuki or Yamaha or Triumph. There are good bikes and less good bikes and both types comes from various sources.
I've had two Kawasakis that where a PITA to work on; a VN800A and a KZ1300DFI. I've had 3 that were brilliant; a KH100, a KZ400G twin and now the KZ650B. Ignoring the 99cc tiddler, the 650 is the most thought out bike I have owned out of 27 (registered).
It's not fault free:
You cannot remove the rear axle without removing a muffler or the shock absorbers and you cannot adjust the chain and tighten the axle with a torque wrench without the same exercise.
The instruments should be much easier to split.
The starter clutch should be accessible without stripping the engine.
I wouldn't mind shim-over-bucket valve adjustment, a reusable gasket and 8 instead of lots of bolt to hold the valve cover.
And, like any old Japanese multi, taking the carbs off and putting them back on with the stock airbox in place is a horrible job.
However, that's all there is. And the valve job isn't such a big deal, instruments are not often required to be split, starter clutches often last a long time. Still, the rear axle issue and the carb issue could have been designed out fairly easily.
But changing the idiot light bulbs, the ignition switch, the headlamp, the wheels, the fork, the cables, the brakes, the starter itself, the footpegs, the stock exhaust system, the swingarm, the seat, fuel tank removal - all the things are out in the open, easy to get at. It's actually a great pleasure to work and wrench on this bike. And you hardly ever have to bust nucles in the process.
I have a CB400SF and a VT500FT Ascot for the kids, and while quite decent to work on - the 400 four being the simpler of the two and the best made - they do not come close to the Kawasaki. Also, I am highly impressed over the over all finish and quality of my 35 year old 650, with most rubber parts looking nigh on factory fresh, not a single bolt stuck from corrossion and so on.
It's a bloody nice machine")
I've had two Kawasakis that where a PITA to work on; a VN800A and a KZ1300DFI. I've had 3 that were brilliant; a KH100, a KZ400G twin and now the KZ650B. Ignoring the 99cc tiddler, the 650 is the most thought out bike I have owned out of 27 (registered).
It's not fault free:
You cannot remove the rear axle without removing a muffler or the shock absorbers and you cannot adjust the chain and tighten the axle with a torque wrench without the same exercise.
The instruments should be much easier to split.
The starter clutch should be accessible without stripping the engine.
I wouldn't mind shim-over-bucket valve adjustment, a reusable gasket and 8 instead of lots of bolt to hold the valve cover.
And, like any old Japanese multi, taking the carbs off and putting them back on with the stock airbox in place is a horrible job.
However, that's all there is. And the valve job isn't such a big deal, instruments are not often required to be split, starter clutches often last a long time. Still, the rear axle issue and the carb issue could have been designed out fairly easily.
But changing the idiot light bulbs, the ignition switch, the headlamp, the wheels, the fork, the cables, the brakes, the starter itself, the footpegs, the stock exhaust system, the swingarm, the seat, fuel tank removal - all the things are out in the open, easy to get at. It's actually a great pleasure to work and wrench on this bike. And you hardly ever have to bust nucles in the process.
I have a CB400SF and a VT500FT Ascot for the kids, and while quite decent to work on - the 400 four being the simpler of the two and the best made - they do not come close to the Kawasaki. Also, I am highly impressed over the over all finish and quality of my 35 year old 650, with most rubber parts looking nigh on factory fresh, not a single bolt stuck from corrossion and so on.
It's a bloody nice machine
1977 KZ650B1
1980 F1 engine
B1 3-phase alternator
B1 Points ignition
Please Log in or Create an account to join the conversation.
- 650ed
-

- Offline
- User
Less
More
- Posts: 15344
- Thank you received: 2829
11 Jun 2012 17:59 - 11 Jun 2012 18:00 #528223
by 650ed
1977 KZ650-C1 Original Owner - Stock (with additional invisible FIAMM horn)
Replied by 650ed on topic Why the KZ650 is so good
"You cannot remove the rear axle without removing a muffler or the shock absorbers and you cannot adjust the chain and tighten the axle with a torque wrench without the same exercise."
I have removed my rear axle / wheel countless times over the past 35 years, but I have never removed the mufflers/exhaust since buying the bike new. It is really a simple process. You loosen the axle nut, torque arm nut, and chain adjusters; push the rear wheel forward; slip the chain off the sprocket; slide the rear wheel all the way back until it drops out of the swingarm; pull the axle. You're done. As far as tightening the axle nut with a torque wrench; most folks don't believe this is necessary because the axle nut is a castle nut. However, for those who are really picky types (yes, like me) it can be very easily accomplished, but you will need to make a simple mod to the axle nut wrench.
I cut a 3/8” square hole a specific distance from the center of the spanner hole so I can connect my torque wrench to the spanner, and then using the formula provided by the torque wrench manufacturer (CDI (Snap-On)) I calculated the appropriate torque value given the additional length of the spanner (you must do this or you will apply way too much torque). Now I can properly torque the axle nut. Ed
Attachment AxleWrench.jpg not found
1977 KZ650-C1 Original Owner - Stock (with additional invisible FIAMM horn)
Attachments:
Last edit: 11 Jun 2012 18:00 by 650ed.
Please Log in or Create an account to join the conversation.
- faffi
-
Topic Author
- Offline
- User
Less
More
- Posts: 554
- Thank you received: 36
11 Jun 2012 18:41 #528249
by faffi
1977 KZ650B1
1980 F1 engine
B1 3-phase alternator
B1 Points ignition
Replied by faffi on topic Why the KZ650 is so good
Silly me - I noticed that when I fitted the rear wheel but forgot all about it. Well, did I mention the Z650 is cleverly made :whistle:
Thanks for reminding me, Ed! The hint about the torque wrench is one to follow up on and can be used for other applications as well. Great tip, thanks again!
Thanks for reminding me, Ed! The hint about the torque wrench is one to follow up on and can be used for other applications as well. Great tip, thanks again!
1977 KZ650B1
1980 F1 engine
B1 3-phase alternator
B1 Points ignition
Please Log in or Create an account to join the conversation.
- 650ed
-
- Offline
- User
Less
More
- Posts: 15344
- Thank you received: 2829
11 Jun 2012 19:07 #528262
by 650ed
1977 KZ650-C1 Original Owner - Stock (with additional invisible FIAMM horn)
Replied by 650ed on topic Why the KZ650 is so good
I also made a torque wrench adapter for the steering stem locknut. Let me know if you need the link for calculating proper torque when adapters are used. Ed
Attachment spanneradapt.JPG not found
1977 KZ650-C1 Original Owner - Stock (with additional invisible FIAMM horn)
Attachments:
Please Log in or Create an account to join the conversation.
- gd4now
-
- Offline
- User
- Denco where did you go?
Less
More
- Posts: 1378
- Thank you received: 435
11 Jun 2012 20:53 #528294
by gd4now
1977 KZ650 B1
Pods and Denco header
OLD KAW OWNERS SMILE ALOT
Replied by gd4now on topic Why the KZ650 is so good
I agree with your assessment the KZ650 is a fine machine that is why I have one 
1977 KZ650 B1
Pods and Denco header
OLD KAW OWNERS SMILE ALOT
Please Log in or Create an account to join the conversation.
- LarryC
-
- Offline
- User
11 Jun 2012 21:15 #528299
by LarryC
It's simple enough to convert them to shim on top if you ever have the head off for a valve job. Get some 1000 buckets and retainers...assemble and adjust. You won't spit a shim with those baby cams the 650 comes with. S.O.B. was way overkill but who can blame the factory for the effort.
Larry C.
Replied by LarryC on topic Why the KZ650 is so good
faffi wrote: Now, before you think I wear thick, rose tinted glasses, let med tell you that I've owned 6 different brands and more than one bike from most manuf. Kawasaki really doesn't mean anything more to me than Honda or Suzuki or Yamaha or Triumph. There are good bikes and less good bikes and both types comes from various sources.
I've had two Kawasakis that where a PITA to work on; a VN800A and a KZ1300DFI. I've had 3 that were brilliant; a KH100, a KZ400G twin and now the KZ650B. Ignoring the 99cc tiddler, the 650 is the most thought out bike I have owned out of 27 (registered).
It's not fault free:
You cannot remove the rear axle without removing a muffler or the shock absorbers and you cannot adjust the chain and tighten the axle with a torque wrench without the same exercise.
The instruments should be much easier to split.
The starter clutch should be accessible without stripping the engine.
I wouldn't mind shim-over-bucket valve adjustment, a reusable gasket and 8 instead of lots of bolt to hold the valve cover.
And, like any old Japanese multi, taking the carbs off and putting them back on with the stock airbox in place is a horrible job.
However, that's all there is. And the valve job isn't such a big deal, instruments are not often required to be split, starter clutches often last a long time. Still, the rear axle issue and the carb issue could have been designed out fairly easily.
But changing the idiot light bulbs, the ignition switch, the headlamp, the wheels, the fork, the cables, the brakes, the starter itself, the footpegs, the stock exhaust system, the swingarm, the seat, fuel tank removal - all the things are out in the open, easy to get at. It's actually a great pleasure to work and wrench on this bike. And you hardly ever have to bust nucles in the process.
I have a CB400SF and a VT500FT Ascot for the kids, and while quite decent to work on - the 400 four being the simpler of the two and the best made - they do not come close to the Kawasaki. Also, I am highly impressed over the over all finish and quality of my 35 year old 650, with most rubber parts looking nigh on factory fresh, not a single bolt stuck from corrossion and so on.
It's a bloody nice machine
It's simple enough to convert them to shim on top if you ever have the head off for a valve job. Get some 1000 buckets and retainers...assemble and adjust. You won't spit a shim with those baby cams the 650 comes with. S.O.B. was way overkill but who can blame the factory for the effort.
Larry C.
Please Log in or Create an account to join the conversation.
- faffi
-
Topic Author
- Offline
- User
Less
More
- Posts: 554
- Thank you received: 36
12 Jun 2012 03:53 #528417
by faffi
1977 KZ650B1
1980 F1 engine
B1 3-phase alternator
B1 Points ignition
Replied by faffi on topic Why the KZ650 is so good
LarryC wrote:
faffi wrote: It's simple enough to convert them to shim on top if you ever have the head off for a valve job. Get some 1000 buckets and retainers...assemble and adjust. You won't spit a shim with those baby cams the 650 comes with. S.O.B. was way overkill but who can blame the factory for the effort.
Thank you for verifying that, I have suspected it for many years but never had confirmation.
1977 KZ650B1
1980 F1 engine
B1 3-phase alternator
B1 Points ignition
Please Log in or Create an account to join the conversation.
- faffi
-
Topic Author
- Offline
- User
Less
More
- Posts: 554
- Thank you received: 36
12 Jun 2012 03:56 #528418
by faffi
The link would be nice to have
However, on my bike there is only one nut for adjusting the steering stem bearings. I simply adjusted it until there were no play but steering still flopped from side to side with next to nothing friction, then torqued down the centre nut above the triple clamp.
1977 KZ650B1
1980 F1 engine
B1 3-phase alternator
B1 Points ignition
Replied by faffi on topic Why the KZ650 is so good
650ed wrote: I also made a torque wrench adapter for the steering stem locknut. Let me know if you need the link for calculating proper torque when adapters are used. Ed
The link would be nice to have
However, on my bike there is only one nut for adjusting the steering stem bearings. I simply adjusted it until there were no play but steering still flopped from side to side with next to nothing friction, then torqued down the centre nut above the triple clamp.
1977 KZ650B1
1980 F1 engine
B1 3-phase alternator
B1 Points ignition
Please Log in or Create an account to join the conversation.
- Proxy
-
- Offline
- User
- 80% Human 20% Nuts/Bolts
Less
More
- Posts: 513
- Thank you received: 46
12 Jun 2012 09:53 #528453
by Proxy
Take it from me cuz I found
If you leave it then somebody else is bound,
To find that treasure, that moment of pleasure,
When yours, it could have been.
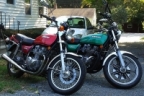
1977 KZ650 B1 Being restored to original (Green)
1977 KZ650 B1 Original (Red) Sold
1977 KZ650 B1 Donor Bike for Parts
Replied by Proxy on topic Why the KZ650 is so good
My favorite motorcycle.
Take it from me cuz I found
If you leave it then somebody else is bound,
To find that treasure, that moment of pleasure,
When yours, it could have been.
1977 KZ650 B1 Being restored to original (Green)
1977 KZ650 B1 Original (Red) Sold
1977 KZ650 B1 Donor Bike for Parts
Please Log in or Create an account to join the conversation.
- 650ed
-
- Offline
- User
Less
More
- Posts: 15344
- Thank you received: 2829
12 Jun 2012 10:17 #528466
by 650ed
1977 KZ650-C1 Original Owner - Stock (with additional invisible FIAMM horn)
Replied by 650ed on topic Why the KZ650 is so good
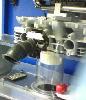
Here's a description of my steering stem spanner adapter and the CDI link. The same rules apply to a hexagonal adapter for the axle; the length of the adapter should be measured from the center of the hexagonal hole to the center of the 3/8" square hole. Also, when using the adapter be sure to keep the adapter and torque wrench in a straight line as if it is all one long straight wrench.
I adapted the steering stem lock nut spanner wrench so I could torque the nut to specs. I started by drilling and tapping 2 holes in a flat bar and drilling holes in the spanner to match. I bolted the spanner to the flat bar and center punched a spot 7” from the spanner lug (where it would center on the steering stem locknut). I drilled a hole there and filed it square to match my 3/8” torque wrench. The added length adds leverage so you MUST calculate the appropriate torque wrench setting to achieve the correct torque on the steering stem locknut. Here’s the formula:
TA x L
= TW
L + A
L = Effective length of the wrench as described below.
for Dial Wrenches L = The measured distance from the center of the square drive to the center ring or notch on the handle.
for Micrometer Wrenches L = The measured length from the center of the square drive to the center of the handle, with the wrench set at the desired torque reading. Keep in mind on micrometer type torque wrenches the length "L" changes as you change the torque setting on the wrench, so you must measure this length when you have the wrench set at the desired torque reading.
A = The measured length from the center of the adapter drive to the center of the wrench square drive.
TA = (Desired Torque) The torque value designated for the fastener with or without an adapter.
TW = (New Setting) The torque setting on the wrench allowing for the added length of the adapter. This reading will be lower than the desired torque.
In my case, using the 7” spanner/adapter, and desiring 260 inch pounds of torque on the steering stem locknut, the formula looks like this:
260 x 8.17
= 140.0
8.17 + 7
So, I set my torque wrench at 140 inch pounds to apply 260 inch pounds of torque on the steering stem locknut. Your numbers will be different depending on the length of your wrench and adapter and the amount of torque you desire.
I HIGHLY recommend you take a look at the CDI Torque Wrench site. They give a detailed description of the use of torque adapters - which is what the spanner actually is. Go to
www.cditorque.com/
click on “TORQUE FACTS” then select “USE OF ADAPTERS.”
Here's what I made and used:
Here's the little table I made for the steering locknut adapter:
I adapted the steering stem lock nut spanner wrench so I could torque the nut to specs. I started by drilling and tapping 2 holes in a flat bar and drilling holes in the spanner to match. I bolted the spanner to the flat bar and center punched a spot 7” from the spanner lug (where it would center on the steering stem locknut). I drilled a hole there and filed it square to match my 3/8” torque wrench. The added length adds leverage so you MUST calculate the appropriate torque wrench setting to achieve the correct torque on the steering stem locknut. Here’s the formula:
TA x L
= TW
L + A
L = Effective length of the wrench as described below.
for Dial Wrenches L = The measured distance from the center of the square drive to the center ring or notch on the handle.
for Micrometer Wrenches L = The measured length from the center of the square drive to the center of the handle, with the wrench set at the desired torque reading. Keep in mind on micrometer type torque wrenches the length "L" changes as you change the torque setting on the wrench, so you must measure this length when you have the wrench set at the desired torque reading.
A = The measured length from the center of the adapter drive to the center of the wrench square drive.
TA = (Desired Torque) The torque value designated for the fastener with or without an adapter.
TW = (New Setting) The torque setting on the wrench allowing for the added length of the adapter. This reading will be lower than the desired torque.
In my case, using the 7” spanner/adapter, and desiring 260 inch pounds of torque on the steering stem locknut, the formula looks like this:
260 x 8.17
= 140.0
8.17 + 7
So, I set my torque wrench at 140 inch pounds to apply 260 inch pounds of torque on the steering stem locknut. Your numbers will be different depending on the length of your wrench and adapter and the amount of torque you desire.
I HIGHLY recommend you take a look at the CDI Torque Wrench site. They give a detailed description of the use of torque adapters - which is what the spanner actually is. Go to
www.cditorque.com/
click on “TORQUE FACTS” then select “USE OF ADAPTERS.”
Here's what I made and used:
Attachment Spannerandwrench.jpg not found
Here's the little table I made for the steering locknut adapter:
Attachment TorqueTable.jpg not found
1977 KZ650-C1 Original Owner - Stock (with additional invisible FIAMM horn)
Attachments:
Please Log in or Create an account to join the conversation.
- faffi
-
Topic Author
- Offline
- User
Less
More
- Posts: 554
- Thank you received: 36
12 Jun 2012 10:34 #528473
by faffi
1977 KZ650B1
1980 F1 engine
B1 3-phase alternator
B1 Points ignition
Replied by faffi on topic Why the KZ650 is so good
Splendid, thank you for your time and effort in explaining, Ed!
1977 KZ650B1
1980 F1 engine
B1 3-phase alternator
B1 Points ignition
Please Log in or Create an account to join the conversation.