
Getting a 1983 KZ750 L3 Back on the Road
- TSJ
-
 Topic Author
- Offline
- User
-

Registered
- Posts: 30
- Thanks: 7
Re: Getting a 1983 KZ750 L3 Back on the Road
23 Jul 2026 15:09
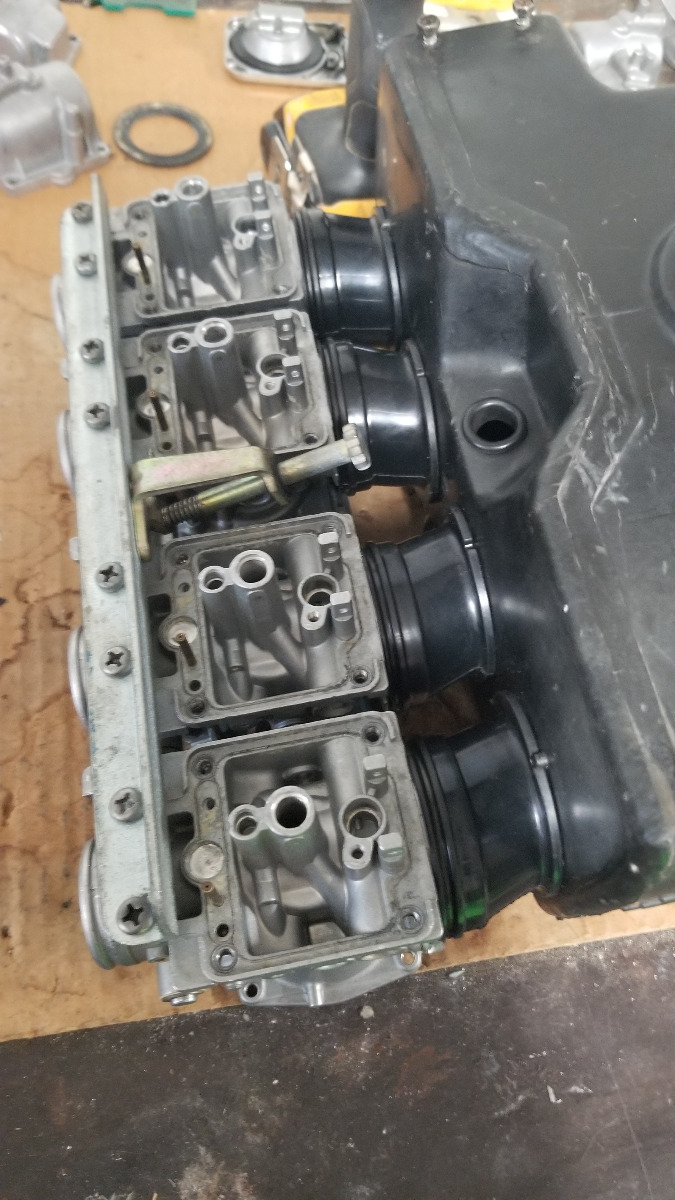
Carb boots came today. I temporarily reassembled the carbs to the rails and each other, fitted the boots into the airbox, and popped them onto the carbs, and they seem to fit well, albeit just a touch loose around the carb bodies, but I think they'll be fine. They were off ebay, but other than that, they matched the old ones identically. A previous owner had used a set of those radiator hose clamps, instead of the springs, which are probably fine to re-use, but I have a thing about replacing parts like those back to stock, so I'm gonna order the springs.
Man Partzilla is fast (as opposed to these eBay sellers)!! Got another batch from them today that I ordered only a few days ago. My engine cover gaskets, oil filter, and some various o-rings and such.
Pic of the carbs, boots, & airbox put together.
Man Partzilla is fast (as opposed to these eBay sellers)!! Got another batch from them today that I ordered only a few days ago. My engine cover gaskets, oil filter, and some various o-rings and such.
Pic of the carbs, boots, & airbox put together.
83 KZ750 L3 current project
78 KZ650 waiting work
97 Concours same
Previous bikes
Brand New 83 KZ750 L3 in 1983! crashed
Brand New KZ700 A1 to replace 750, later sold
1986 900 Ninja, sold
2003 HD Electra Glide, later sold
78 KZ650 waiting work
97 Concours same
Previous bikes
Brand New 83 KZ750 L3 in 1983! crashed
Brand New KZ700 A1 to replace 750, later sold
1986 900 Ninja, sold
2003 HD Electra Glide, later sold
Please Log in or Create an account to join the conversation.
- TSJ
-
Topic Author
- Offline
- User
-
Registered
- Posts: 30
- Thanks: 7
Re: Getting a 1983 KZ750 L3 Back on the Road
26 Jul 2026 17:25
I got my tank pretty clean. I used the muriatic acid method twice, followed by a phosphoric acid coating, then poured in some Marvel Mystery Oil to protect it until I'm 100% ready to put some gas in it. It's not as good as I'd like, but I ordered clear fuel lines and an inline filter, so I'll be able to see if anything is headed towards the carbs. And if so, I'll do the tank again. And if it continues, then I'll go ahead and just use a tank sealer. But I'm trying to avoid that if possible.
One note- if anyone ever uses the nuts & bolts method in the tank to help break up the rust, do 2 things: Count how many you use so they can all be accounted for (I had 1 get stuck, and I didn't know it at first), and make sure they're all ferrous, so you can use a magnet probe to fish out the last few stubborn ones.
Discovered a missing spring and washer that goes between the oil filter cover and the filter, so I guess the filter wasn't raised up enough like it should be. Someone just wasn't careful when they worked on this bike in the past, losing, or forgetting to reinstall, parts like that. I've also found missing dowel pins from 2 engine covers, and 1 wrong bolt. I'm kind of a stickler for stuff like this, so I ordered all those missing items.
I also wanted to remove all 5 covers for cleaning (timing, generator, starter, shift, and clutch), but the generator cover gave me fits!! 1 stuck dowel pin, that I wanted out of my way so it'd be easier to clean the gasket, and the fasteners that attach the field coil to the inside were way too tight! I broke 1 of the 3 bolts that attach that part to the cover, so off to a machine shop tomorrow. It took a lot of effort, but I finally freed the stuck pin, but that gasket was also a bitch to remove. I'm not even gonna try to remove the clutch cover gasket, especially since it's mostly intact on the engine. I'll use a thin smear of Kawabond sealant on the cover, add the new gasket, and if it leaks then I'll deal with doing it right. Which as far as I can see means removing the clutch basket to gain some working room.
The boroscope I bought failed, so I returned it. But I was able to use it enough to see some carbon debris in the cylinders, probably from the step of placing MMO in them. Between sucking it out and using compressed air, they look good now. So I cleaned, checked the gaps, and reinstalled the plugs. But then I noticed they were also the wrong heat range- 1 size higher than even Kawasaki recommends if you want a hotter plug than stock, which I do not need. I'm ordering a set of BR8ES, and if they don't look good when I check them, I have a set of 7's from my 650 that I'll just swap in, and go from there.
My Kawabond arrived, and due to a bit of corrosion I found under the starter cover, I decided the first place to use it was in between the new cover gasket and the cover. I also plan to put a dab under the bolt heads when I reinstall the cover, since that was another place I saw some rust when I removed the cover.
Basically I'm renewing all the outer gaskets, and making sure no future corrosion can get in them when I'm done buttoning everything back up. And cleaning all the parts the best I can for now. This isn't a full-on resto..., just get it back in shape to ride. Maybe that will happen in the future, but I'd need to get one of these other 2 bikes back on the road first, as well as gain some refinishing skills!
So, 1 more (large) parts order, from Partzilla, so based on their previous speed in shipping, as long as my o-rings from Ed arrive this week, I may have a running bike by this coming weekend! Actually I may be getting ahead of myself. I'll still need all the electrics and brakes working, which I won't know until I get everything that I have apart at this stage, reassembled. Crossing my fingers...
One note- if anyone ever uses the nuts & bolts method in the tank to help break up the rust, do 2 things: Count how many you use so they can all be accounted for (I had 1 get stuck, and I didn't know it at first), and make sure they're all ferrous, so you can use a magnet probe to fish out the last few stubborn ones.
Discovered a missing spring and washer that goes between the oil filter cover and the filter, so I guess the filter wasn't raised up enough like it should be. Someone just wasn't careful when they worked on this bike in the past, losing, or forgetting to reinstall, parts like that. I've also found missing dowel pins from 2 engine covers, and 1 wrong bolt. I'm kind of a stickler for stuff like this, so I ordered all those missing items.
I also wanted to remove all 5 covers for cleaning (timing, generator, starter, shift, and clutch), but the generator cover gave me fits!! 1 stuck dowel pin, that I wanted out of my way so it'd be easier to clean the gasket, and the fasteners that attach the field coil to the inside were way too tight! I broke 1 of the 3 bolts that attach that part to the cover, so off to a machine shop tomorrow. It took a lot of effort, but I finally freed the stuck pin, but that gasket was also a bitch to remove. I'm not even gonna try to remove the clutch cover gasket, especially since it's mostly intact on the engine. I'll use a thin smear of Kawabond sealant on the cover, add the new gasket, and if it leaks then I'll deal with doing it right. Which as far as I can see means removing the clutch basket to gain some working room.
The boroscope I bought failed, so I returned it. But I was able to use it enough to see some carbon debris in the cylinders, probably from the step of placing MMO in them. Between sucking it out and using compressed air, they look good now. So I cleaned, checked the gaps, and reinstalled the plugs. But then I noticed they were also the wrong heat range- 1 size higher than even Kawasaki recommends if you want a hotter plug than stock, which I do not need. I'm ordering a set of BR8ES, and if they don't look good when I check them, I have a set of 7's from my 650 that I'll just swap in, and go from there.
My Kawabond arrived, and due to a bit of corrosion I found under the starter cover, I decided the first place to use it was in between the new cover gasket and the cover. I also plan to put a dab under the bolt heads when I reinstall the cover, since that was another place I saw some rust when I removed the cover.
Basically I'm renewing all the outer gaskets, and making sure no future corrosion can get in them when I'm done buttoning everything back up. And cleaning all the parts the best I can for now. This isn't a full-on resto..., just get it back in shape to ride. Maybe that will happen in the future, but I'd need to get one of these other 2 bikes back on the road first, as well as gain some refinishing skills!
So, 1 more (large) parts order, from Partzilla, so based on their previous speed in shipping, as long as my o-rings from Ed arrive this week, I may have a running bike by this coming weekend! Actually I may be getting ahead of myself. I'll still need all the electrics and brakes working, which I won't know until I get everything that I have apart at this stage, reassembled. Crossing my fingers...
83 KZ750 L3 current project
78 KZ650 waiting work
97 Concours same
Previous bikes
Brand New 83 KZ750 L3 in 1983! crashed
Brand New KZ700 A1 to replace 750, later sold
1986 900 Ninja, sold
2003 HD Electra Glide, later sold
78 KZ650 waiting work
97 Concours same
Previous bikes
Brand New 83 KZ750 L3 in 1983! crashed
Brand New KZ700 A1 to replace 750, later sold
1986 900 Ninja, sold
2003 HD Electra Glide, later sold
The following user(s) said Thank You: Wookie58
Please Log in or Create an account to join the conversation.
- TSJ
-
Topic Author
- Offline
- User
-
Registered
- Posts: 30
- Thanks: 7
Re: Getting a 1983 KZ750 L3 Back on the Road
27 Jul 2026 15:52
Well, no luck in finding any machine shops in my area that could confidently say they could extract the 5mm bolt that broke off inside the generator cover. I could've tried a few other places, but I said screw it. I've already spent at least a few hours dealing with this, and I made up my mind that, worst case scenario, I'd just reattach the field coil with 2 bolts instead of 3. Those bolts are clocked at 0, 120, and 240 degrees, so I'm sure 2 will hold it just fine. It just goes slightly against my OCD in wanting everything right on this bike, but I also understand that with a 43 year-old bike, I can't have everything perfect.
In other news, my cam cover gasket arrived, and I had debated buying NOS OEM, and taking a chance it would be old and somewhat brittle, vs. buying a new aftermarket one that may not have the same quality, and sure enough, I chose OEM, and it was indeed brittle. I'll revisit it if it leaks.
Oh, and getting to 69 inch lbs. on the torque wrench for the cap bolts started feeling a bit too tight. An old head Kawasaki mechanic from back in the day taught me to use a 1/4" ratchet, and gently push between my thumb and 2 middle fingers, as opposed to pulling on it with my entire hand. So that's how I used to do it in the 80's before I owned an inch-lb torque wrench, but I couldn't get the bolts up to 69 before I "felt" they were too tight. I checked the wrench against another one I have that reads higher torques, and they seemed to agree with each other, so Idk. It is a cheapy "Amazon Basics" tool, so who knows. For now, I'm at 50 inch-lbs., and thinking of leaving it there.
Placed my last large parts order (for now, until any possible brake or electrical issues; knock wood), the costliest item being the rear master cylinder assembly, but I did go with the part for the 82 GPz, since it was $70 cheaper. I hope the only difference is indeed the color.
Something else I just learned..., that cam cover gasket isn't reversible! I would've thought the engine is symmetrical, but when I placed it on the head, the 2 inner-most holes next to the timing chain didn't line up with the holes in the head. Lesson learned- check gaskets against the cover first, before applying any sealant/oil. It all worked out, since all I chose to do was place 2 tiny dabs of Kawabond onto each of the rubber plugs (which I left on the head since they didn't leak previously) right where they meet the head. So once I flipped over the gasket, I some got on the other side. Oh well. Live and learn.
Not including a few tools and a bunch of supplies/ trips to the hardware store, I'm into this atm for about $900. I'll post my breakdown at the end.
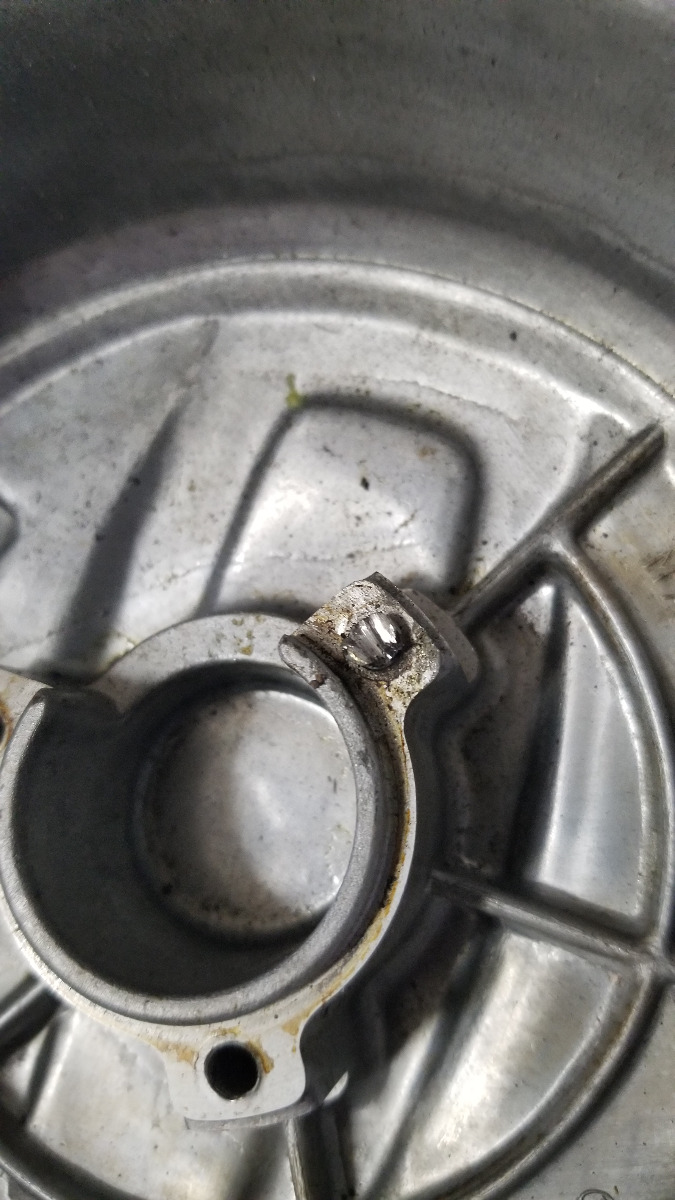
Pic of gen cover showing the broken bolt:
In other news, my cam cover gasket arrived, and I had debated buying NOS OEM, and taking a chance it would be old and somewhat brittle, vs. buying a new aftermarket one that may not have the same quality, and sure enough, I chose OEM, and it was indeed brittle. I'll revisit it if it leaks.
Oh, and getting to 69 inch lbs. on the torque wrench for the cap bolts started feeling a bit too tight. An old head Kawasaki mechanic from back in the day taught me to use a 1/4" ratchet, and gently push between my thumb and 2 middle fingers, as opposed to pulling on it with my entire hand. So that's how I used to do it in the 80's before I owned an inch-lb torque wrench, but I couldn't get the bolts up to 69 before I "felt" they were too tight. I checked the wrench against another one I have that reads higher torques, and they seemed to agree with each other, so Idk. It is a cheapy "Amazon Basics" tool, so who knows. For now, I'm at 50 inch-lbs., and thinking of leaving it there.
Placed my last large parts order (for now, until any possible brake or electrical issues; knock wood), the costliest item being the rear master cylinder assembly, but I did go with the part for the 82 GPz, since it was $70 cheaper. I hope the only difference is indeed the color.
Something else I just learned..., that cam cover gasket isn't reversible! I would've thought the engine is symmetrical, but when I placed it on the head, the 2 inner-most holes next to the timing chain didn't line up with the holes in the head. Lesson learned- check gaskets against the cover first, before applying any sealant/oil. It all worked out, since all I chose to do was place 2 tiny dabs of Kawabond onto each of the rubber plugs (which I left on the head since they didn't leak previously) right where they meet the head. So once I flipped over the gasket, I some got on the other side. Oh well. Live and learn.
Not including a few tools and a bunch of supplies/ trips to the hardware store, I'm into this atm for about $900. I'll post my breakdown at the end.
Pic of gen cover showing the broken bolt:
83 KZ750 L3 current project
78 KZ650 waiting work
97 Concours same
Previous bikes
Brand New 83 KZ750 L3 in 1983! crashed
Brand New KZ700 A1 to replace 750, later sold
1986 900 Ninja, sold
2003 HD Electra Glide, later sold
78 KZ650 waiting work
97 Concours same
Previous bikes
Brand New 83 KZ750 L3 in 1983! crashed
Brand New KZ700 A1 to replace 750, later sold
1986 900 Ninja, sold
2003 HD Electra Glide, later sold
Please Log in or Create an account to join the conversation.
- Wookie58
-

- Offline
- Moderator
-

Registered
- Posts: 6749
- Thanks: 4258
Re: Getting a 1983 KZ750 L3 Back on the Road
27 Jul 2026 16:36
There is enough there to put a nut over it and weld it on
1982 KZ1000 Ltd
www.kzrider.com/forum/11-projects/617631...-82-begins?start=192
kzrider.com/forum/faq-wiki/616810-electr...-fault-finding-guide
www.kzrider.com/forum/11-projects/617631...-82-begins?start=192
kzrider.com/forum/faq-wiki/616810-electr...-fault-finding-guide
Please Log in or Create an account to join the conversation.
- F64
-
- Offline
- User
-
Registered
- 81-KZ440D2
- Posts: 1198
- Thanks: 443
Re: Getting a 1983 KZ750 L3 Back on the Road
27 Jul 2026 18:21 - 27 Jul 2026 23:01
i would contact
www.bbwireedm.com/
.
They're in Maryland and do EDM machining.
I figure you just ship the part to them and they will burn out the bolt easily. or they will know someone closer to you that has the same process.
I didn't vet them.
They just happened to be the first result via google (EDM machining Maryland)
www.google.com/search?client=firefox-b-1...machining%20maryland
They're in Maryland and do EDM machining.
I figure you just ship the part to them and they will burn out the bolt easily. or they will know someone closer to you that has the same process.
I didn't vet them.
They just happened to be the first result via google (EDM machining Maryland)
www.google.com/search?client=firefox-b-1...machining%20maryland
81-KZ440-D2.
Louis Dudzik's GM HEI ignitor conversion installed 2015 s3.amazonaws.com/gpzweb/Ignition/GPZgmHEImod.html
Motogadget m-unit blue installed 2017.
LIC, NY
Louis Dudzik's GM HEI ignitor conversion installed 2015 s3.amazonaws.com/gpzweb/Ignition/GPZgmHEImod.html
Motogadget m-unit blue installed 2017.
LIC, NY
Last edit: 27 Jul 2026 23:01 by F64.
The following user(s) said Thank You: Wookie58
Please Log in or Create an account to join the conversation.
- Nessism
-
- Offline
- Sustaining Member
-

Registered
- Posts: 8178
- Thanks: 3553
Re: Getting a 1983 KZ750 L3 Back on the Road
28 Jul 2026 04:26
Vice grips should be able to grab that nub.
Ed
Carb O-ring Kits : www.kzrider.com/forum/14-vendor-forum/62...rburetor-o-ring-kits
www.kzrider.com/forum/faq-wiki/618026-new-owner-things-to-know
1981 KZ750E2
www.kzrider.com/forum/11-projects/604901...z750e-project-thread
Carb O-ring Kits : www.kzrider.com/forum/14-vendor-forum/62...rburetor-o-ring-kits
www.kzrider.com/forum/faq-wiki/618026-new-owner-things-to-know
1981 KZ750E2
www.kzrider.com/forum/11-projects/604901...z750e-project-thread
Please Log in or Create an account to join the conversation.
- TSJ
-
Topic Author
- Offline
- User
-
Registered
- Posts: 30
- Thanks: 7
Re: Getting a 1983 KZ750 L3 Back on the Road
28 Jul 2026 17:03
That bolt is practically welded to the cover. I got vice grips on it, but couldn't turn it, and I can't weld. (I know a machine shop could though.) That round, raised portion in the pic locks the field coil in place, so all it really needs is for the remaining 2 bolts to keep it held downward, so I'll just put a touch a semi-permanent threadlocker on them and put it back together. I'm done messing with it.
83 KZ750 L3 current project
78 KZ650 waiting work
97 Concours same
Previous bikes
Brand New 83 KZ750 L3 in 1983! crashed
Brand New KZ700 A1 to replace 750, later sold
1986 900 Ninja, sold
2003 HD Electra Glide, later sold
78 KZ650 waiting work
97 Concours same
Previous bikes
Brand New 83 KZ750 L3 in 1983! crashed
Brand New KZ700 A1 to replace 750, later sold
1986 900 Ninja, sold
2003 HD Electra Glide, later sold
Please Log in or Create an account to join the conversation.
- Wookie58
-
- Offline
- Moderator
-
Registered
- Posts: 6749
- Thanks: 4258
Re: Getting a 1983 KZ750 L3 Back on the Road
28 Jul 2026 23:13
I would advise against the two bolt route. It appears fine on the bench but in use vibration will cause the stator to "flap" and could crack the casing.
1982 KZ1000 Ltd
www.kzrider.com/forum/11-projects/617631...-82-begins?start=192
kzrider.com/forum/faq-wiki/616810-electr...-fault-finding-guide
www.kzrider.com/forum/11-projects/617631...-82-begins?start=192
kzrider.com/forum/faq-wiki/616810-electr...-fault-finding-guide
The following user(s) said Thank You: asphalt900
Please Log in or Create an account to join the conversation.
- asphalt900
-
- Offline
- Sustaining Member
-
Registered
- Posts: 1901
- Thanks: 1282
Re: Getting a 1983 KZ750 L3 Back on the Road
29 Jul 2026 03:37
Seems you're limited with tools but might i suggest go ahead and mount with the 2 remaining bolts. Then..using the stator hole as a pilot, center drill thru old stuck remnant. drill straight!! Tap for either M5 or M6.
The following user(s) said Thank You: Wookie58
Please Log in or Create an account to join the conversation.
- chopper1963
-
- Offline
- User
-
Registered
- Posts: 416
- Thanks: 92
Re: Getting a 1983 KZ750 L3 Back on the Road
29 Jul 2026 09:04
For sure this is not a typical build thread.
Please Log in or Create an account to join the conversation.
- TSJ
-
Topic Author
- Offline
- User
-
Registered
- Posts: 30
- Thanks: 7
Re: Getting a 1983 KZ750 L3 Back on the Road
11 Aug 2026 15:40
I've slowed down a bit after landing a new job that has me working long hours. But I did receive the rest of my parts needed to at least get the bike running again.
I installed the new carburetor O-rings (Thanks Ed!) and reassembled and re-ganged the carbs. Put the engine covers back on and the missing spring and washer that goes under the oil filter, filled it with oil and a new filter, and just cranked the engine for a few minutes to get it circulated. Once I get it fired up, I plan to let it run at idle for about 10 minutes, flush that oil because of when it got contaminated with gasoline, then put new oil and a 2nd new filter, then hopefully call that part done.
I had some problems when trying to fit the carbs back on the bike. I knew from my past with these bikes, even though it's been decades, this is a difficult part of the job, but I had some extra trouble. Some more missing parts, namely, the 2 brackets that slide into the back of the airbox and attach it to the battery frame. So I'm trying to keep the airbox pushed all the way back against the battery, while trying to get those boots attached to the carbs, when I finally broke the part that the air cleaner sits into, inside the airbox. So I gave up.
Came inside, and did some parts numbers cross-referencing, and both the part I broke, and those 2 90 degree brackets are the same ones on my KZ 650. So when I get back to it, I'll cannibalize those from the 650, and mount the airbox properly, and remove that air filter holder temporarily until I get the carbs back on the bike.
Oh and I put the new, correct heat range, spark plugs on also. Getting close...
I installed the new carburetor O-rings (Thanks Ed!) and reassembled and re-ganged the carbs. Put the engine covers back on and the missing spring and washer that goes under the oil filter, filled it with oil and a new filter, and just cranked the engine for a few minutes to get it circulated. Once I get it fired up, I plan to let it run at idle for about 10 minutes, flush that oil because of when it got contaminated with gasoline, then put new oil and a 2nd new filter, then hopefully call that part done.
I had some problems when trying to fit the carbs back on the bike. I knew from my past with these bikes, even though it's been decades, this is a difficult part of the job, but I had some extra trouble. Some more missing parts, namely, the 2 brackets that slide into the back of the airbox and attach it to the battery frame. So I'm trying to keep the airbox pushed all the way back against the battery, while trying to get those boots attached to the carbs, when I finally broke the part that the air cleaner sits into, inside the airbox. So I gave up.
Came inside, and did some parts numbers cross-referencing, and both the part I broke, and those 2 90 degree brackets are the same ones on my KZ 650. So when I get back to it, I'll cannibalize those from the 650, and mount the airbox properly, and remove that air filter holder temporarily until I get the carbs back on the bike.
Oh and I put the new, correct heat range, spark plugs on also. Getting close...
83 KZ750 L3 current project
78 KZ650 waiting work
97 Concours same
Previous bikes
Brand New 83 KZ750 L3 in 1983! crashed
Brand New KZ700 A1 to replace 750, later sold
1986 900 Ninja, sold
2003 HD Electra Glide, later sold
78 KZ650 waiting work
97 Concours same
Previous bikes
Brand New 83 KZ750 L3 in 1983! crashed
Brand New KZ700 A1 to replace 750, later sold
1986 900 Ninja, sold
2003 HD Electra Glide, later sold
Please Log in or Create an account to join the conversation.
Moderators: Street Fighter LTD