
Getting a 1983 KZ750 L3 Back on the Road
- TSJ
-
 Topic Author
- Away
- User
-

Registered
- Posts: 20
- Thanks: 4
Getting a 1983 KZ750 L3 Back on the Road
18 Jul 2026 10:12
I let this bike sit, with gas in the tank, for almost 10 years (UGH!), but this past week I started the work to get it running again. The bike ran when parked, but it started puking gas. I'm not new to these bikes, having bought a new one in 83 as a 19 year old, then an 84 700 A1 after I crashed the 750. (I was a hellion-on-wheels back then.)
I have the 1983 Factory Service Manual from back when I bought it in 84, and did a few mods to my 700, so I'm pretty familiar with the processes involved, but I'm sure I'll have lots of questions, probably mostly about the quality of aftermarket parts, and what cleaning products to use.
Btw, I found a great source for part numbers that I didn't see listed in the thread about sourcing parts. It's Kawasaki dot com owners center, and when you find your ride, it has all the exploded views for your bike, along with the FULL part #. (You always want those digits after the 'dash')
So I started with the fuel. Removed the Fuel Tap & Fuel Gauge units, disassembled them, and am awaiting parts to rebuild them. Drained and did a 1st-cleaning of the tank with some kerosene, and ordered a boroscope so I can see how bad it is to know what my next step is.
Removed carbs and airbox and carb holders, and today I plan to disassemble and separate them. Checked the valve lash. All were good (bike has ~20K miles), but a couple are getting close to needing a smaller shim. I'll deal with that later. I want to RIDE this thing!
I'm SO GLAD this site exists, and if I can help anyone, please reach out!
Thanks, and more to follow!
I have the 1983 Factory Service Manual from back when I bought it in 84, and did a few mods to my 700, so I'm pretty familiar with the processes involved, but I'm sure I'll have lots of questions, probably mostly about the quality of aftermarket parts, and what cleaning products to use.
Btw, I found a great source for part numbers that I didn't see listed in the thread about sourcing parts. It's Kawasaki dot com owners center, and when you find your ride, it has all the exploded views for your bike, along with the FULL part #. (You always want those digits after the 'dash')
So I started with the fuel. Removed the Fuel Tap & Fuel Gauge units, disassembled them, and am awaiting parts to rebuild them. Drained and did a 1st-cleaning of the tank with some kerosene, and ordered a boroscope so I can see how bad it is to know what my next step is.
Removed carbs and airbox and carb holders, and today I plan to disassemble and separate them. Checked the valve lash. All were good (bike has ~20K miles), but a couple are getting close to needing a smaller shim. I'll deal with that later. I want to RIDE this thing!
I'm SO GLAD this site exists, and if I can help anyone, please reach out!
Thanks, and more to follow!
83 KZ750 L3 current project
78 KZ650 waiting work
97 Concours same
Previous bikes
Brand New 83 KZ750 L3 in 1983! crashed
Brand New KZ700 A1 to replace 750, later sold
1986 900 Ninja, sold
2003 HD Electra Glide, later sold
78 KZ650 waiting work
97 Concours same
Previous bikes
Brand New 83 KZ750 L3 in 1983! crashed
Brand New KZ700 A1 to replace 750, later sold
1986 900 Ninja, sold
2003 HD Electra Glide, later sold
The following user(s) said Thank You: Wookie58
Please Log in or Create an account to join the conversation.
- TSJ
-
Topic Author
- Away
- User
-
Registered
- Posts: 20
- Thanks: 4
Re: Getting a 1983 KZ750 L3 Back on the Road
19 Jul 2026 14:24
Parts have started arriving, yea!!
Initial batch of rubber to rebuild the fuel tap, and to replace any questionable rubber @ fuel gauge and tank cap. I did just like someone else here, and forgot the 2 washers for the screws that attach the tap to the tank, but fortunately, as I was searching related threads, I read his post and realized I had done the same thing. Oops.
So today's projects include rebuilding the tap and cleaning the fuel cap parts. Tomorrow I'm supposed to receive the boroscope I ordered, so I can look way down in the tank to see what steps need to be taken next, on making sure it's properly cleaned. New battery should also arrive, but I won't be able to attempt to start it for probably a few more weeks. But I can't wait!!
I also plan on separating the carbs today to assess the condition of the starter plunger parts, since I know at least one of them is bad, right next to the choke knob. Once I get that list together, I plan on ordered an 0-ring kit from Ed (Nessism.)
And I bought some single-edge razor blades to scrape the cam cover gasket from the cylinder head. Cover is done, cleaned, and ready to go back on the bike.
Ordered a bunch more parts today also- intake boots, starter cover gasket, those little carb cap plugs (mine were completely hard.) I want to make sure every single place that could potentially leak on a 43 yo bike is taken care of. That way if I have any issues, I'll hopefully know what it is NOT.
I'll post some pics next time...
Initial batch of rubber to rebuild the fuel tap, and to replace any questionable rubber @ fuel gauge and tank cap. I did just like someone else here, and forgot the 2 washers for the screws that attach the tap to the tank, but fortunately, as I was searching related threads, I read his post and realized I had done the same thing. Oops.
So today's projects include rebuilding the tap and cleaning the fuel cap parts. Tomorrow I'm supposed to receive the boroscope I ordered, so I can look way down in the tank to see what steps need to be taken next, on making sure it's properly cleaned. New battery should also arrive, but I won't be able to attempt to start it for probably a few more weeks. But I can't wait!!
I also plan on separating the carbs today to assess the condition of the starter plunger parts, since I know at least one of them is bad, right next to the choke knob. Once I get that list together, I plan on ordered an 0-ring kit from Ed (Nessism.)
And I bought some single-edge razor blades to scrape the cam cover gasket from the cylinder head. Cover is done, cleaned, and ready to go back on the bike.
Ordered a bunch more parts today also- intake boots, starter cover gasket, those little carb cap plugs (mine were completely hard.) I want to make sure every single place that could potentially leak on a 43 yo bike is taken care of. That way if I have any issues, I'll hopefully know what it is NOT.
I'll post some pics next time...
83 KZ750 L3 current project
78 KZ650 waiting work
97 Concours same
Previous bikes
Brand New 83 KZ750 L3 in 1983! crashed
Brand New KZ700 A1 to replace 750, later sold
1986 900 Ninja, sold
2003 HD Electra Glide, later sold
78 KZ650 waiting work
97 Concours same
Previous bikes
Brand New 83 KZ750 L3 in 1983! crashed
Brand New KZ700 A1 to replace 750, later sold
1986 900 Ninja, sold
2003 HD Electra Glide, later sold
Please Log in or Create an account to join the conversation.
- TSJ
-
Topic Author
- Away
- User
-
Registered
- Posts: 20
- Thanks: 4
Re: Getting a 1983 KZ750 L3 Back on the Road
20 Jul 2026 20:52 - 20 Jul 2026 20:55I had disassembled the fuel cap so I could clean it really good. And wouldn't you know it, just as I was about to push down on the large spring inside, BOTH springs that work against the turning of the key flew out. I found one right away, but as you can see, my garage has all kinds of places to look for the other one. And of course, when I finally gave up and put it back together with just the 1 spring, I found the other. I'll come back to that last.
Fuel tap rebuild went fine. Used a Dremel to polish the diaphragm o-ring seat, and some 320 on a piece of marble to make sure the mating surfaces were nice and flat.
Battery, boroscope, & hot plate came today. I'll use the scope to see how bad the inside of the tank is, and maybe even poke around inside the head, just because. Head is supposed to swivel 360 degrees back towards itself (paid extra for that feature), so I hope I'll be able to see everything I need to.
I used the hot plate for an old-school cleaning method I read online, so I wanted to try it: Boil 4oz. lemon juice concentrate and 1 qt. water and dunk parts in it to clean. I did some research which said it can be too aggressive for carb bodies, so I tried it on a bunch of bolts and a few parts of the fuel cap, kept a close eye on them, and it worked quite well. I'm not going to risk the aluminum carb bodies though. I'll bite the bullet and buy a gallon of carb dip tomorrow, because...
I also separated the carbs today. Mine have the full-length choke rod, which is NOT covered in the Kawasaki service manual. But with some careful inspection, I determined you remove the circlip at each starter plunger, and slide the carbs off 1 at a time. I then used a Jorgensen clamp to hold the bodies, so I could have better leverage to break free the starter plunger cap nuts. And like I remembered from way back when I was a young punk, you can separate the carbs w/o disturbing the throttle sync adjusters. I don't want to deal with syncing these carbs unless there's an issue once it's running. We'll see.
I do plan to remove the throttle butterfly plates prior to dunking them in the cleaner, but I'll do that one at a time. I've already got a ton of parts removed from this bike, and I'm keeping them all straight, but the less I have to remember, the better. Been taking notes and a few pics for certain things, but for the most part I'm pretty sure I'll get it all back together and have no leftover parts! Haha
Attachment not found
Attachment not found
83 KZ750 L3 current project
78 KZ650 waiting work
97 Concours same
Previous bikes
Brand New 83 KZ750 L3 in 1983! crashed
Brand New KZ700 A1 to replace 750, later sold
1986 900 Ninja, sold
2003 HD Electra Glide, later sold
78 KZ650 waiting work
97 Concours same
Previous bikes
Brand New 83 KZ750 L3 in 1983! crashed
Brand New KZ700 A1 to replace 750, later sold
1986 900 Ninja, sold
2003 HD Electra Glide, later sold
Last edit: 20 Jul 2026 20:55 by TSJ.
Please Log in or Create an account to join the conversation.
- TSJ
-
Topic Author
- Away
- User
-
Registered
- Posts: 20
- Thanks: 4
Re: Getting a 1983 KZ750 L3 Back on the Road
20 Jul 2026 20:58 - 20 Jul 2026 20:59
I've also been working on getting my rear brake pedal shaft freed up tonight. Not only was the brake plunger rusted all up into the mstr cylinder, the shaft is rusted stuck where it passes through the footpeg bracket. I've had PB Blaster soaking on it for a full day, and I heated the surrounding area with a torch, but still won't budge. Letting it soak some more. I also removed the entire bracket so I could lay it on its side, and let gravity guide the Blaster to the shaft. I really hope I can get this thing freed, since I'm pushing about $600 in parts alone, not including shop supplies and a few new tools.
Which I don't mind, cuz I have 2 other bikes to do this to lined up right behind the 750- a 97 Concours, and a 78 KZ650.
Couple pics of the reassembled stuff:
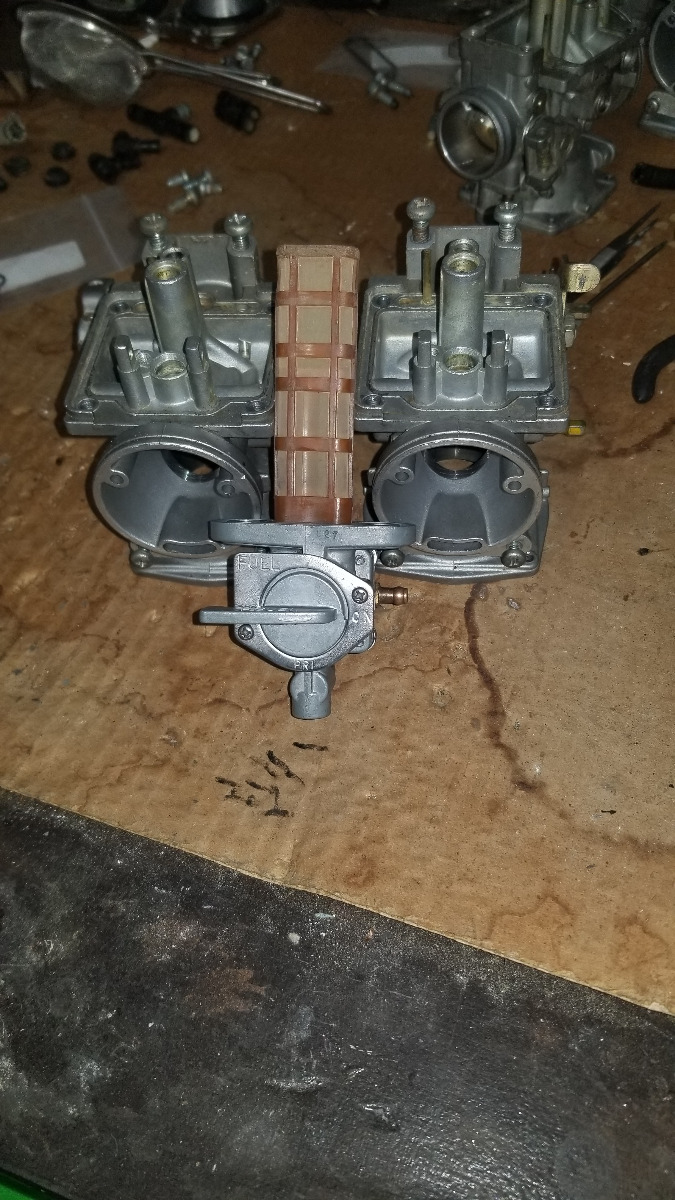
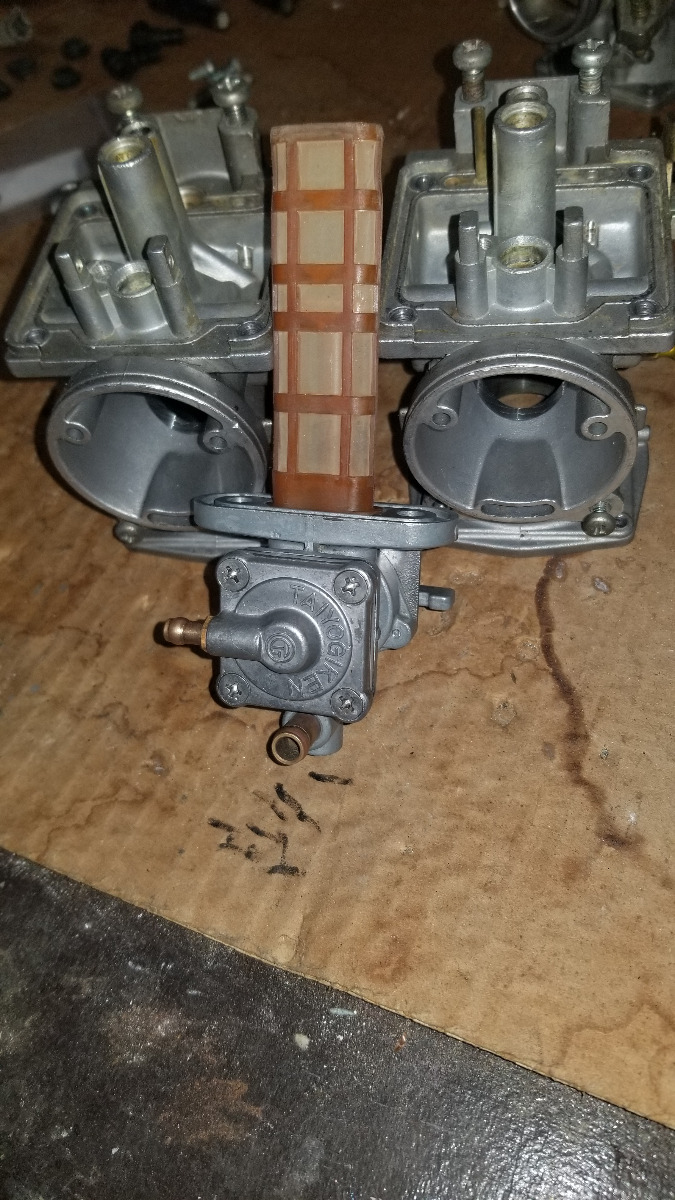
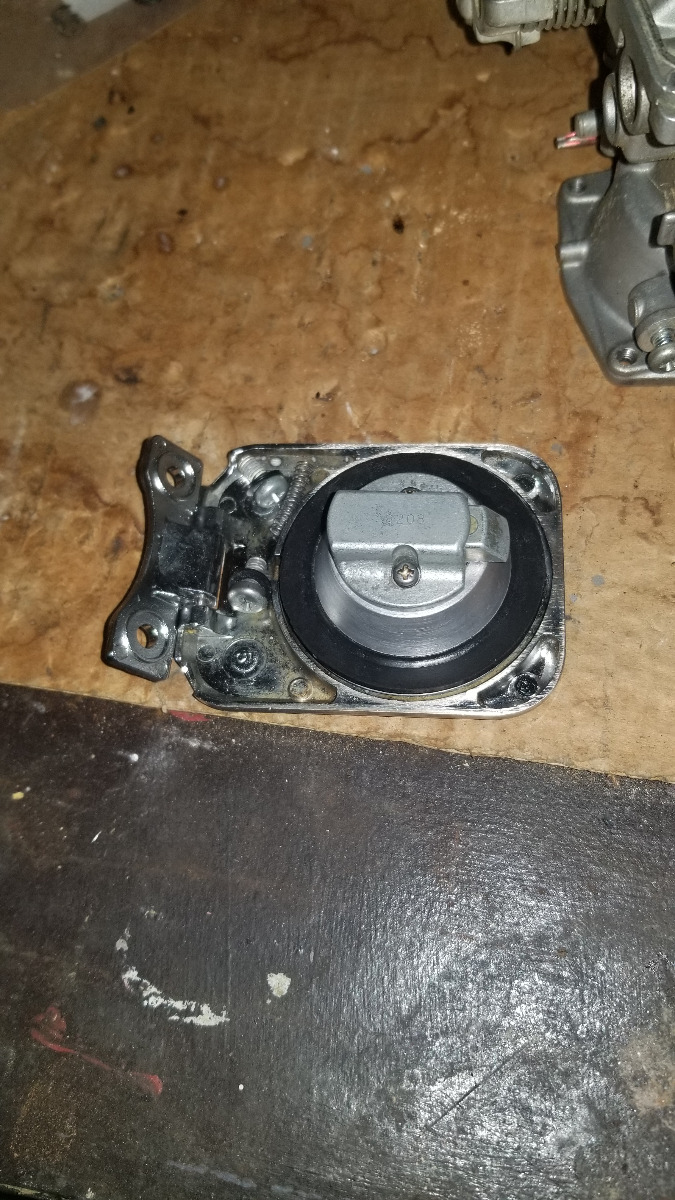
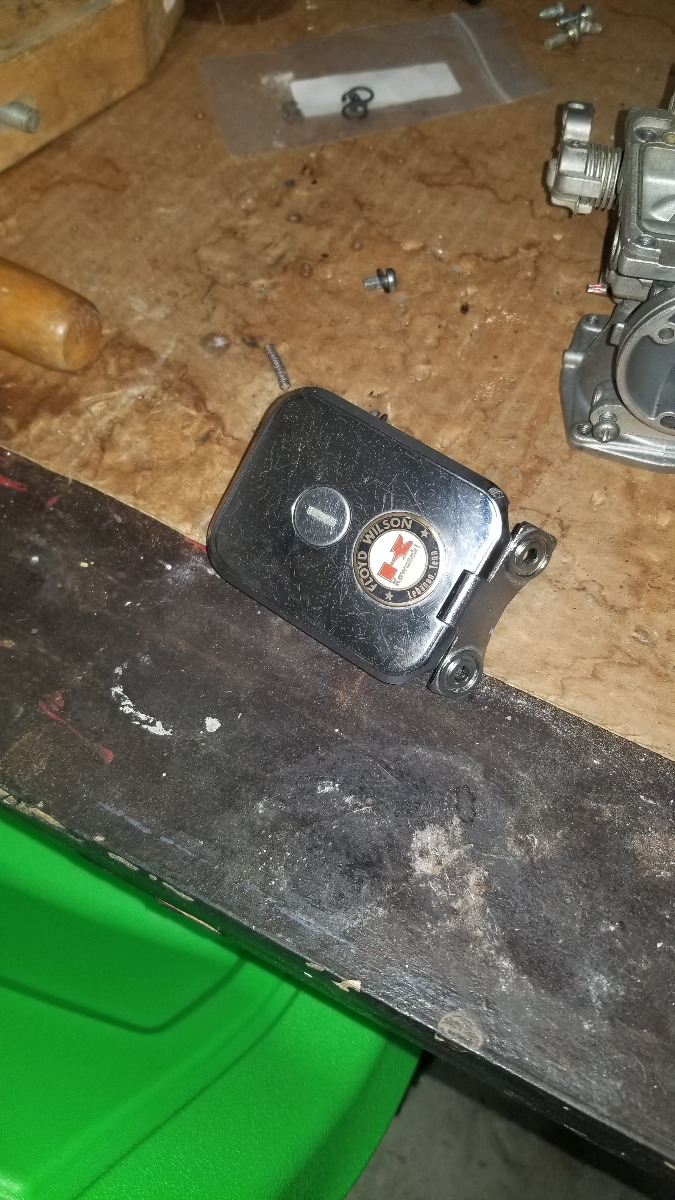
Which I don't mind, cuz I have 2 other bikes to do this to lined up right behind the 750- a 97 Concours, and a 78 KZ650.
Couple pics of the reassembled stuff:
83 KZ750 L3 current project
78 KZ650 waiting work
97 Concours same
Previous bikes
Brand New 83 KZ750 L3 in 1983! crashed
Brand New KZ700 A1 to replace 750, later sold
1986 900 Ninja, sold
2003 HD Electra Glide, later sold
78 KZ650 waiting work
97 Concours same
Previous bikes
Brand New 83 KZ750 L3 in 1983! crashed
Brand New KZ700 A1 to replace 750, later sold
1986 900 Ninja, sold
2003 HD Electra Glide, later sold
Last edit: 20 Jul 2026 20:59 by TSJ.
The following user(s) said Thank You: Wookie58
Please Log in or Create an account to join the conversation.
- Wookie58
-

- Offline
- Moderator
-

Registered
- Posts: 6592
- Thanks: 4164
Re: Getting a 1983 KZ750 L3 Back on the Road
21 Jul 2026 01:27
I assume when you removed the choke rod you secured the springs and ball bearings from the "detents"
1982 KZ1000 Ltd
www.kzrider.com/forum/11-projects/617631...-82-begins?start=192
kzrider.com/forum/faq-wiki/616810-electr...-fault-finding-guide
www.kzrider.com/forum/11-projects/617631...-82-begins?start=192
kzrider.com/forum/faq-wiki/616810-electr...-fault-finding-guide
The following user(s) said Thank You: Nessism, TSJ
Please Log in or Create an account to join the conversation.
- Nessism
-
- Offline
- Sustaining Member
-

Registered
- Posts: 8129
- Thanks: 3517
Re: Getting a 1983 KZ750 L3 Back on the Road
21 Jul 2026 03:52
Listen to Wookie and make sure you don't lose the small springs and balls that create the choke detent. Also, do not remove the throttle butterfly valves. It's not necessary unless something really bad has happened. Do your carb dipping, but limit the time to just long enough to clean them well; a few hours is enough, not overnight.
Ed
Carb O-ring Kits : www.kzrider.com/forum/14-vendor-forum/62...rburetor-o-ring-kits
www.kzrider.com/forum/faq-wiki/618026-new-owner-things-to-know
1981 KZ750E2
www.kzrider.com/forum/11-projects/604901...z750e-project-thread
Carb O-ring Kits : www.kzrider.com/forum/14-vendor-forum/62...rburetor-o-ring-kits
www.kzrider.com/forum/faq-wiki/618026-new-owner-things-to-know
1981 KZ750E2
www.kzrider.com/forum/11-projects/604901...z750e-project-thread
The following user(s) said Thank You: ThatGPzGuy, Wookie58, TSJ
Please Log in or Create an account to join the conversation.
- TSJ
-
Topic Author
- Away
- User
-
Registered
- Posts: 20
- Thanks: 4
Re: Getting a 1983 KZ750 L3 Back on the Road
21 Jul 2026 09:28Yes. In fact, they didn't budge, when I removed them. So I dropped the round end of a torx driver impact tip down into the starter shaft hole, to hold them in place. Then I'll shoot some carb cleaner in there, and use a magnet to guide them out carefully (but in a different room, and maybe in a cardboard box, so if they do go flying, I'll have less cubic feet to search!I assume when you removed the choke rod you secured the springs and ball bearings from the "detents"
83 KZ750 L3 current project
78 KZ650 waiting work
97 Concours same
Previous bikes
Brand New 83 KZ750 L3 in 1983! crashed
Brand New KZ700 A1 to replace 750, later sold
1986 900 Ninja, sold
2003 HD Electra Glide, later sold
78 KZ650 waiting work
97 Concours same
Previous bikes
Brand New 83 KZ750 L3 in 1983! crashed
Brand New KZ700 A1 to replace 750, later sold
1986 900 Ninja, sold
2003 HD Electra Glide, later sold
The following user(s) said Thank You: Wookie58
Please Log in or Create an account to join the conversation.
- Kelly E
-
- Offline
- User
-
Registered
- Never Give Up. Never Surrender
- Posts: 547
- Thanks: 458
Re: Getting a 1983 KZ750 L3 Back on the Road
21 Jul 2026 09:40
I'll be waiting for you to get started on your 97' Concours. I love my 94' Concours, they are great bikes.
There's a Concours parts specialist called Murph's Kits. He's very knowledgeable and a good guy.
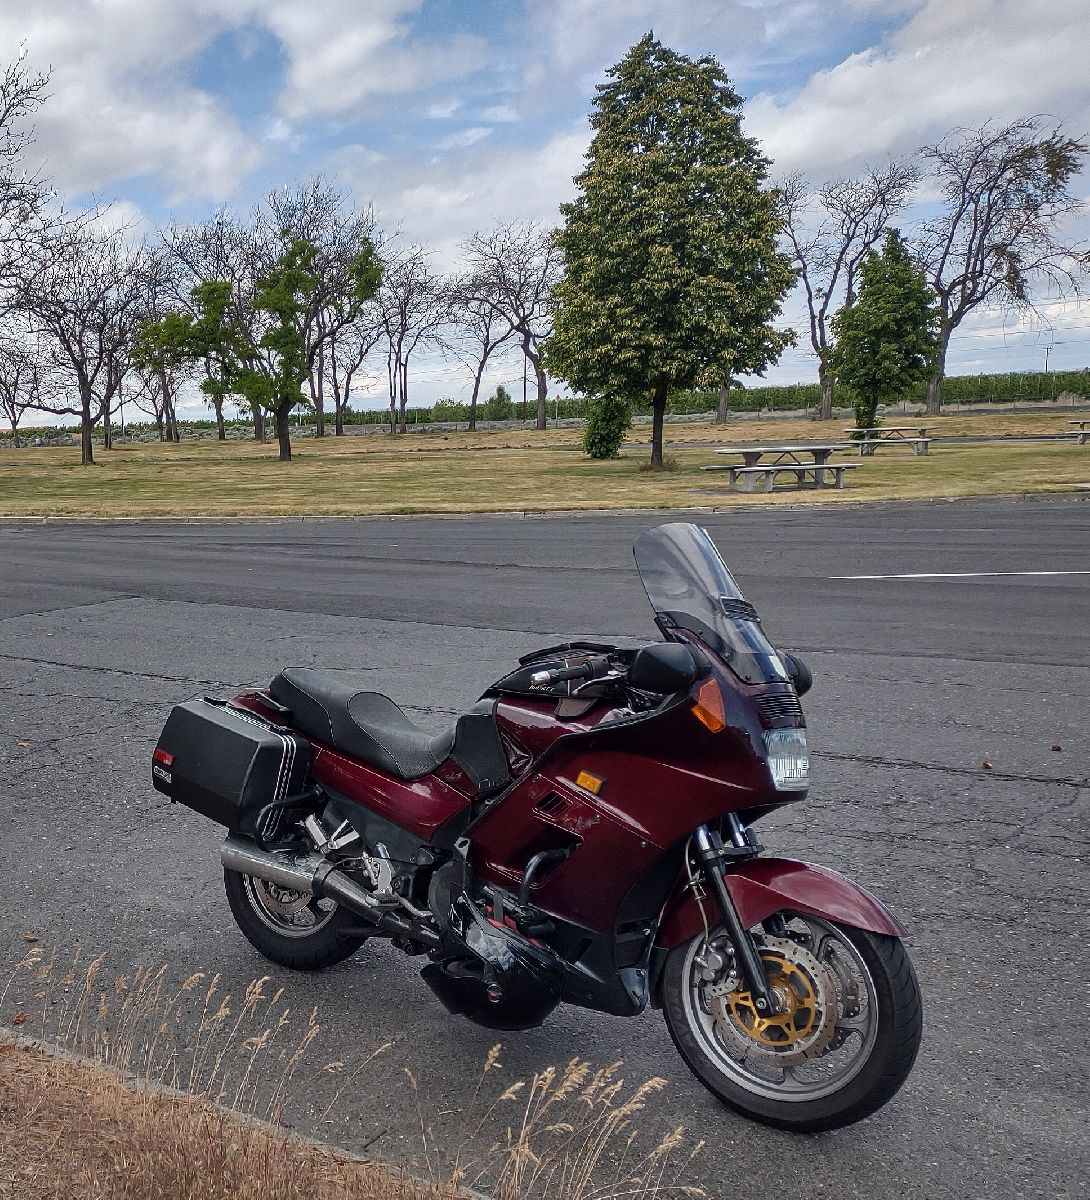
There's a Concours parts specialist called Murph's Kits. He's very knowledgeable and a good guy.
The Rust Bros. Garage Collection
1974 Honda CB 550 K0
1975 Honda CB 400F Super Sport
1977 Kawasaki KZ 1000 LTD
1978 Kawasaki KL 250
1980 Suzuki GS 1100E
1983 Honda CB 1100F
1984 Honda Sabre 700
1984 Honda Interceptor 1000
1990 Moto Guzzi 1000
1994 Kawasaki ZG 1000 Concours
And more
1974 Honda CB 550 K0
1975 Honda CB 400F Super Sport
1977 Kawasaki KZ 1000 LTD
1978 Kawasaki KL 250
1980 Suzuki GS 1100E
1983 Honda CB 1100F
1984 Honda Sabre 700
1984 Honda Interceptor 1000
1990 Moto Guzzi 1000
1994 Kawasaki ZG 1000 Concours
And more
Please Log in or Create an account to join the conversation.
- TSJ
-
Topic Author
- Away
- User
-
Registered
- Posts: 20
- Thanks: 4
Re: Getting a 1983 KZ750 L3 Back on the Road
21 Jul 2026 10:10After riding my 86 900 Ninja for years, once I learned about the Concours, I knew I'd move on to one some day. I have "blanks" in my memory of which years I rode, and years I did not, but I do recall the day the wife and I drove to Cycle World Kawasaki in Glen Burnie, Md, and bought it and I rode it home. Definitely a fun bike to ride!I'll be waiting for you to get started on your 97' Concours. I love my 94' Concours, they are great bikes.
There's a Concours parts specialist called Murph's Kits. He's very knowledgeable and a good guy.
I remember it developing some type of cooling, or overheating, issue..., I seem to recall reading something about it, but my memory is vague. But I took out the thermostat for whatever reason. And I had a minor scrape (not laid down or anything like that) that broke one of the fairing lowers at a mounting bolt.
It's been parked for at least a couple decades, and being liguid-cooled I know it's going to be more of a project than the KZ is. Which is why I chose to start with this bike. Plus, I know the KZ better.
83 KZ750 L3 current project
78 KZ650 waiting work
97 Concours same
Previous bikes
Brand New 83 KZ750 L3 in 1983! crashed
Brand New KZ700 A1 to replace 750, later sold
1986 900 Ninja, sold
2003 HD Electra Glide, later sold
78 KZ650 waiting work
97 Concours same
Previous bikes
Brand New 83 KZ750 L3 in 1983! crashed
Brand New KZ700 A1 to replace 750, later sold
1986 900 Ninja, sold
2003 HD Electra Glide, later sold
Please Log in or Create an account to join the conversation.
- TSJ
-
Topic Author
- Away
- User
-
Registered
- Posts: 20
- Thanks: 4
Re: Getting a 1983 KZ750 L3 Back on the Road
Yesterday 19:03
Today was carb dip day. And use the boroscope to look inside the tank. And hook up the battery to see if everything still works.
2 hours each carb body in the dip (it's brand-new), but I still see some corrosion (they didn't have much to begin with, mostly just in places where gas collected around o-rings, some places where the gasket seats, and down in the bowl recess where the drain screw is located.) I may give them another go, because I also have what looks like thin carbon on the bores, near the butterfly valves (engine side.) I tried shooting it with spray carb cleaner, but it didn't touch it. Maybe I need a better brand...? Does anyone here know if that matters?
Boroscope showed only a few places of remaining varnish in the tank, some flash rust, and rust along the seams, which was expected. It's better than I thought it would be. That's a neat little tool! I'll tackle that tomorrow and hopefully won't need to seal the tank.
All the electrics still work except the flashers, and the horn is intermittent. Probably needs a topping-off charge. At least I hope that's the reason. I haven't cranked it over yet. And the turn signals all flash fast, like when in your car or truck, and you have a burned-out bulb. But none of my bulbs are burned out, so not sure what's going on there. Either that's normal, and I just don't remember it that way, or I have a relay problem...? Or something I'm not thinking of. I'll see if the service manual says anything about that.
Ordered another batch of parts- starter plunger rubber "bellows", the engine cover gaskets, oil filter & o-rings, and the 2 little washers for the fuel tap mounting screws that I missed earlier.
Still no luck getting my rear brake shaft freed up from inside the footpeg/exhaust bracket. I'm constantly soaking it in PB Blaster, and applying heat from a torch. I have the blue bottle, which apparently is the hottest, hitting it for about 3-4 minutes, then tapping it with a hammer, on the backside lever portion. No luck. Any ideas, other than to just keep trying every day?
I originally was going to use the boiling water with lemon juice method on my carbs, but decided not to after reading it's too aggressive, but it sure works well for cleaning bolts.
I'm ordering the carb o-ring kit from Ed tomorrow, and after that I think I'm done with parts until I get it running again, then see what else it needs. I hope not too much!
2 hours each carb body in the dip (it's brand-new), but I still see some corrosion (they didn't have much to begin with, mostly just in places where gas collected around o-rings, some places where the gasket seats, and down in the bowl recess where the drain screw is located.) I may give them another go, because I also have what looks like thin carbon on the bores, near the butterfly valves (engine side.) I tried shooting it with spray carb cleaner, but it didn't touch it. Maybe I need a better brand...? Does anyone here know if that matters?
Boroscope showed only a few places of remaining varnish in the tank, some flash rust, and rust along the seams, which was expected. It's better than I thought it would be. That's a neat little tool! I'll tackle that tomorrow and hopefully won't need to seal the tank.
All the electrics still work except the flashers, and the horn is intermittent. Probably needs a topping-off charge. At least I hope that's the reason. I haven't cranked it over yet. And the turn signals all flash fast, like when in your car or truck, and you have a burned-out bulb. But none of my bulbs are burned out, so not sure what's going on there. Either that's normal, and I just don't remember it that way, or I have a relay problem...? Or something I'm not thinking of. I'll see if the service manual says anything about that.
Ordered another batch of parts- starter plunger rubber "bellows", the engine cover gaskets, oil filter & o-rings, and the 2 little washers for the fuel tap mounting screws that I missed earlier.
Still no luck getting my rear brake shaft freed up from inside the footpeg/exhaust bracket. I'm constantly soaking it in PB Blaster, and applying heat from a torch. I have the blue bottle, which apparently is the hottest, hitting it for about 3-4 minutes, then tapping it with a hammer, on the backside lever portion. No luck. Any ideas, other than to just keep trying every day?
I originally was going to use the boiling water with lemon juice method on my carbs, but decided not to after reading it's too aggressive, but it sure works well for cleaning bolts.
I'm ordering the carb o-ring kit from Ed tomorrow, and after that I think I'm done with parts until I get it running again, then see what else it needs. I hope not too much!
83 KZ750 L3 current project
78 KZ650 waiting work
97 Concours same
Previous bikes
Brand New 83 KZ750 L3 in 1983! crashed
Brand New KZ700 A1 to replace 750, later sold
1986 900 Ninja, sold
2003 HD Electra Glide, later sold
78 KZ650 waiting work
97 Concours same
Previous bikes
Brand New 83 KZ750 L3 in 1983! crashed
Brand New KZ700 A1 to replace 750, later sold
1986 900 Ninja, sold
2003 HD Electra Glide, later sold
Please Log in or Create an account to join the conversation.
- TSJ
-
Topic Author
- Away
- User
-
Registered
- Posts: 20
- Thanks: 4
Re: Getting a 1983 KZ750 L3 Back on the Road
Yesterday 20:19
While waiting for my 3rd carb body to soak in carb cleaner dip, I decided to drain the oil, working towards a couple other issues:
1) Cleaning the clutch cover and replacing the old gasket, since I have no idea how old it is, and,
2) When I removed my airbox, it took 3 of those blue shop towels (like paper towels on a roll) to soak up the oil in the bottom of the airbox. Hmmm, another issue to sort through...
After doing a search, I found one possible/probable cause was the oil level being too high, and yes it was. But what I read also told me to smell the oil, and yep, it smelled like gasoline. I think the gas puking from the bike on my first ride many years ago (that had me so discouraged after being excited I won the ebay bid, that I just parked it), the subsequent gas just sitting in the tank, most likely continuing to degrade various o-rings, and the fact that the carb fuel fittings were so loose they practically fell out of the carb bodies, is all related.
I hope it's all related, and somehow gas leaked down into the oil, causing it to overfill, and during that ride it came up into the breather tube into the airbox.
Crossing my fingers that completely cleaning the tank, rebuilding the fuel tap and carbs, and changing the oil & filter will clear all this up. To be continued...
Forgot to mention, when I started on the airbox, the foam filter was also so full of oil that I just tossed it, not realizing there was a cage that that foam filter attached to. And I couldn't find a replacement anywhere. (That cage was long-gone, since I cleaned out my garage fully before starting this project, and made a dump-run. Lol)
Fortunately I was able to find a K&N drop-in on ebay, and it came yesterday. Apparently that's another item no longer made, cuz I had trouble finding it. The paperwork with it was definitely old, but the filter looked pristine, and fit nice and tight in the airbox. Shouldn't have to deal with that ever again (provided that the work I'm doing fixes that oil getting into the airbox, and it's not being caused by some other reason!)
1) Cleaning the clutch cover and replacing the old gasket, since I have no idea how old it is, and,
2) When I removed my airbox, it took 3 of those blue shop towels (like paper towels on a roll) to soak up the oil in the bottom of the airbox. Hmmm, another issue to sort through...
After doing a search, I found one possible/probable cause was the oil level being too high, and yes it was. But what I read also told me to smell the oil, and yep, it smelled like gasoline. I think the gas puking from the bike on my first ride many years ago (that had me so discouraged after being excited I won the ebay bid, that I just parked it), the subsequent gas just sitting in the tank, most likely continuing to degrade various o-rings, and the fact that the carb fuel fittings were so loose they practically fell out of the carb bodies, is all related.
I hope it's all related, and somehow gas leaked down into the oil, causing it to overfill, and during that ride it came up into the breather tube into the airbox.
Crossing my fingers that completely cleaning the tank, rebuilding the fuel tap and carbs, and changing the oil & filter will clear all this up. To be continued...
Forgot to mention, when I started on the airbox, the foam filter was also so full of oil that I just tossed it, not realizing there was a cage that that foam filter attached to. And I couldn't find a replacement anywhere. (That cage was long-gone, since I cleaned out my garage fully before starting this project, and made a dump-run. Lol)
Fortunately I was able to find a K&N drop-in on ebay, and it came yesterday. Apparently that's another item no longer made, cuz I had trouble finding it. The paperwork with it was definitely old, but the filter looked pristine, and fit nice and tight in the airbox. Shouldn't have to deal with that ever again (provided that the work I'm doing fixes that oil getting into the airbox, and it's not being caused by some other reason!)
83 KZ750 L3 current project
78 KZ650 waiting work
97 Concours same
Previous bikes
Brand New 83 KZ750 L3 in 1983! crashed
Brand New KZ700 A1 to replace 750, later sold
1986 900 Ninja, sold
2003 HD Electra Glide, later sold
78 KZ650 waiting work
97 Concours same
Previous bikes
Brand New 83 KZ750 L3 in 1983! crashed
Brand New KZ700 A1 to replace 750, later sold
1986 900 Ninja, sold
2003 HD Electra Glide, later sold
Please Log in or Create an account to join the conversation.
- TSJ
-
Topic Author
- Away
- User
-
Registered
- Posts: 20
- Thanks: 4
Re: Getting a 1983 KZ750 L3 Back on the Road
Today 17:39
YES!! Rear brake pedal is freed up! Last night I kept going at it with heat, hitting the backside of the lever with a hammer, and it finally moved! But it was still extremely tight. Good thing there's a section on the back that's nice and thick where hitting it with a hammer won't break it, or damage its functionality. But it still required hammer blows to move it in both directions. But I stopped using that method, and went to the vice. That gave me a little back and forth, and then I left it again to soak in PB Blaster overnight.
Today I held the torch on it longer than I had before, figuring if I could get it to swell just a bit, there'd be more room for the Blaster to get to the rust. Which worked great, as I was able to stop using the vice, and work it using the brake pedal instead. I thought the splines were rusted to the point of not allowing it to slide onto the shaft without a few hammer taps, but it turns out my dumbass didn't realize you do have to remove the screw first, not just loosen it! Duh!
Heated really hot, hot enough that I needed a thick rag to even hold it way down on the end of the footpeg bracket, then I went back-and-forth with PB Blaster, work it, then flush out the rust w/ WD40, (a LOT dripped out into my pan) then repeat several times. Gradually it rotated a bit further each time, binding up at the far end of its travel both ways, until it was so free I could rotate with my hand, from stop to stop.
Damn, that feels good to get that problem fixed without breaking anything, or having to buy new parts! Which is partly why I detailed it so thoroughly, haha. (Although in looking around here, I doubt many people are reading this. I guess that's just the deal when you're working on a 43 year-old bike that wasn't all that popular even when it was new. But hey, if anyone does this same project in the future, maybe they'll find this thread, and some part of it will help them out.)
Dumped my oil from the drain pan into my used-oil storage bucket, and it was indeed contaminated with gasoline. I could see just by how it flowed and its color, and the smell. Man I hope the bottom end is ok.
During the limited amount of hand-cranking I did when I checked the valves, it felt fine. But I'm thinking only some of the gas got dumped into the oil during my one-and-only, short ride 9 years ago, and hopefully it wasn't enough, or long enough of a ride to hurt the bearings. I guess I'll know soon enough...
I also cleaned out the timing cavity that had collected some corrosion, and removed the advancer mechanism, took it all apart, and cleaned and lubed it. The oblong rotor part was a little hard to rotate before-hand, but now it moves nice, and the advancers snap right back into place like they should. So once the gasket arrives I can button up that part, and cross it off the list of potential things that could cause the bike to not run right.
This whole project pretty much comes down to 3 things: Age of the old rubber parts, leaving it out in the weather unprotected (man I was SO stupid to do that!), and gasoline left in the tank to wreak havoc.
Next things to do while awaiting more parts: Finish cleaning/de-rusting the tank then reinstall the fuel tap and gauge, finish cleaning the carb bodies, a little more gasket scraping, suck out the gunk from the cylinders that got dislodged during my first step of letting some Marvel Mystery Oil soak in them for a few days, and clean up as best I can the clutch and generator covers. Can't wait to really start putting things back together and fire it up!
Oh, and I'm pretty sure my front brakes are fine, so if all goes according to plan, I WILL take it for a spin, at least around the block, before I deal with the inspection and tags. (I live out in the boonies, so to speak.)
Today I held the torch on it longer than I had before, figuring if I could get it to swell just a bit, there'd be more room for the Blaster to get to the rust. Which worked great, as I was able to stop using the vice, and work it using the brake pedal instead. I thought the splines were rusted to the point of not allowing it to slide onto the shaft without a few hammer taps, but it turns out my dumbass didn't realize you do have to remove the screw first, not just loosen it! Duh!
Heated really hot, hot enough that I needed a thick rag to even hold it way down on the end of the footpeg bracket, then I went back-and-forth with PB Blaster, work it, then flush out the rust w/ WD40, (a LOT dripped out into my pan) then repeat several times. Gradually it rotated a bit further each time, binding up at the far end of its travel both ways, until it was so free I could rotate with my hand, from stop to stop.
Damn, that feels good to get that problem fixed without breaking anything, or having to buy new parts! Which is partly why I detailed it so thoroughly, haha. (Although in looking around here, I doubt many people are reading this. I guess that's just the deal when you're working on a 43 year-old bike that wasn't all that popular even when it was new. But hey, if anyone does this same project in the future, maybe they'll find this thread, and some part of it will help them out.)
Dumped my oil from the drain pan into my used-oil storage bucket, and it was indeed contaminated with gasoline. I could see just by how it flowed and its color, and the smell. Man I hope the bottom end is ok.
During the limited amount of hand-cranking I did when I checked the valves, it felt fine. But I'm thinking only some of the gas got dumped into the oil during my one-and-only, short ride 9 years ago, and hopefully it wasn't enough, or long enough of a ride to hurt the bearings. I guess I'll know soon enough...
I also cleaned out the timing cavity that had collected some corrosion, and removed the advancer mechanism, took it all apart, and cleaned and lubed it. The oblong rotor part was a little hard to rotate before-hand, but now it moves nice, and the advancers snap right back into place like they should. So once the gasket arrives I can button up that part, and cross it off the list of potential things that could cause the bike to not run right.
This whole project pretty much comes down to 3 things: Age of the old rubber parts, leaving it out in the weather unprotected (man I was SO stupid to do that!), and gasoline left in the tank to wreak havoc.
Next things to do while awaiting more parts: Finish cleaning/de-rusting the tank then reinstall the fuel tap and gauge, finish cleaning the carb bodies, a little more gasket scraping, suck out the gunk from the cylinders that got dislodged during my first step of letting some Marvel Mystery Oil soak in them for a few days, and clean up as best I can the clutch and generator covers. Can't wait to really start putting things back together and fire it up!
Oh, and I'm pretty sure my front brakes are fine, so if all goes according to plan, I WILL take it for a spin, at least around the block, before I deal with the inspection and tags. (I live out in the boonies, so to speak.)
83 KZ750 L3 current project
78 KZ650 waiting work
97 Concours same
Previous bikes
Brand New 83 KZ750 L3 in 1983! crashed
Brand New KZ700 A1 to replace 750, later sold
1986 900 Ninja, sold
2003 HD Electra Glide, later sold
78 KZ650 waiting work
97 Concours same
Previous bikes
Brand New 83 KZ750 L3 in 1983! crashed
Brand New KZ700 A1 to replace 750, later sold
1986 900 Ninja, sold
2003 HD Electra Glide, later sold
Please Log in or Create an account to join the conversation.
Moderators: Street Fighter LTD