
1979 KZ650 - Baby Steps to a Running Bike
- CMcAuliffe
-
 Topic Author
- Offline
- User
-

Registered
- Posts: 27
- Thanks: 2
Re: 1979 KZ650 - Baby Steps to a Running Bike
22 Dec 2021 13:26
While still soaking in MMO, I checked the valve clearance in mm:
Exh: .009 - .007 - .008 - .010
Int: .003 - .002 - .003 - .002
The Service Manual states the correct clearance is 0.08 ~ 0.18, so I'm real tight. It looks like I'll be adjusting the valve clearance with the correct shim. I need to identify the current shim on the valve and see if I can get a smaller one, or if I'm looking into the valve seats.
Deeper & deeper I go...
The following user(s) said Thank You: howardhb
Please Log in or Create an account to join the conversation.
- richard-GPZ
-
- Offline
- User
-
Registered
- Posts: 41
- Thanks: 9
Re: 1979 KZ650 - Baby Steps to a Running Bike
23 Dec 2021 08:38
You might want to check your feeler gauge I believe they are in inches.
1983 GPZ-1100 completely stock
1983 Gpz-1100 hot rod build in process
1983 Gpz-1100 hot rod build in process
The following user(s) said Thank You: CMcAuliffe
Please Log in or Create an account to join the conversation.
- CMcAuliffe
-
Topic Author
- Offline
- User
-
Registered
- Posts: 27
- Thanks: 2
Re: 1979 KZ650 - Baby Steps to a Running Bike
23 Dec 2021 09:08
Thanks, Richard. You just saved me wasted time & money and possible engine damage.
My feeler gauge has two numbers - one stacked on top of the other, stacked on "MM." I didn't think through why...
So, to translate:
Exh: .229 - .178 - .203 - .254
Int: .076 - .051 - .076 - .051
The Service Manual states the correct clearance is 0.08 ~ 0.18, so I'm tight on the intake, mostly floppy on the exhaust. It looks like I'll be adjusting the valve clearance with the correct shim. I need to identify the current shim on the valve and see if I can get a smaller one, or if I'm looking into the valve seats. Maybe I'll get a metric-specific feeler gauge first...
Deeper & deeper I go...
Please Log in or Create an account to join the conversation.
- Nessism
-

- Offline
- Sustaining Member
-

Registered
- Posts: 8070
- Thanks: 3454
Re: 1979 KZ650 - Baby Steps to a Running Bike
23 Dec 2021 09:29Are you following the factory manual cam positioning scheme before measuring?Thanks, Richard. You just saved me wasted time & money and possible engine damage.
My feeler gauge has two numbers - one stacked on top of the other, stacked on "MM." I didn't think through why...
So, to translate:
Exh: .229 - .178 - .203 - .254
Int: .076 - .051 - .076 - .051
The Service Manual states the correct clearance is 0.08 ~ 0.18, so I'm tight on the intake, mostly floppy on the exhaust. It looks like I'll be adjusting the valve clearance with the correct shim. I need to identify the current shim on the valve and see if I can get a smaller one, or if I'm looking into the valve seats. Maybe I'll get a metric-specific feeler gauge first...
Deeper & deeper I go...
Ed
Carb O-ring Kits : www.kzrider.com/forum/14-vendor-forum/62...rburetor-o-ring-kits
www.kzrider.com/forum/faq-wiki/618026-new-owner-things-to-know
1981 KZ750E2
www.kzrider.com/forum/11-projects/604901...z750e-project-thread
Carb O-ring Kits : www.kzrider.com/forum/14-vendor-forum/62...rburetor-o-ring-kits
www.kzrider.com/forum/faq-wiki/618026-new-owner-things-to-know
1981 KZ750E2
www.kzrider.com/forum/11-projects/604901...z750e-project-thread
The following user(s) said Thank You: howardhb, Wookie58
Please Log in or Create an account to join the conversation.
- CMcAuliffe
-
Topic Author
- Offline
- User
-
Registered
- Posts: 27
- Thanks: 2
Re: 1979 KZ650 - Baby Steps to a Running Bike
23 Dec 2021 10:19
Yessir.
"T" and "Ex" arrows pointing front & rear. There was an extra arrow that threw me at one point...
"T" and "Ex" arrows pointing front & rear. There was an extra arrow that threw me at one point...
Please Log in or Create an account to join the conversation.
- hardrockminer
-

- Offline
- Sustaining Member
-
Registered
- Posts: 3124
- Thanks: 1232
Re: 1979 KZ650 - Baby Steps to a Running Bike
24 Dec 2021 04:53
The shims are located underneath the tappets, so you will have to pull the cams off in order to remove them. They should have numbers on them, but even when they do I usually mic them to ensure I know the thickness. I'm currently in the middle of setting up my valve clearances and am waiting for a few shims to arrive from Partzilla.
I have several restored bikes along with a 2006 Goldwing with a sidecar.
Please Log in or Create an account to join the conversation.
- Scirocco
-

- Offline
- Premium Member
-

Registered
- Never change a running system
- Posts: 4397
- Thanks: 2260
Re: 1979 KZ650 - Baby Steps to a Running Bike
24 Dec 2021 06:20
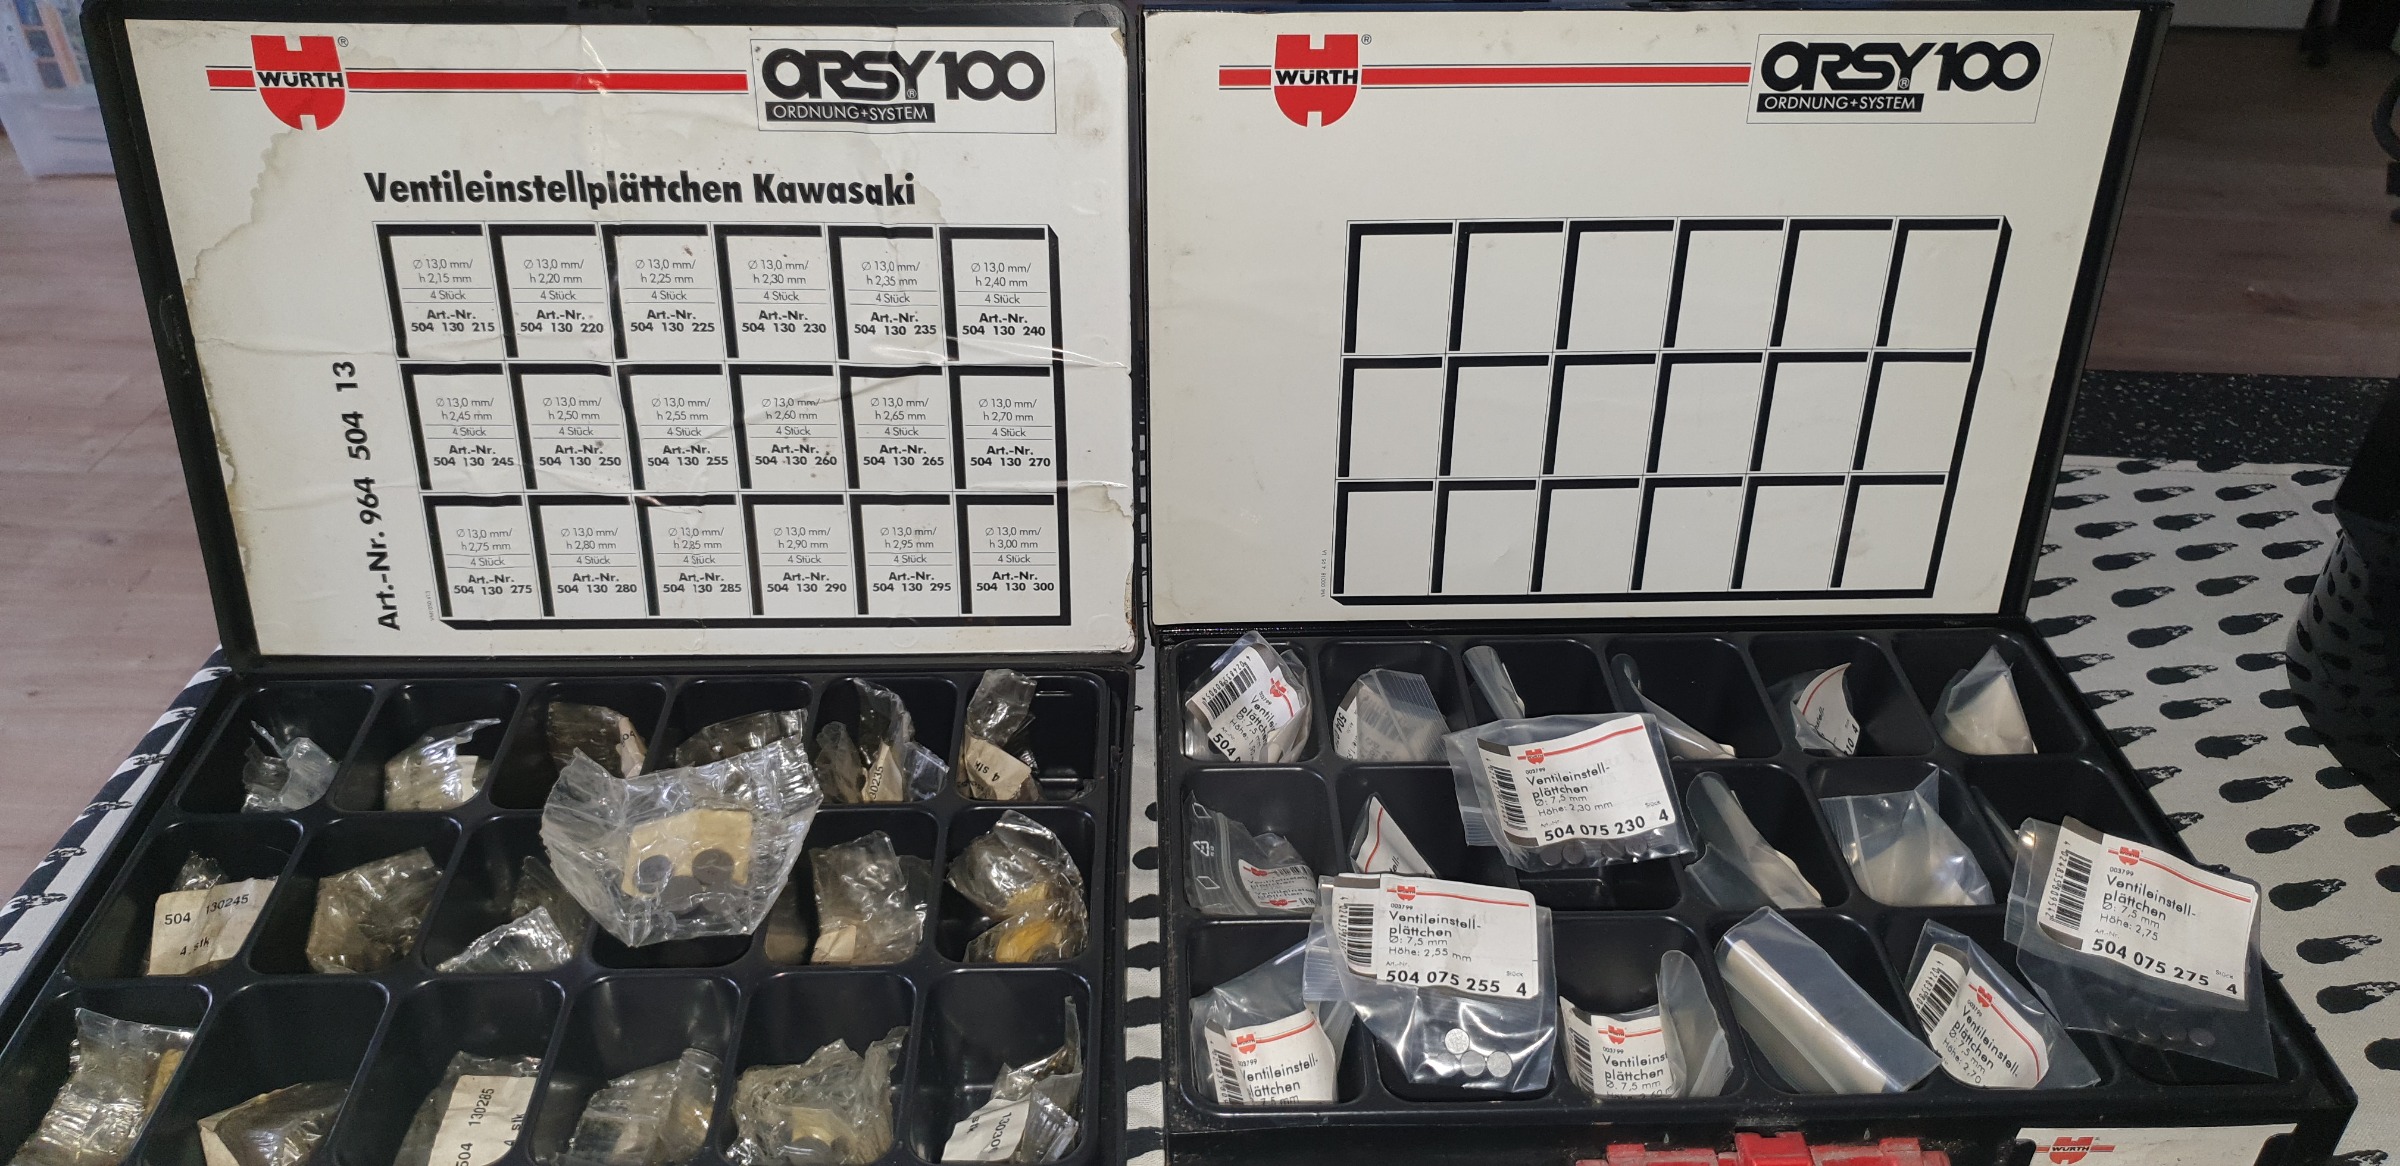
I have had the luck to get two full sets of valve shims (13,0 and 7,5 mm) for 100 Euro. Makes your valve adjustments easy-peasy in no time.

My 1975 Z 1 B 900 Project
www.kzrider.com/forum/11-projects/605133...ears-deep-sleep-mode
www.kzrider.com/forum/11-projects/605133...ears-deep-sleep-mode
Please Log in or Create an account to join the conversation.
- CMcAuliffe
-
Topic Author
- Offline
- User
-
Registered
- Posts: 27
- Thanks: 2
Re: 1979 KZ650 - Baby Steps to a Running Bike
28 Dec 2021 16:54
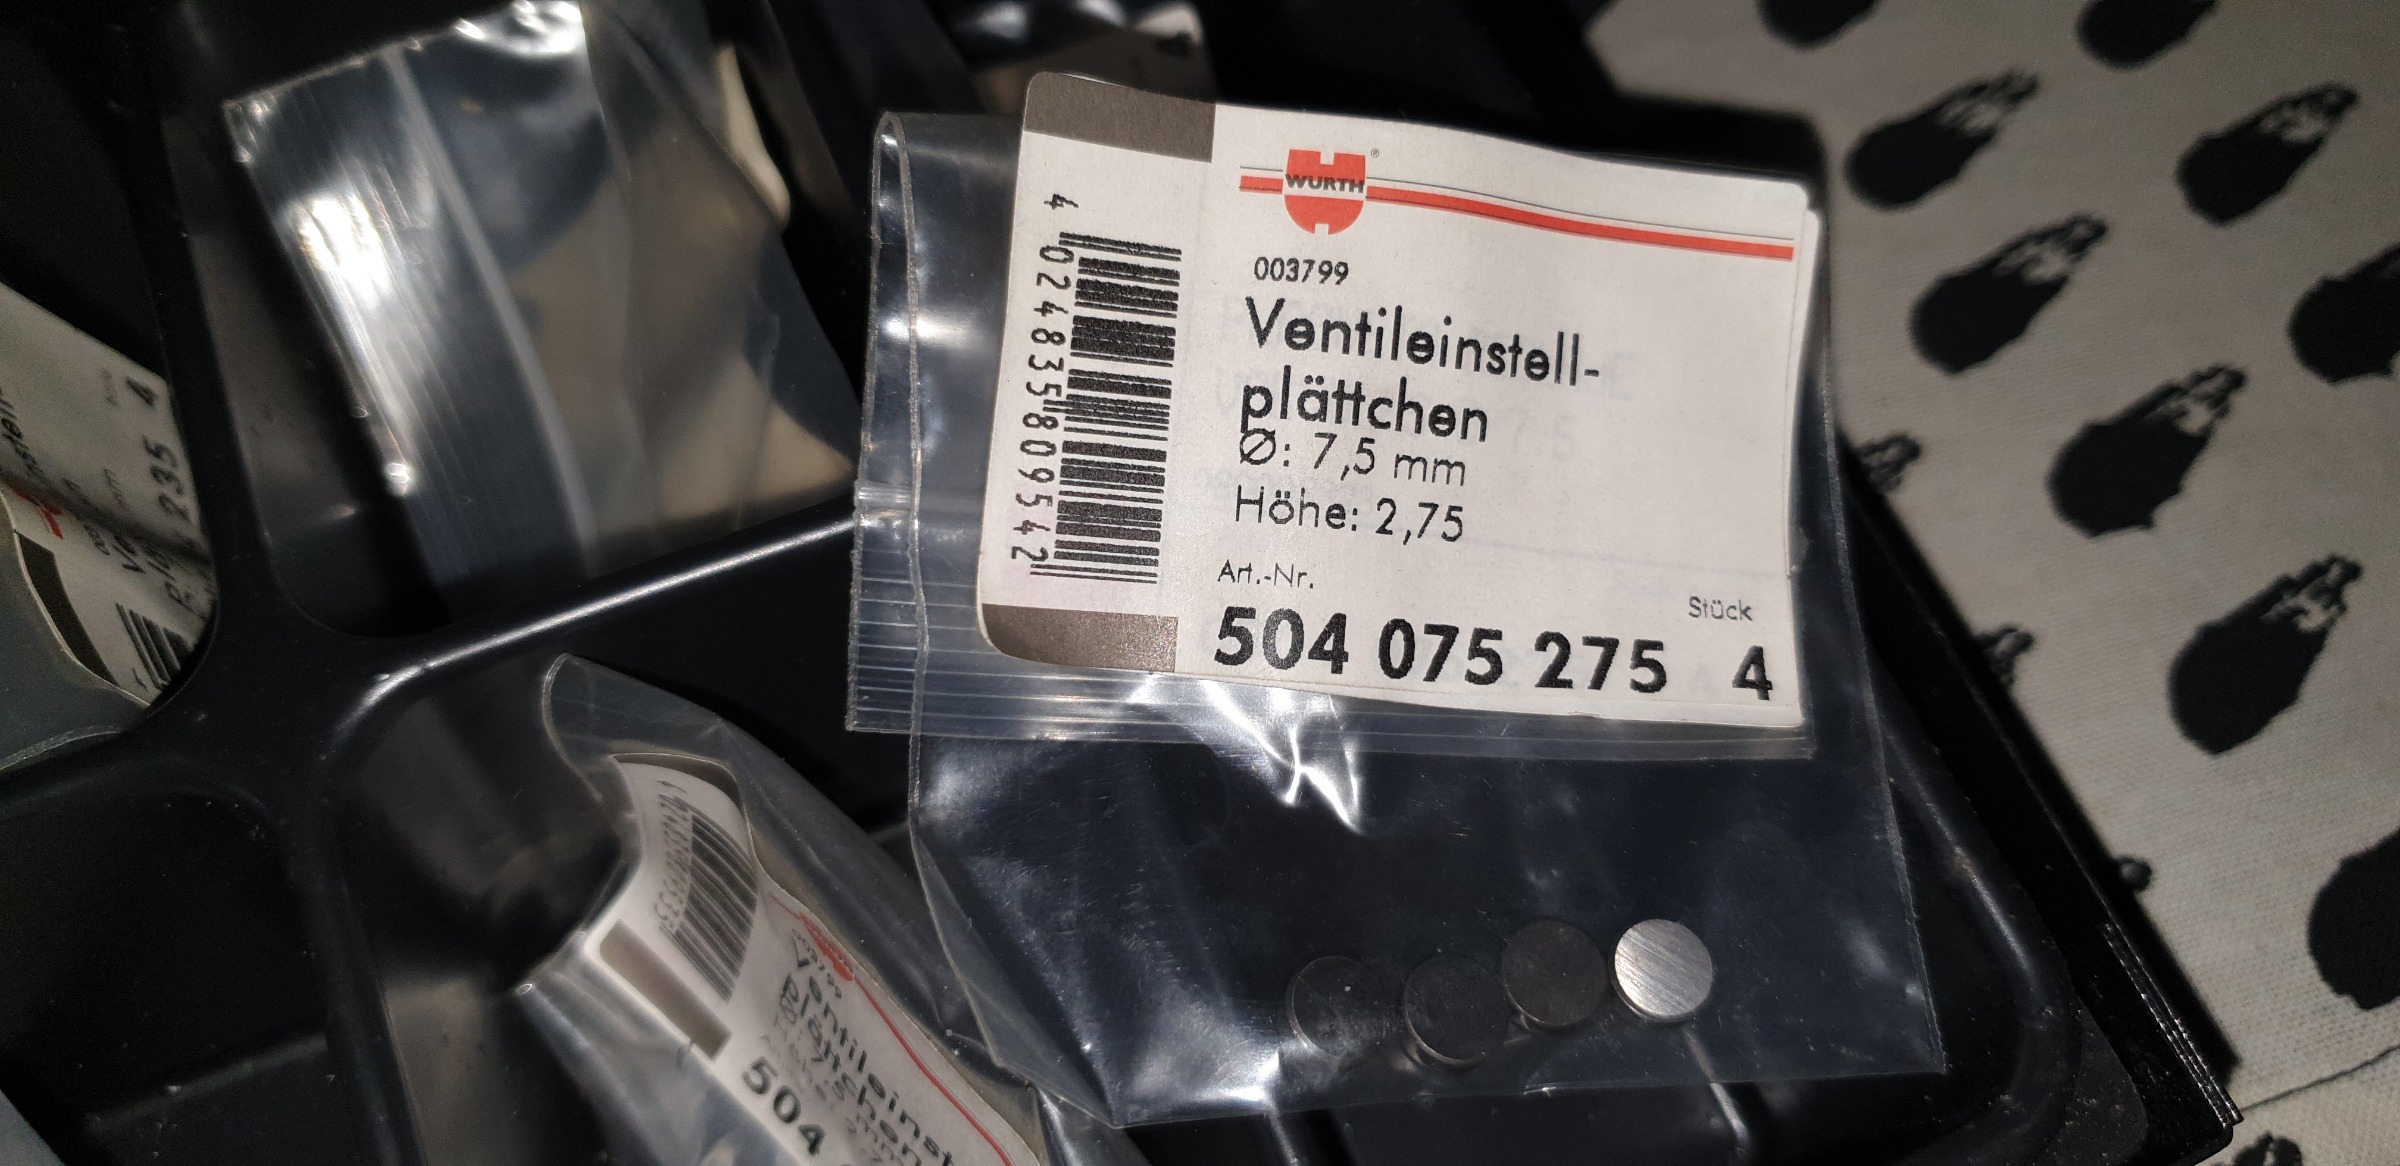
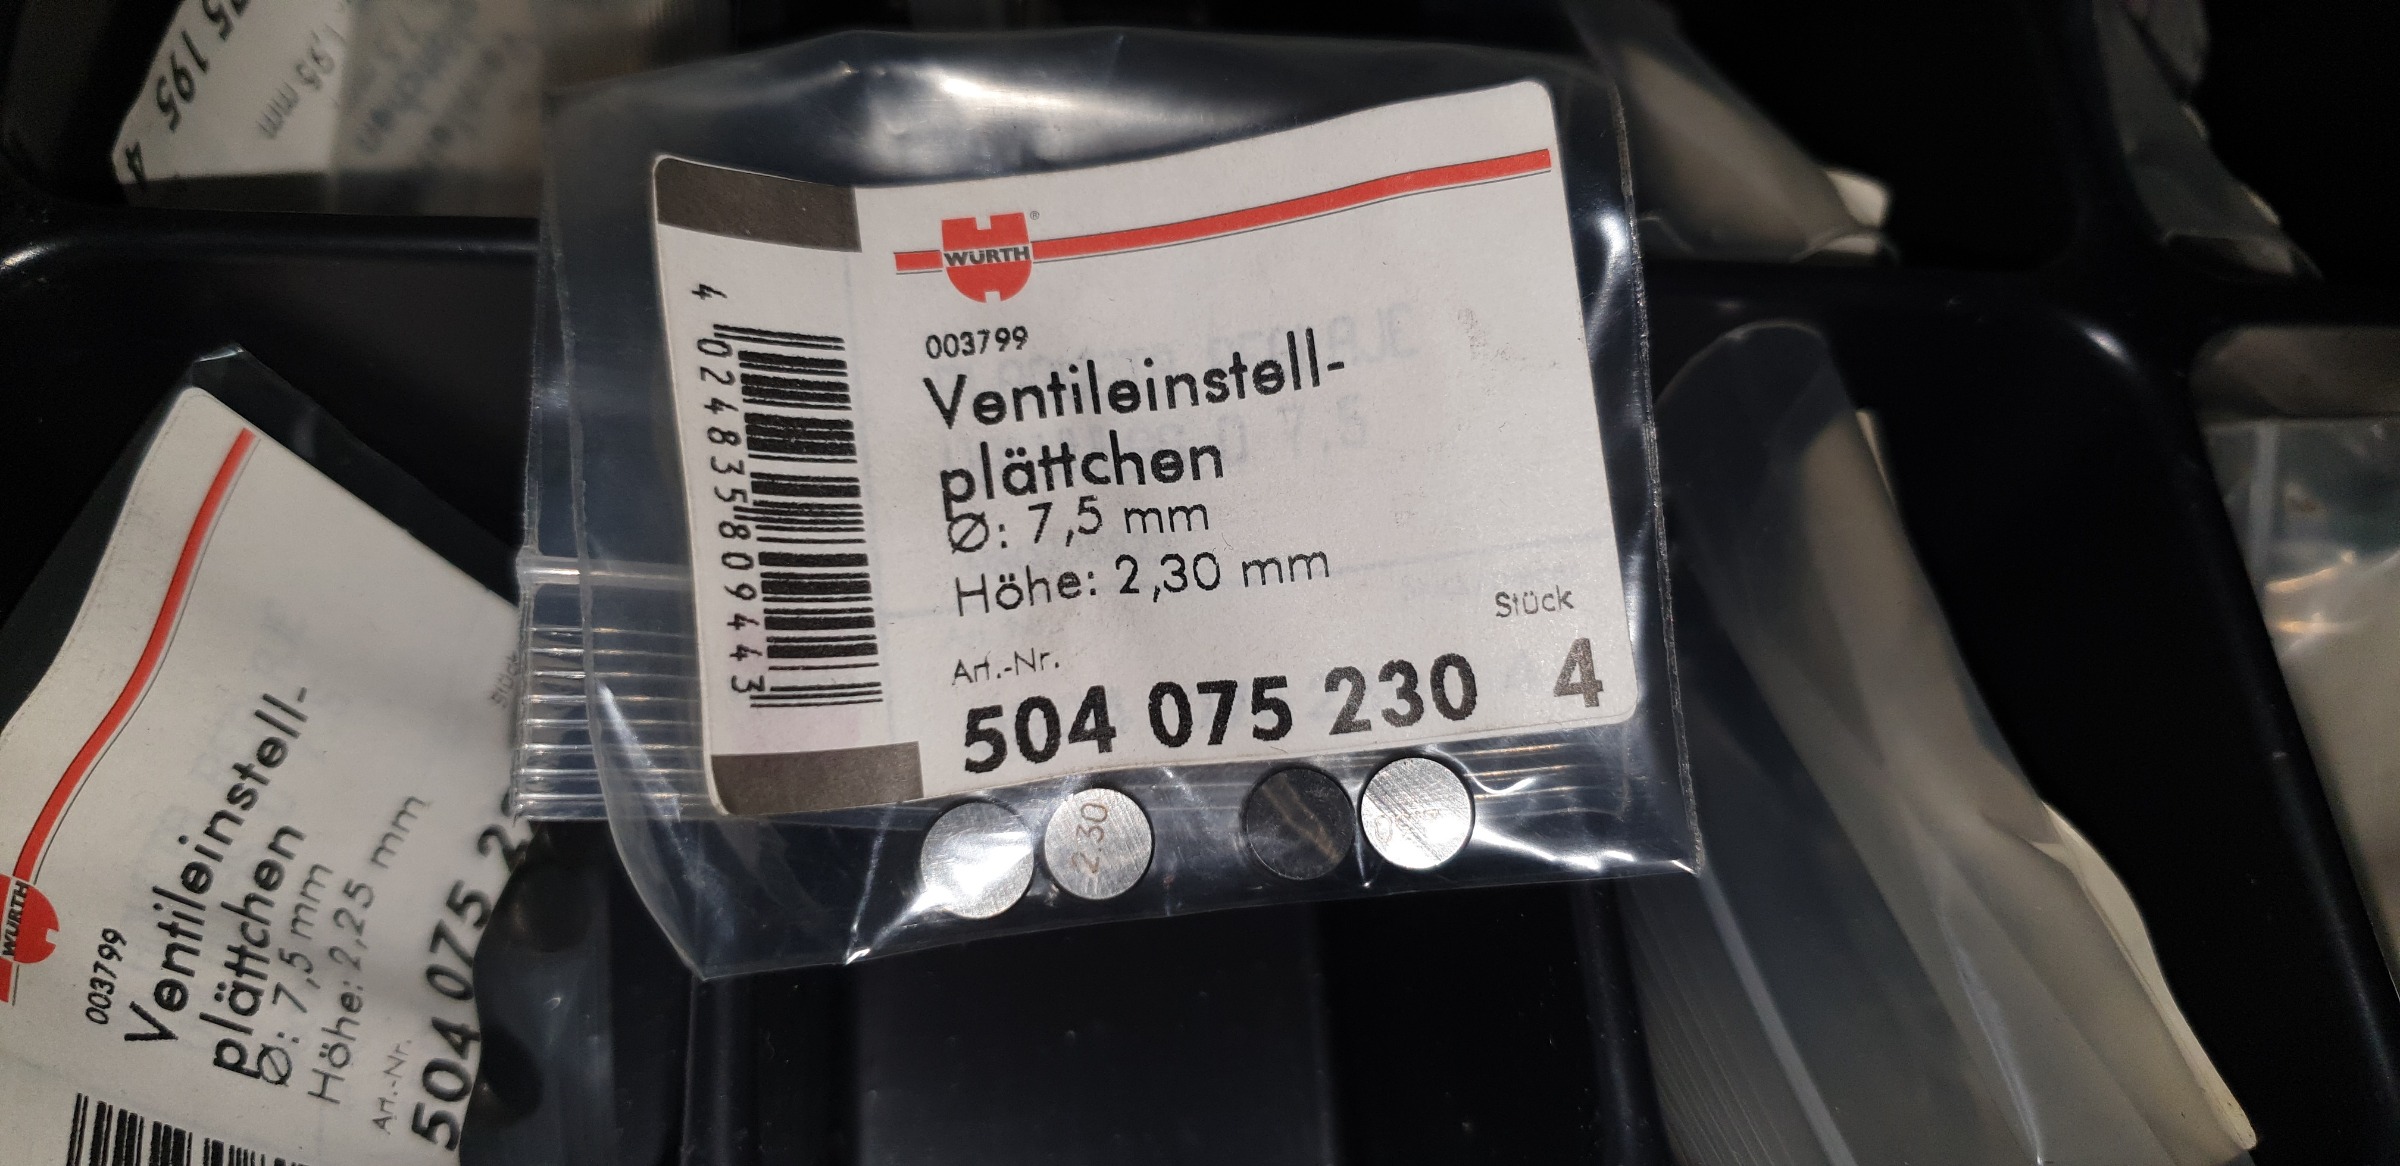
I got the shims out, and measured them as well.
Exh. 1-4 shims: 255, 255, 245, 245 - measured at 2.56, 2.53, 2.45, 2.45
Int. 1-4 shims: 270, 270, 270, 270 - measured at 2.68, 2.71, 2.71, 2.70
Measuring seemed harder than it should have been. There's a visible wear spot on the shim where it contacts the valve. It's visible only in that it's a circular spot. I cannot tell on visual inspection that the shim is dished at all. I tried to account for this by using a Lego with the stud in the spot (zeroing out the caliper on the Lego and then measuring the Lego & the shim). However, every time I used the Lego, I came out .02mm more than if I just put the calipers across the shim (disregarding the spot & possible dish).
I remeasured the valve clearance using another set of feeler gauges prior to going after the shims. Between the two sets I have, I came up with the following numbers:
Exh. 1-4 Valves: .20, .18, .30, .25
Int. 1-4 Valves: .07, .05, .07, .06
I suppose the next step is to order up the shims according to the chart in the service manual (page 16!), then turn my attention to the carbs. The plan thus far is to reassemble the top end, reattach the carbs (with new rubbers to the engine), see if she runs, and if I can get compression back. I'll see where I go from there.
I appreciate your input. Thank you.
Please Log in or Create an account to join the conversation.
- blipco
-

- Offline
- User
-
Registered
- 2002 KZ1000P
- Posts: 556
- Thanks: 212
Re: 1979 KZ650 - Baby Steps to a Running Bike
28 Dec 2021 19:48
The best thing I ever did was buy a METRIC feeler gauge set. No more complicated math that would cause even Einstein to pick another profession.
After the adjustment, if the engine runs strong with no burning oil or bad noises, don't bother with another compression check for at least a year. Only then, if the engine continues to run right, still don't bother unless you feel like tearing into it.
Sometimes you just don't want to know.
After the adjustment, if the engine runs strong with no burning oil or bad noises, don't bother with another compression check for at least a year. Only then, if the engine continues to run right, still don't bother unless you feel like tearing into it.
Sometimes you just don't want to know.
"Swim against the current, even a dead fish can go with the flow"-somebody (I forget Who)
Please Log in or Create an account to join the conversation.
- ckahleer
-
- Offline
- User
-
Registered
- Posts: 528
- Thanks: 185
Re: 1979 KZ650 - Baby Steps to a Running Bike
29 Dec 2021 09:21 - 29 Dec 2021 09:30
Sometimes valves will not seat fully if the engine has been sitting awhile. Since you have at least some clearance on all the valves, I would run the bike for 100 miles or so, then recheck clearances. Similar to the low compression advice. I know it would be easier to do it now, but you may be redoing it in a hundred miles anyway.
Whenever I pick up a non running bike, I do the bare minimum to get it ridable. Then after a good "break in" comes the real work of getting everything right.
Whenever I pick up a non running bike, I do the bare minimum to get it ridable. Then after a good "break in" comes the real work of getting everything right.
1997 ZL600
94 KE100
82 KZ305
74 TC185
94 KE100
82 KZ305
74 TC185
Last edit: 29 Dec 2021 09:30 by ckahleer.
Please Log in or Create an account to join the conversation.
- CMcAuliffe
-
Topic Author
- Offline
- User
-
Registered
- Posts: 27
- Thanks: 2
Re: 1979 KZ650 - Baby Steps to a Running Bike
29 Dec 2021 12:11
It's unknown when the bike last ran. I suppose from here, I should go through the carbs/fuel system, button up the valve train as is, then try to get it started.
If it runs without sounding like hells bells, I'll put some miles on it before I delve into it further. If, on start up, it sounds like the valve train is rattling itself to pieces, I'll look more into the valve train.
Thanks.
If it runs without sounding like hells bells, I'll put some miles on it before I delve into it further. If, on start up, it sounds like the valve train is rattling itself to pieces, I'll look more into the valve train.
Thanks.
Please Log in or Create an account to join the conversation.
- CMcAuliffe
-
Topic Author
- Offline
- User
-
Registered
- Posts: 27
- Thanks: 2
Re: 1979 KZ650 - Baby Steps to a Running Bike
11 Dec 2023 15:53
Wow. Time flies.
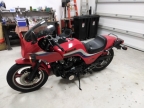
On October 30th, she fired up.
It likes to burp out of carbs 1 & 4 at higher RPMs, but only revving. It's getting cold in the northeast, so putting some miles on it may have to wait.
But, it's a runner!
On October 30th, she fired up.
It likes to burp out of carbs 1 & 4 at higher RPMs, but only revving. It's getting cold in the northeast, so putting some miles on it may have to wait.
But, it's a runner!
The following user(s) said Thank You: howardhb
Please Log in or Create an account to join the conversation.
Moderators: Street Fighter LTD