
'77 KZ-1000A1 Refurbishment, Not Restoration
- z1kzonly
-

- Offline
- User
-

Registered
- Sustaining Member
- Posts: 2818
- Thanks: 526
Re: '77 KZ-1000A1 Refurbishment, Not Restoration
23 Jan 2020 13:02
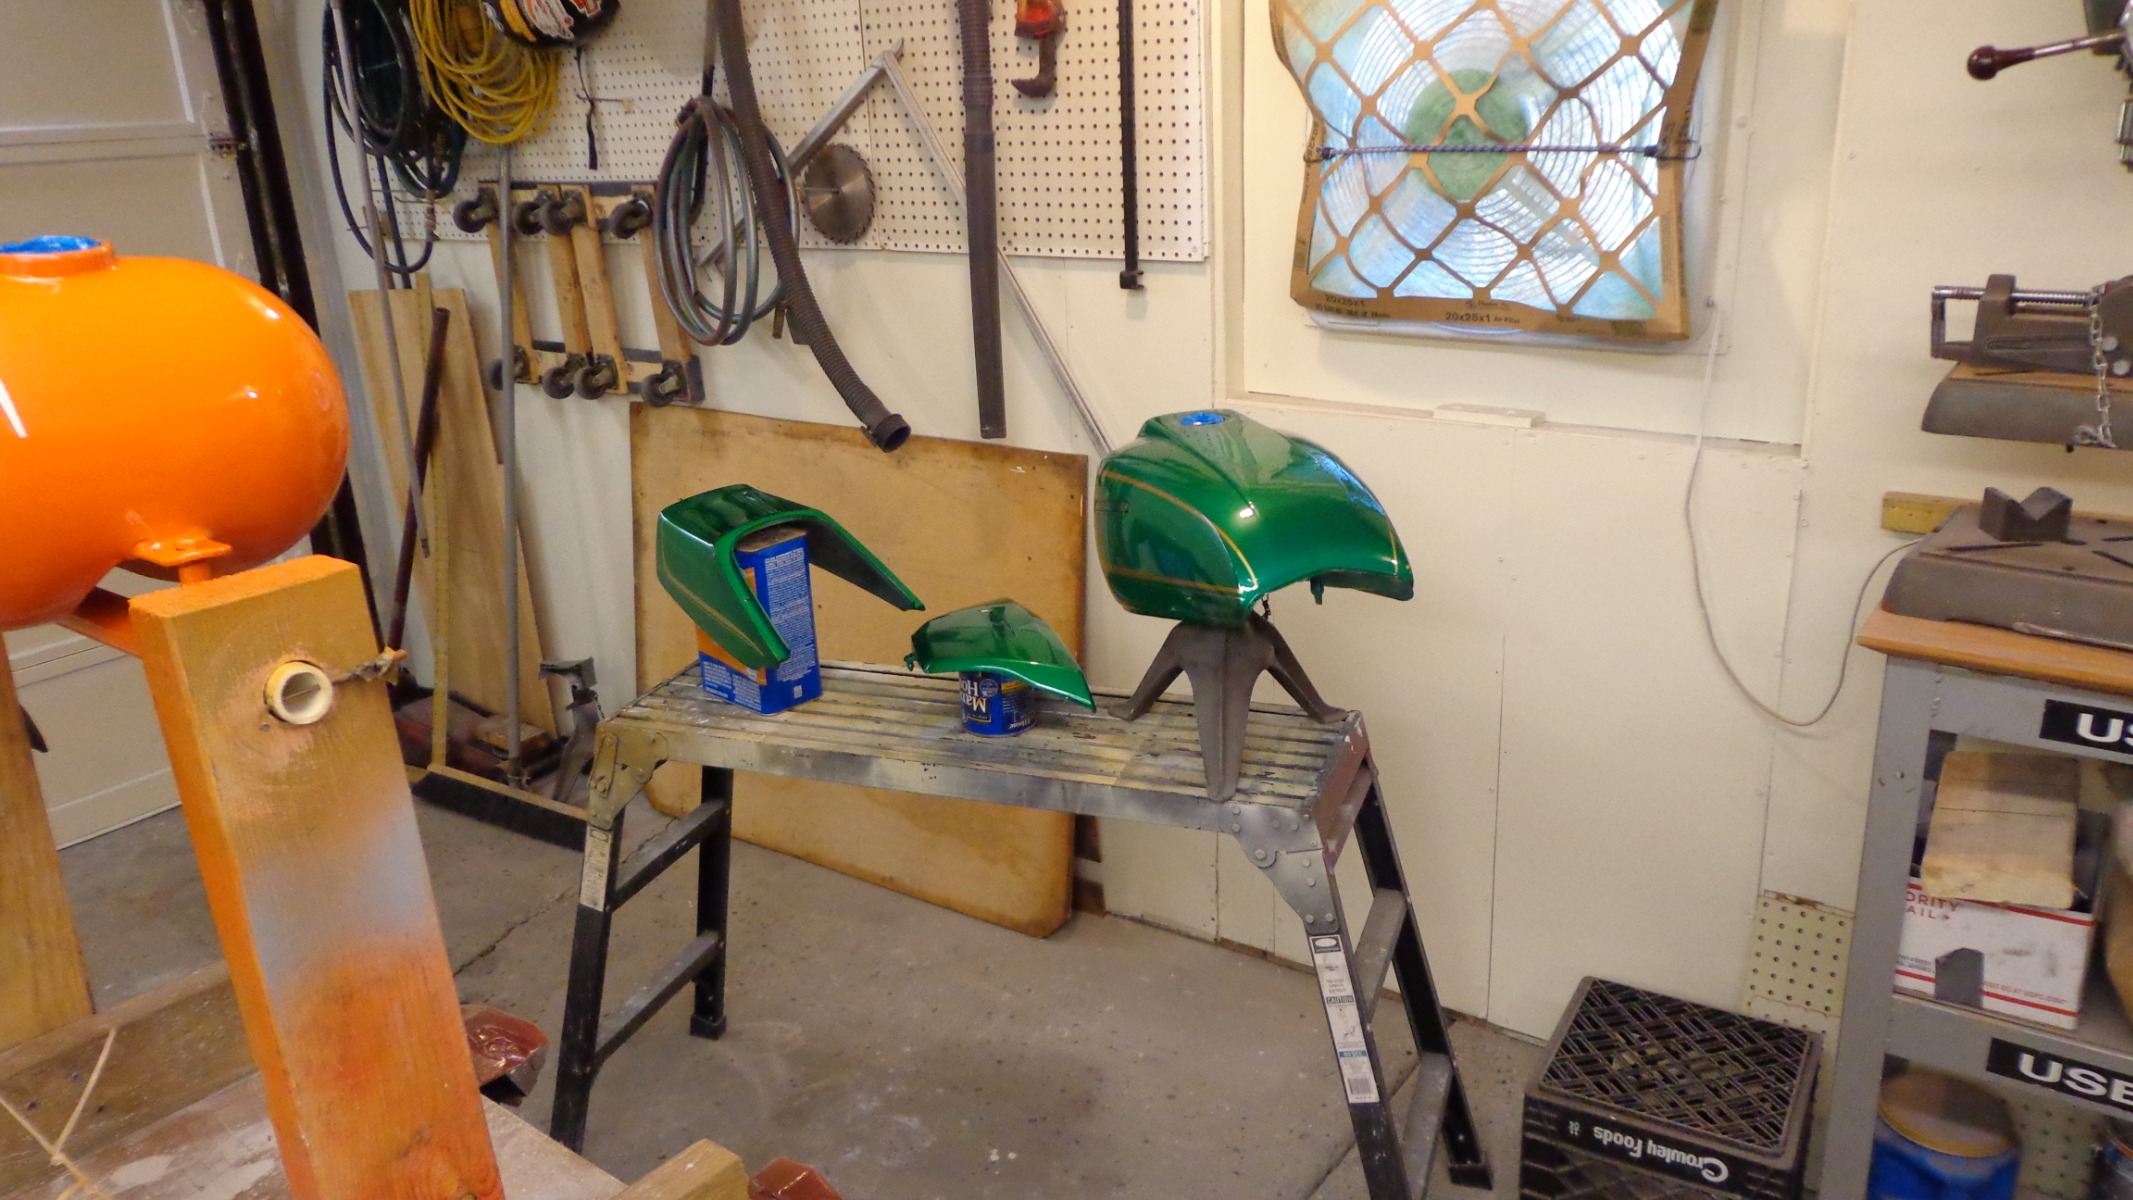
Very Nice Job!! I like the save with the paint. I have done this also with a smaller Kaw, The guy could not believe it! He thought I re-painted the whole job! But Nice save! Make sure you show it off at your local summer cruise nights!
I did not have pics of it. But I was taking the Harley peanut tank pics, And the kaw was there also .
I did not have pics of it. But I was taking the Harley peanut tank pics, And the kaw was there also .
Livin in "CheektaVegas, NY
Went thru 25 of these in 40 yrs.
I SOLD OUT! THE KAW BARN IS EMPTY.
More room for The Old Girl, Harley 75 FLH Electra Glide,
Old faithful! Points ign. Bendix Orig. carb.
Starts everytime!
Went thru 25 of these in 40 yrs.
I SOLD OUT! THE KAW BARN IS EMPTY.
More room for The Old Girl, Harley 75 FLH Electra Glide,
Old faithful! Points ign. Bendix Orig. carb.
Starts everytime!
Please Log in or Create an account to join the conversation.
- Rick H.
-
 Topic Author
- Offline
- User
-
Registered
- Posts: 840
- Thanks: 241
Re: '77 KZ-1000A1 Refurbishment, Not Restoration
23 Jan 2020 15:28
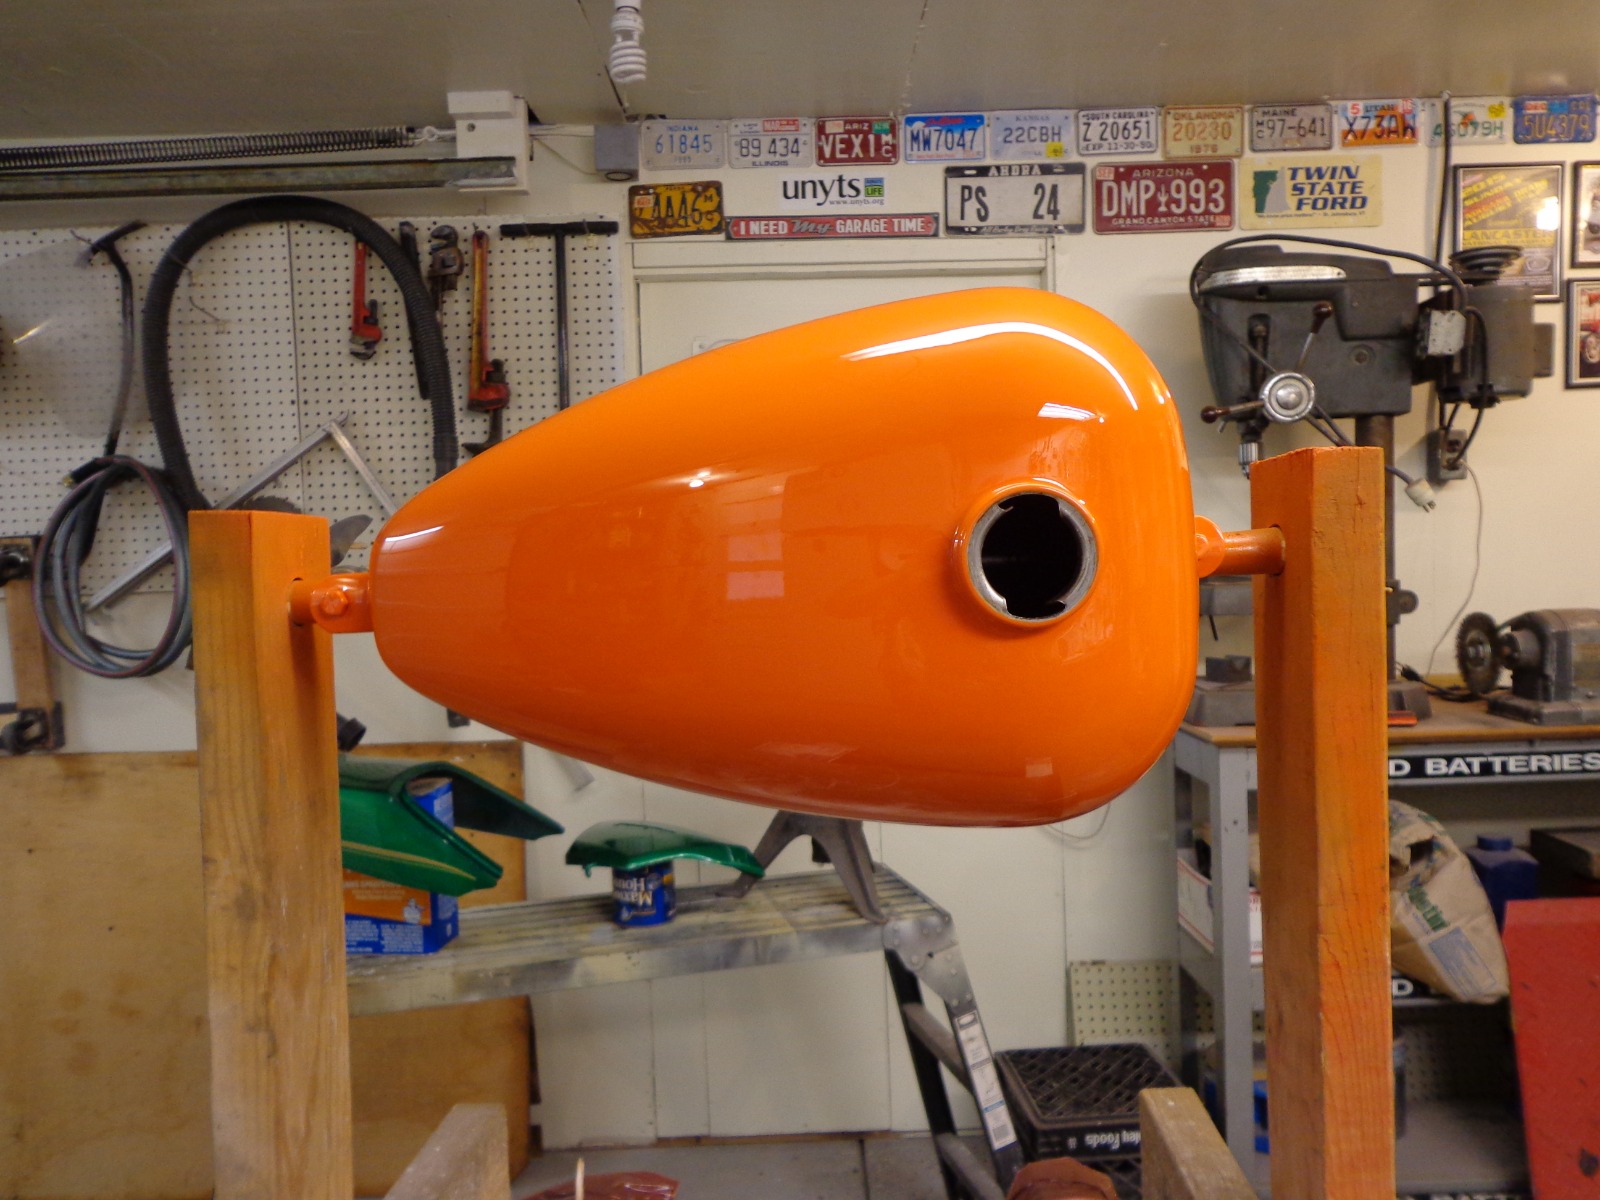
Funny in a way, at one time I didn't care at all for the Kawasaki green color, but lately I like it a lot.....
Rick H.
Rick H.
Rick H.
1977 Kawasaki KZ-1000A1
1977 Kawasaki KZ-1000A1
Please Log in or Create an account to join the conversation.
- hardrockminer
-

- Offline
- Sustaining Member
-

Registered
- Posts: 3118
- Thanks: 1230
Re: '77 KZ-1000A1 Refurbishment, Not Restoration
23 Jan 2020 20:04
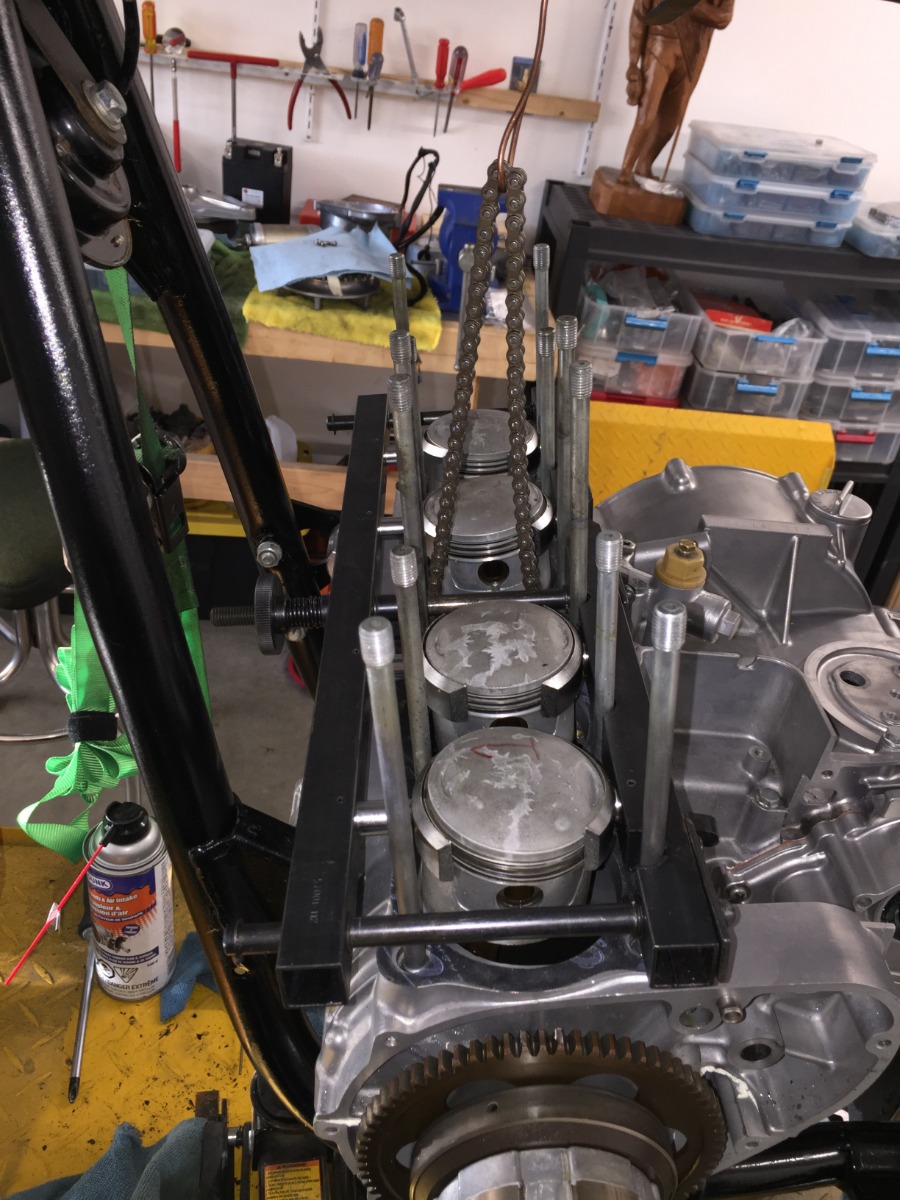
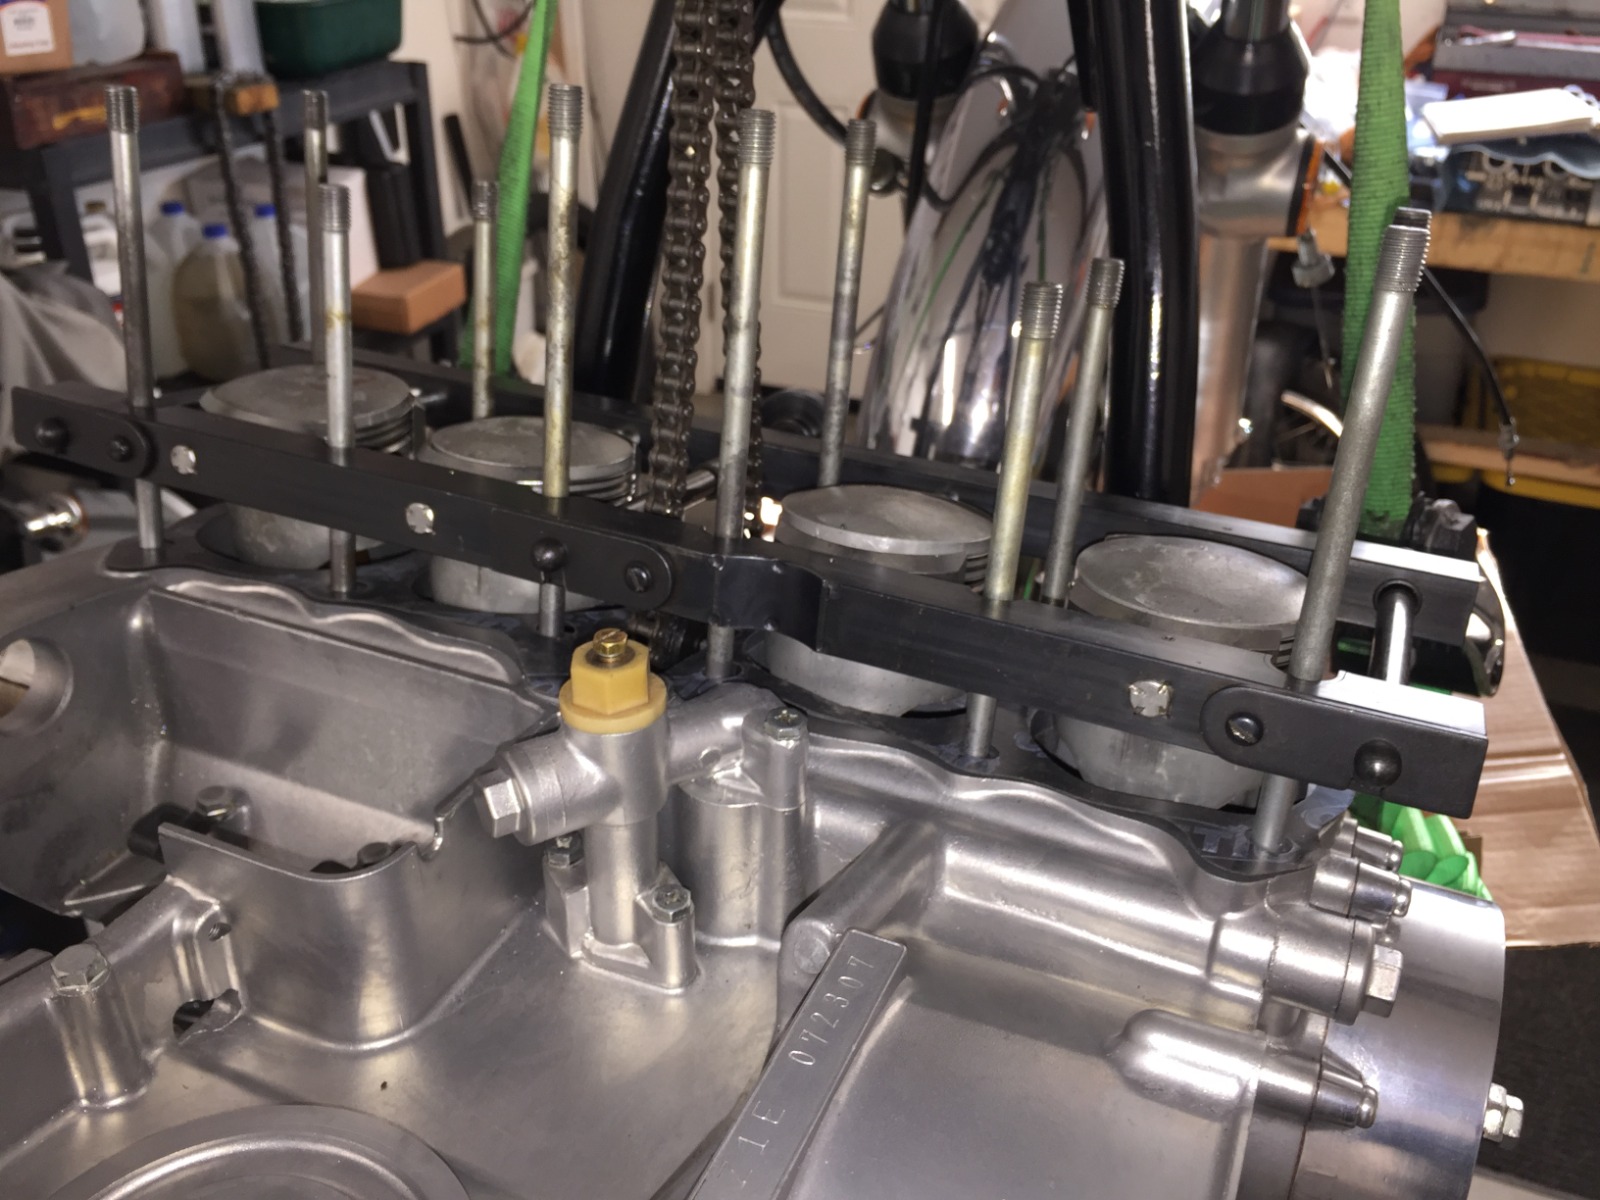
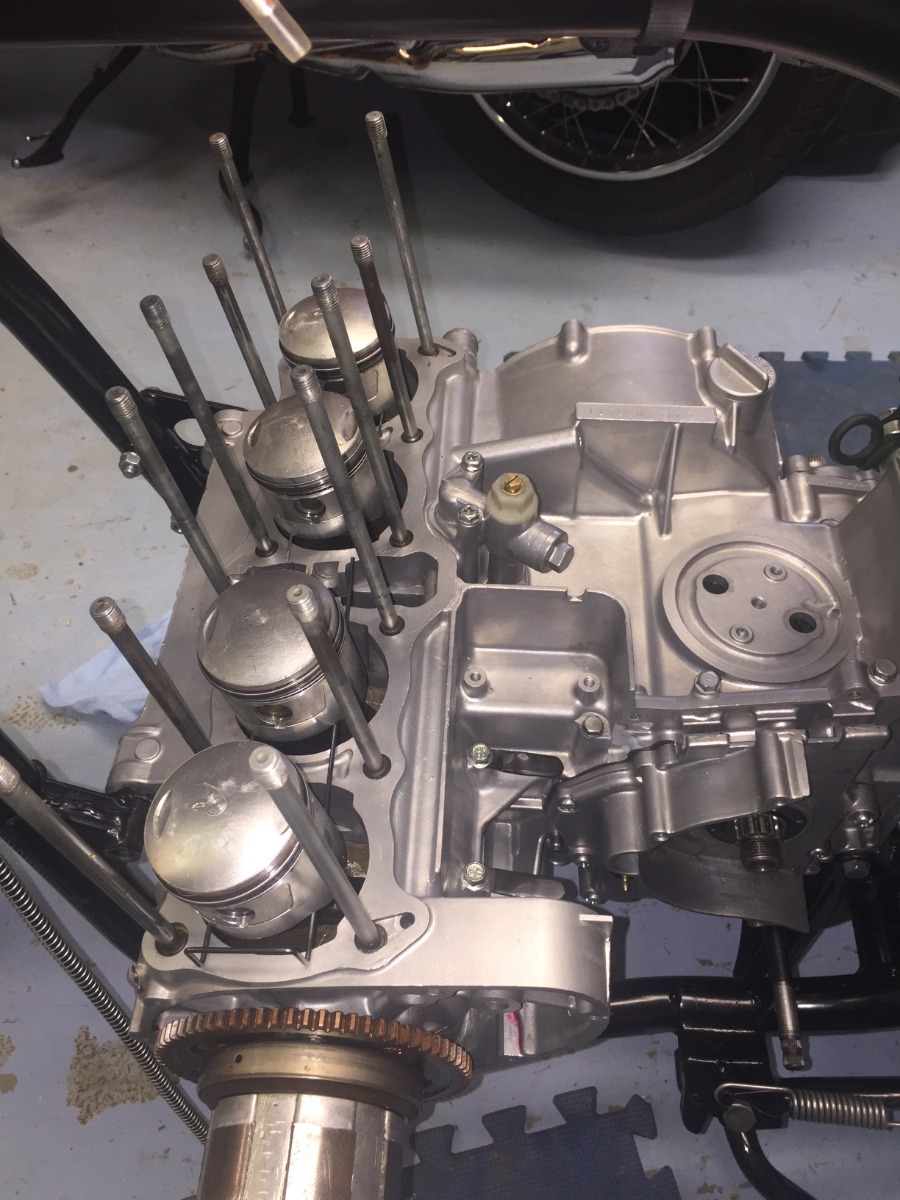
The piston installing tool works very well, but you need a different one for a 1000 vs a 900 due to the different piston size. It takes a few minutes to set up but it only takes a few seconds to drop the cylinders onto the pistons. Attached photos show one I did last week. Notice that I did not have the wires under the pistons when I took the photos but they are necessary to hold the pistons upright before sliding the cylinders on.
I have several restored bikes along with a 2006 Goldwing with a sidecar.
The following user(s) said Thank You: Rick H.
Please Log in or Create an account to join the conversation.
- Rick H.
-
Topic Author
- Offline
- User
-
Registered
- Posts: 840
- Thanks: 241
Re: '77 KZ-1000A1 Refurbishment, Not Restoration
24 Jan 2020 06:31
Thanks for the pictures. Thinking back on my decision making process at the point of installing the pistons one of the issues was that I didn't have the original support wires and was trying to figure out what to use in their place. The skirt on the bottom of the Weisco pistons was also different than the stock pistons and like I said I didn't want to damage the new pistons messing around with something I didn't fully comprehend. It's not an excuse, but I was also working on this project in between other job assignments I had so time was a real concern for me. If there's a "next time" perhaps I will try to use something like brazing rod to sneak under the pistons and hold them in place. The tool I have is for the 1000 cc pistons. I did learn that a good chamfer placed around the bottom of the cylinder sleeves is critical for easy piston installation.
Rick H.
Rick H.
Rick H.
1977 Kawasaki KZ-1000A1
1977 Kawasaki KZ-1000A1
Please Log in or Create an account to join the conversation.
- hardrockminer
-
- Offline
- Sustaining Member
-
Registered
- Posts: 3118
- Thanks: 1230
Re: '77 KZ-1000A1 Refurbishment, Not Restoration
24 Jan 2020 08:54 - 24 Jan 2020 08:57
I didn't have the original wires either, so I made a couple out of coat hangers. The wires a a bit thicker but still fit under the piston skirts. If the Weisco piston skirts are longer than stock the wire might not fit. And if they are shorter then you might need a thicker support.
I have a set of 1015 cc cylinders that were bored out from 903 cc and the bottom taper is almost all bored out, making it difficult to install the cylinders on pistons. This was one reason why I set them aside and bought a good used set of 903's off ebay for another project I did.
I have a set of 1015 cc cylinders that were bored out from 903 cc and the bottom taper is almost all bored out, making it difficult to install the cylinders on pistons. This was one reason why I set them aside and bought a good used set of 903's off ebay for another project I did.
I have several restored bikes along with a 2006 Goldwing with a sidecar.
Last edit: 24 Jan 2020 08:57 by hardrockminer.
Please Log in or Create an account to join the conversation.
- 650ed
-

- Offline
- User
-
Registered
- Posts: 15334
- Thanks: 2830
Re: '77 KZ-1000A1 Refurbishment, Not Restoration
24 Jan 2020 09:34
It makes me wonder what do folks do with the original wires? I have Kawasaki tool for the KZ650 that I bought used and the wires are missing from it. How hard would it be for the original tool owner to keep the wires with the tool? Ed
1977 KZ650-C1 Original Owner - Stock (with additional invisible FIAMM horn)
Please Log in or Create an account to join the conversation.
- Rick H.
-
Topic Author
- Offline
- User
-
Registered
- Posts: 840
- Thanks: 241
Re: '77 KZ-1000A1 Refurbishment, Not Restoration
24 Jan 2020 15:44650ed wrote: It makes me wonder what do folks do with the original wires? I have Kawasaki tool for the KZ650 that I bought used and the wires are missing from it. How hard would it be for the original tool owner to keep the wires with the tool? Ed
Probably kept the wires for the outdoor grill! When I took my cylinders in to be bored out I specifically asked about making sure there was a really good chamfer on the bottom of the sleeves. When I got them back the chamfer was impeccable to my eyes and worked really well at piston install time. The chamfer was distinct and extremely smooth.
For Hardrockminer: does the Kawasaki tool stand off the block when you use it, or lay on the block?
Rick H.
Rick H.
1977 Kawasaki KZ-1000A1
1977 Kawasaki KZ-1000A1
Please Log in or Create an account to join the conversation.
- hardrockminer
-
- Offline
- Sustaining Member
-
Registered
- Posts: 3118
- Thanks: 1230
Re: '77 KZ-1000A1 Refurbishment, Not Restoration
24 Jan 2020 17:01 - 24 Jan 2020 17:04
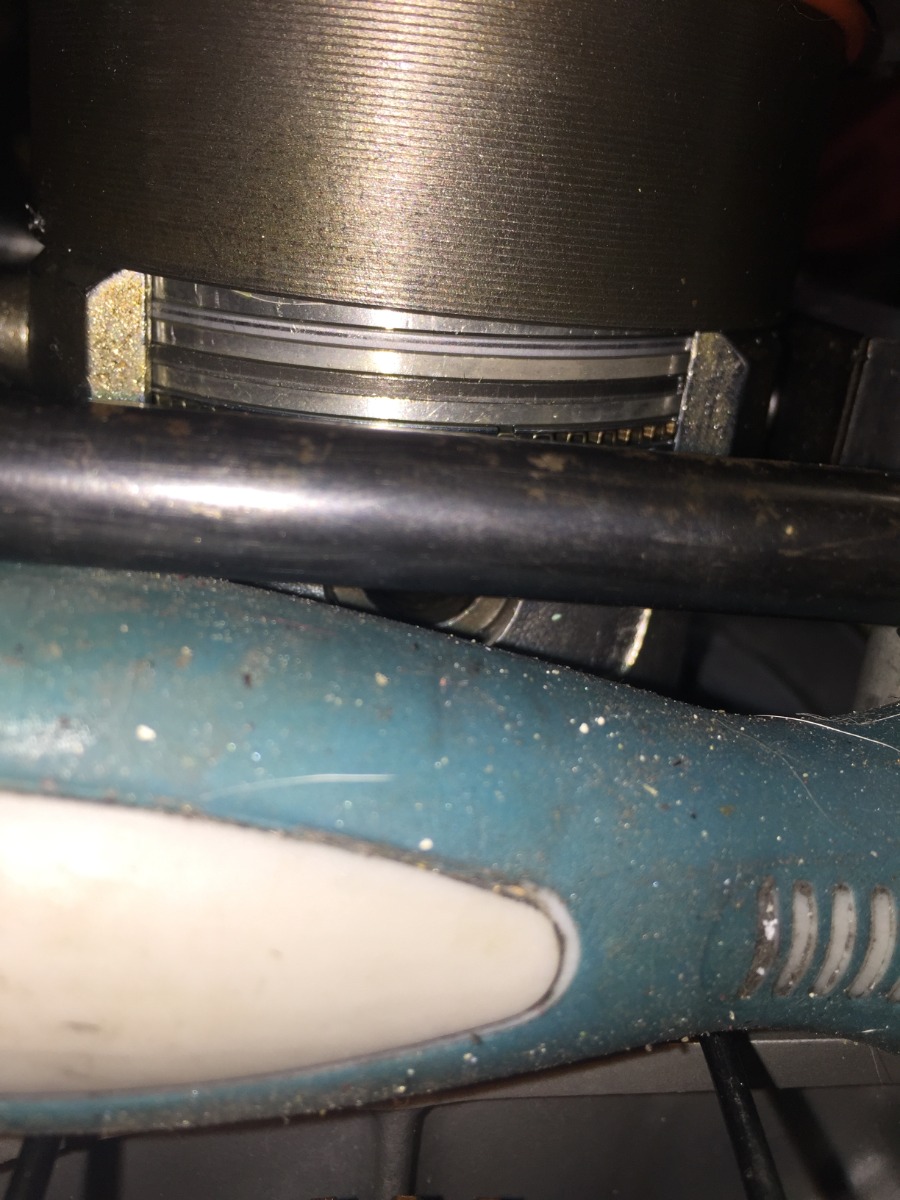
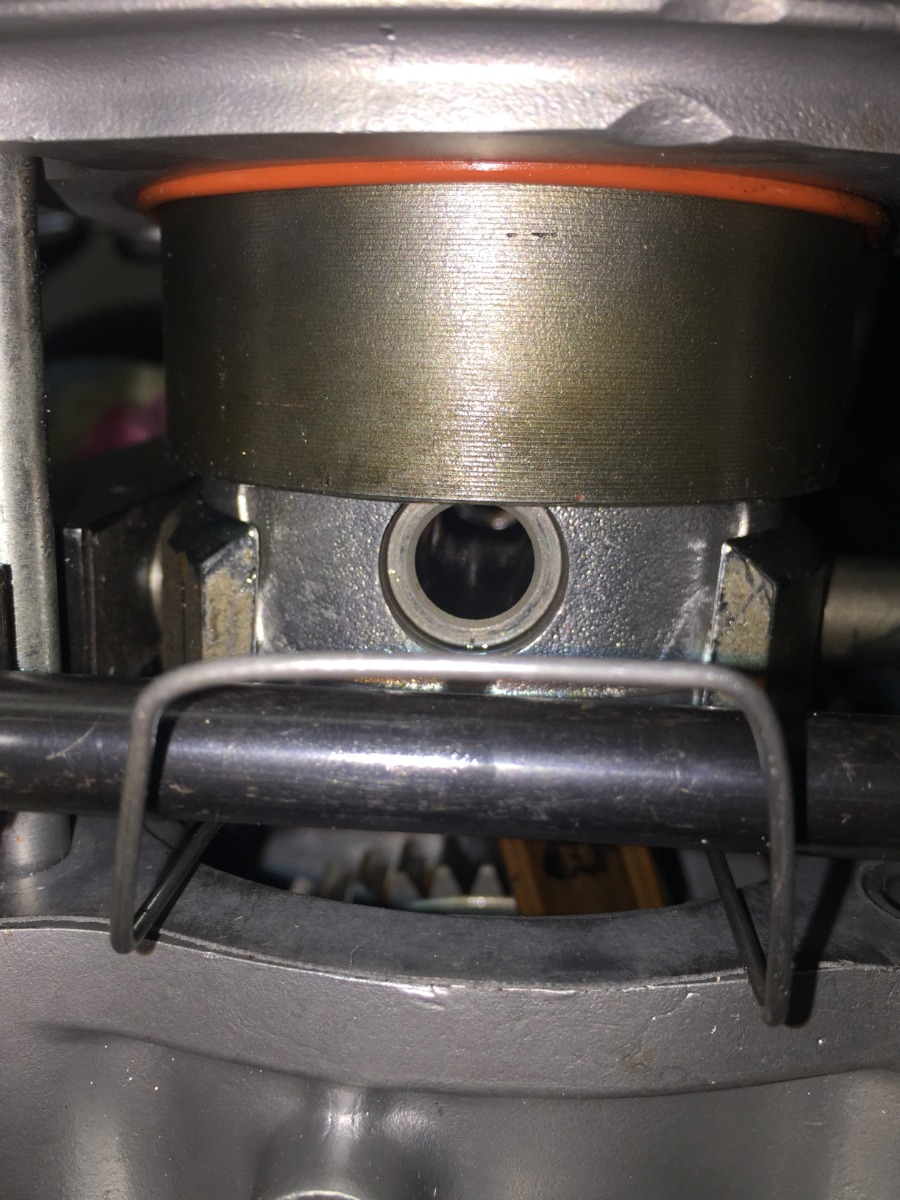
The tool has to fit around the rings and compress them into their grooves, so the tool sits above the block when you install it. It's a bit tricky for one person to install it because it needs to be level from side to side and from front to back before you tighten it on the rings. A second person is perfect to hold one side while you hold the other and tighten things up. It needs to be tight enough to stay in place but also loose enough to slide downwards when the cylinder tapers drop onto the tool reverse tapers. When the rings are finally covered you can remove the tool. The tool is designed to fit in behind the oil bypass but I would advise not installing the bypass (or the cam chain tensioner) until the cylinders are installed. Makes it easier to pull the tool off.
Here are a series of photos of another engine I did last year. This tool was borrowed from a friend, and the wires were still in the case. You can see them in the photos.
Wires are under the pistons but the gasket is not yet installed. I find it easier to install the gasket with all the pistons sitting upright. I put the gasket on, removed the wires and then re-installed them over top of the gasket.
Gasket is now installed.
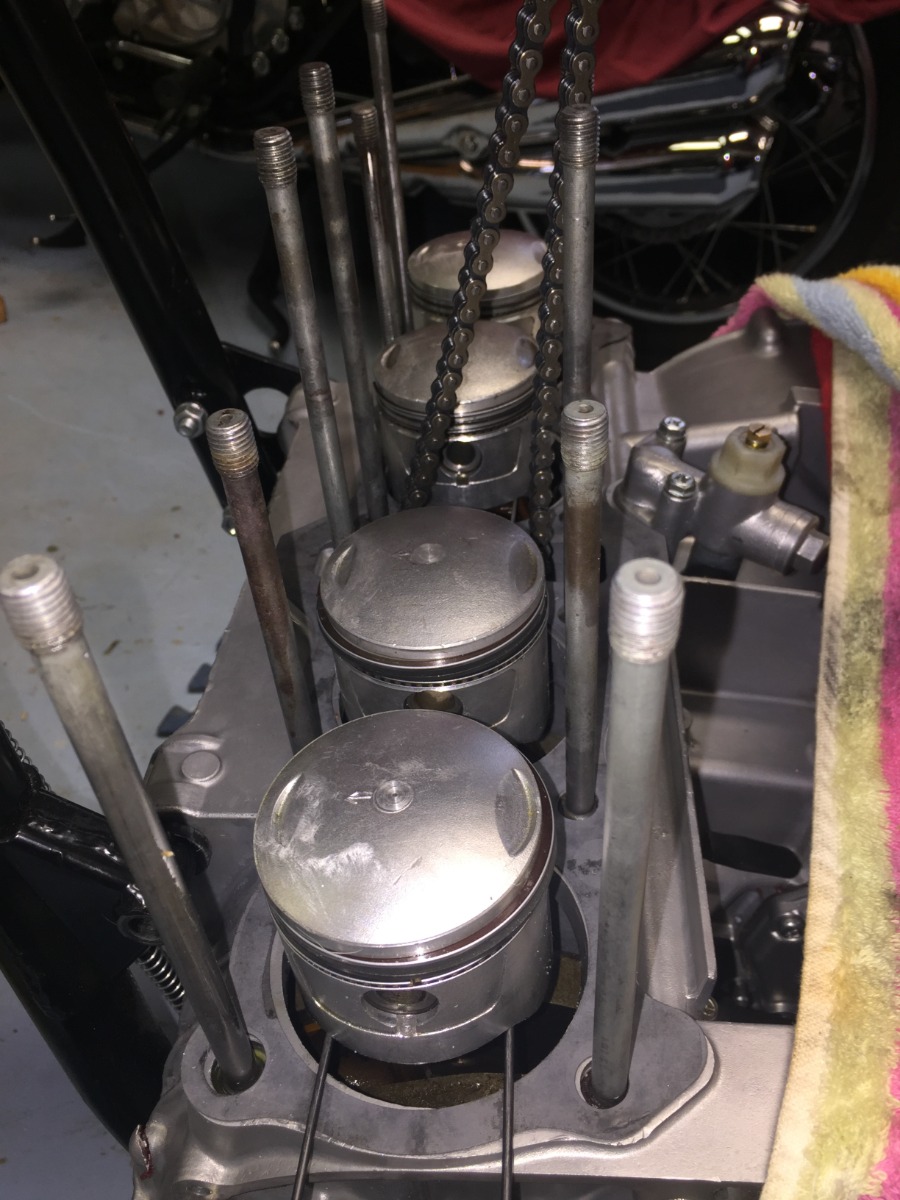
Here you can see one end of the wire over top of the gasket and one underneath. You need to be careful when putting the wire in that you don't tear the gasket.
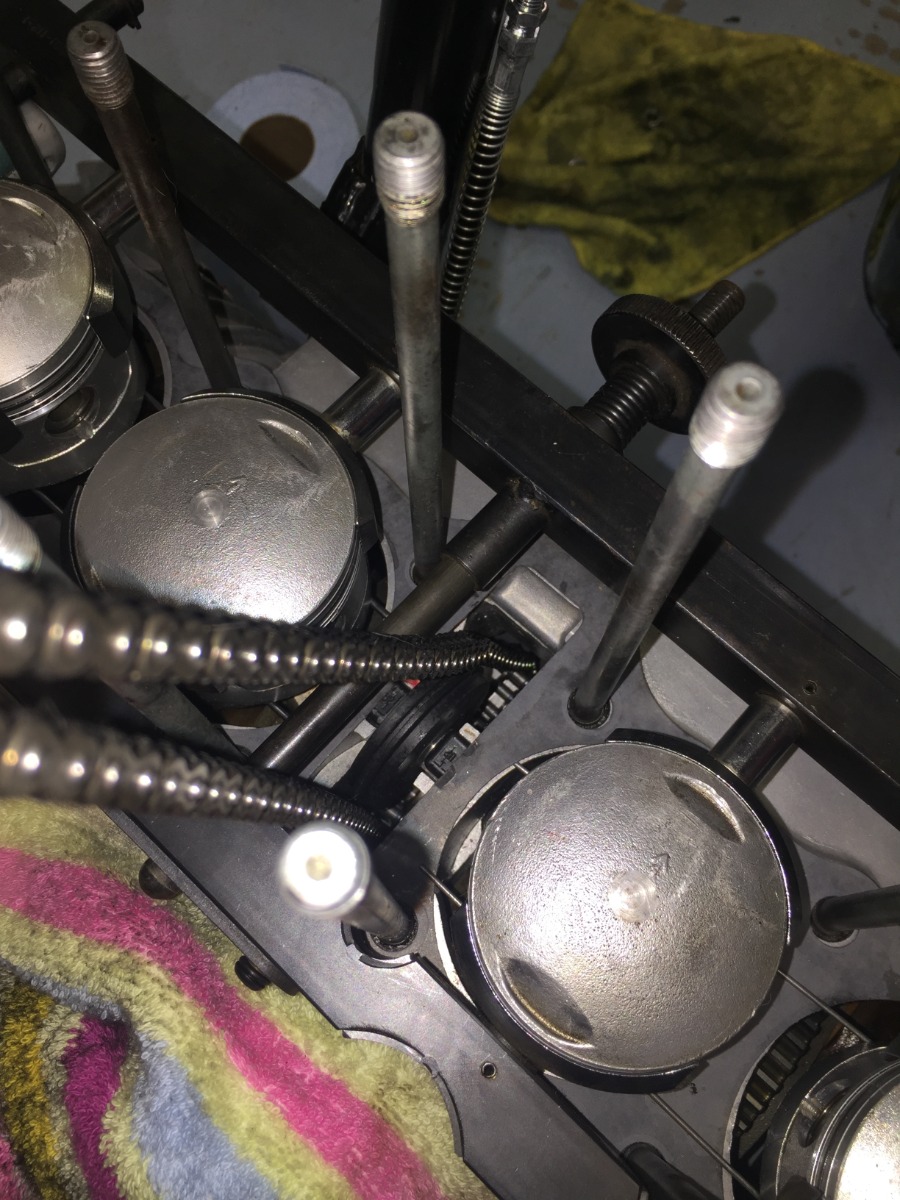
The tool is installed and tight. Notice I used a screwdriver on the far side to hold the tool up off the case. It was exactly the right size!
End view of the screwdriver side. The tool has compressed the rings and is ready for the cylinder to slide into place.
The other end.
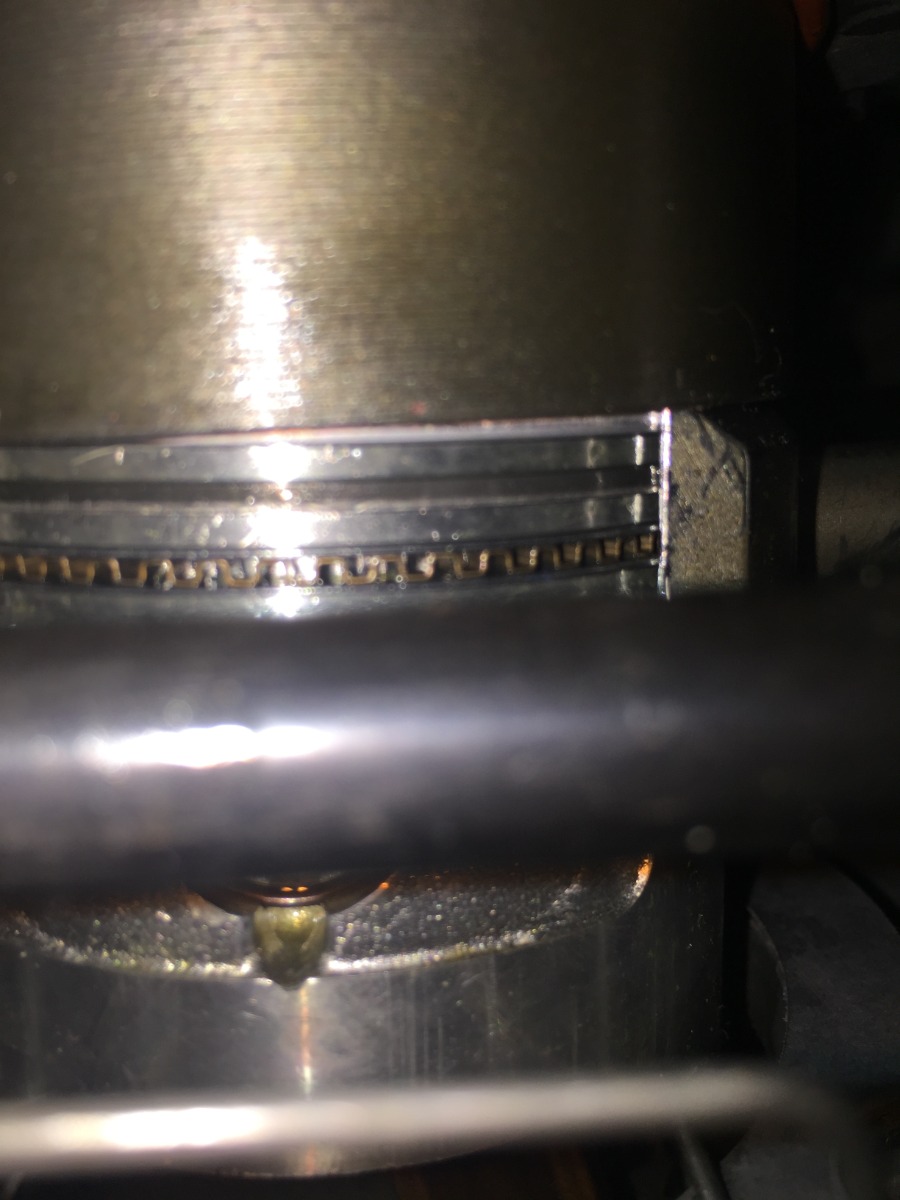
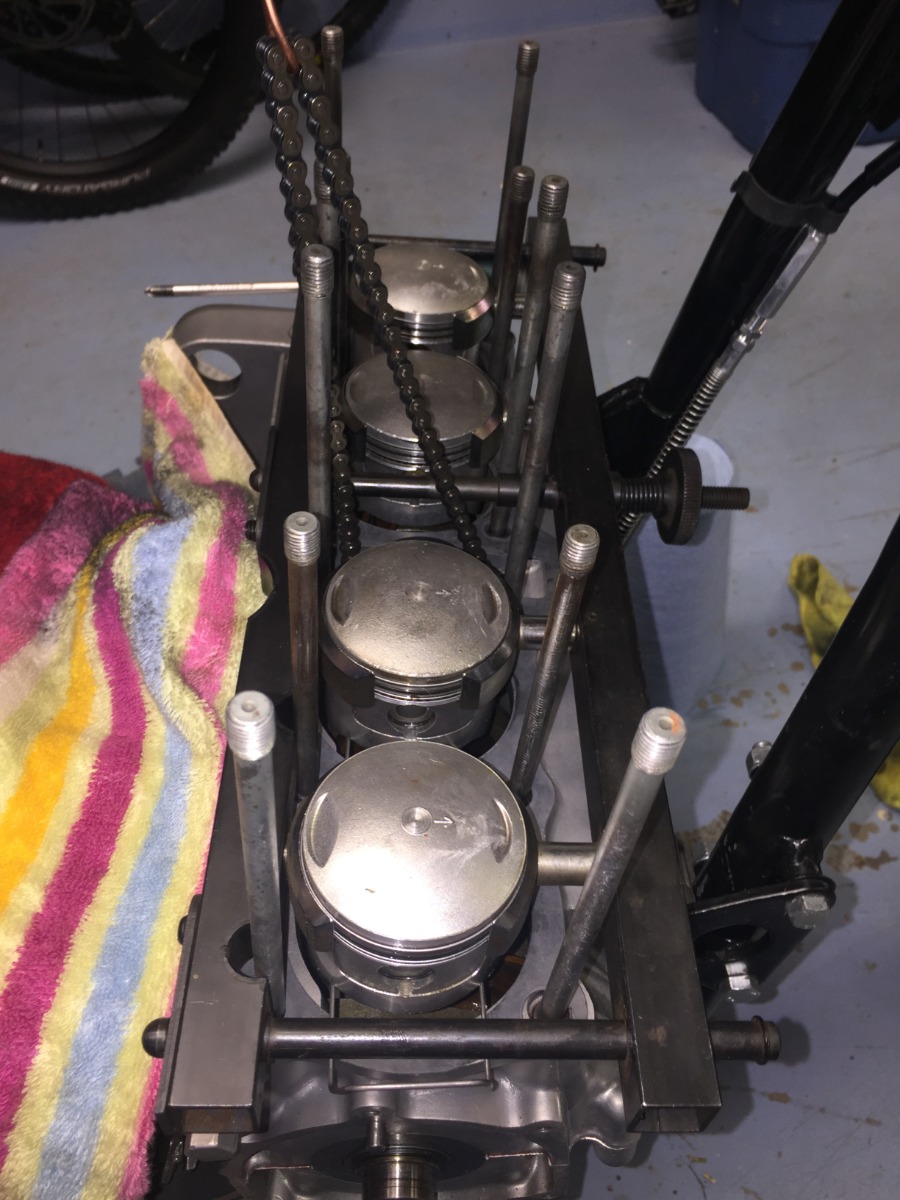
This view from the front shows the cylinders have slid below the rings. The tool is resting on the case.
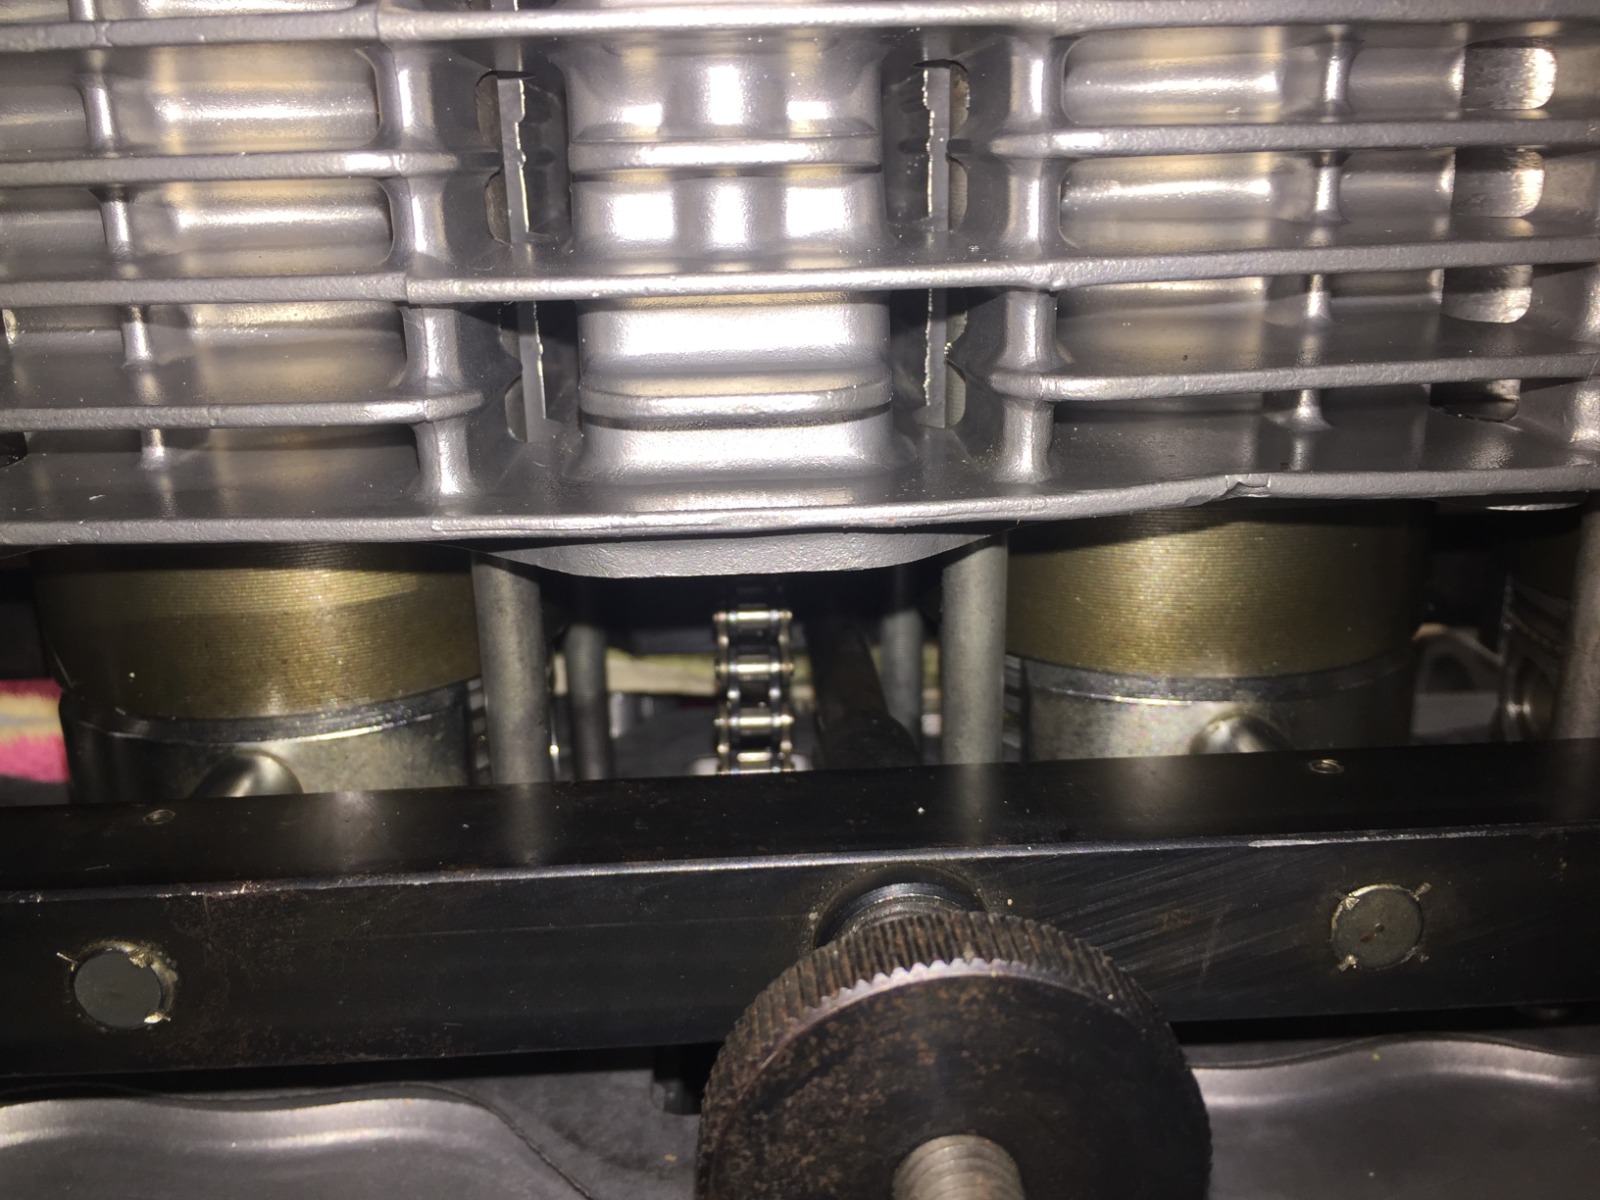
This is a side view with the cylinders over the rings.
This view shows the tool is removed.
Cylinders are all the way down and tensioner and oil bypass are installed.

It would be a lot easier to do this on the engine when it's not in the frame.
Here are a series of photos of another engine I did last year. This tool was borrowed from a friend, and the wires were still in the case. You can see them in the photos.
Wires are under the pistons but the gasket is not yet installed. I find it easier to install the gasket with all the pistons sitting upright. I put the gasket on, removed the wires and then re-installed them over top of the gasket.
Gasket is now installed.
Here you can see one end of the wire over top of the gasket and one underneath. You need to be careful when putting the wire in that you don't tear the gasket.
The tool is installed and tight. Notice I used a screwdriver on the far side to hold the tool up off the case. It was exactly the right size!
End view of the screwdriver side. The tool has compressed the rings and is ready for the cylinder to slide into place.
The other end.
This view from the front shows the cylinders have slid below the rings. The tool is resting on the case.
This is a side view with the cylinders over the rings.
This view shows the tool is removed.
Cylinders are all the way down and tensioner and oil bypass are installed.
It would be a lot easier to do this on the engine when it's not in the frame.
I have several restored bikes along with a 2006 Goldwing with a sidecar.
Last edit: 24 Jan 2020 17:04 by hardrockminer.
The following user(s) said Thank You: 650ed, Rick H.
Please Log in or Create an account to join the conversation.
- Scirocco
-

- Offline
- Premium Member
-

Registered
- Never change a running system
- Posts: 4397
- Thanks: 2260
Re: '77 KZ-1000A1 Refurbishment, Not Restoration
24 Jan 2020 17:43 - 24 Jan 2020 18:45
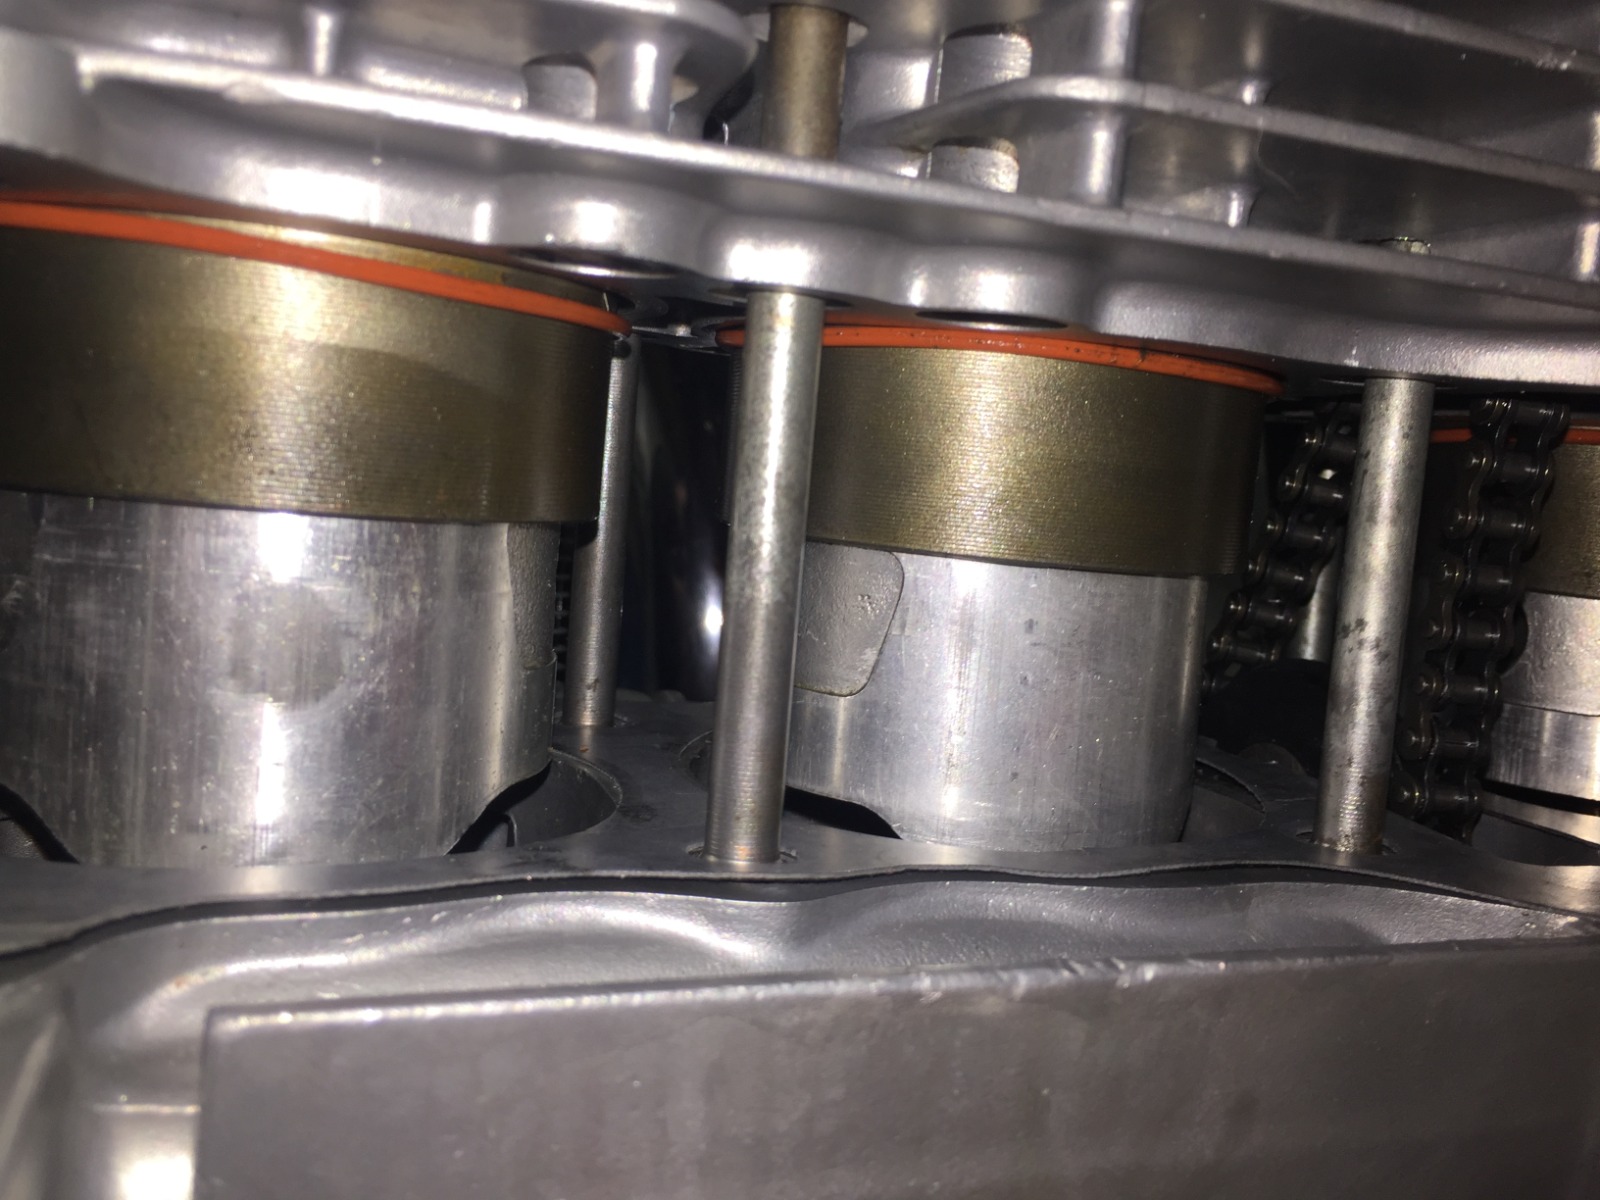
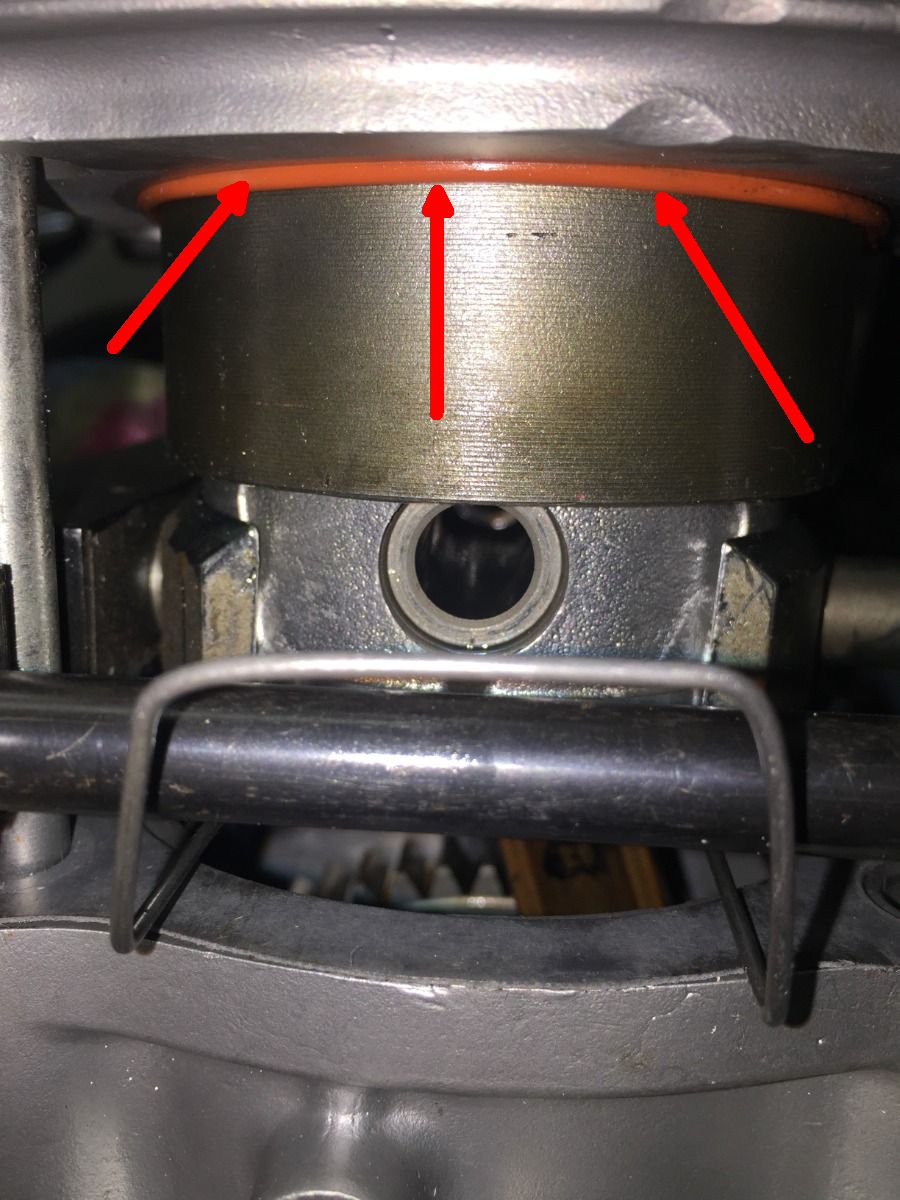
Did these o-rings are really necessary to seal the sleeeves? My bottom Z1B engine case (903 ccm) is prepared and bored to 85 mm Diameter to fit >1200 ccm sleeves.
I never have any oil leak ever, so what is the Advantage to install them?
I never have any oil leak ever, so what is the Advantage to install them?
My 1975 Z 1 B 900 Project
www.kzrider.com/forum/11-projects/605133...ears-deep-sleep-mode
www.kzrider.com/forum/11-projects/605133...ears-deep-sleep-mode
Last edit: 24 Jan 2020 18:45 by Scirocco.
The following user(s) said Thank You: Rick H.
Please Log in or Create an account to join the conversation.
- baldy110
-
- Offline
- User
-
Registered
- Posts: 2272
- Thanks: 512
Re: '77 KZ-1000A1 Refurbishment, Not Restoration
24 Jan 2020 17:59 - 24 Jan 2020 18:00
I've wondered about that too. There seems to be no reason for them as far as sealing the barrel. My 1984 Honda XL350R had an oring like that. When I rebuilt that engine I left it out just to see what would happen. 10 years later and no leaks or ill effects. Kawasaki engineers must have had a reason for them, Maybe a backup to the base gasket.
Last edit: 24 Jan 2020 18:00 by baldy110.
Please Log in or Create an account to join the conversation.
- 650ed
-
- Offline
- User
-
Registered
- Posts: 15334
- Thanks: 2830
Re: '77 KZ-1000A1 Refurbishment, Not Restoration
24 Jan 2020 18:24
Is it possible that that ring was suppose to lock the cylinder sleeve in place once everything got hot? I doubt that the sleeve really could move much, but maybe that ring prevented any movement at all. Ed
1977 KZ650-C1 Original Owner - Stock (with additional invisible FIAMM horn)
Please Log in or Create an account to join the conversation.
- Scirocco
-
- Offline
- Premium Member
-
Registered
- Never change a running system
- Posts: 4397
- Thanks: 2260
Re: '77 KZ-1000A1 Refurbishment, Not Restoration
24 Jan 2020 18:32 - 24 Jan 2020 18:33
The o-ring was made for to protect oil is gone up between the press fit outer sleeve surface and inner cylinder Body.
It´s a over developed design in case of a case that never happend to anyone.
It´s a over developed design in case of a case that never happend to anyone.
My 1975 Z 1 B 900 Project
www.kzrider.com/forum/11-projects/605133...ears-deep-sleep-mode
www.kzrider.com/forum/11-projects/605133...ears-deep-sleep-mode
Last edit: 24 Jan 2020 18:33 by Scirocco.
The following user(s) said Thank You: 650ed
Please Log in or Create an account to join the conversation.
Moderators: Street Fighter LTD