
Making the my 82 GPZ 1100 B2 look shiney again.
- Hollywoodmx
-
 Topic Author
- Offline
- User
-

Registered
- Posts: 562
- Thanks: 16
Making the my 82 GPZ 1100 B2 look shiney again.
26 Mar 2012 02:42
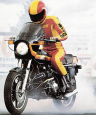
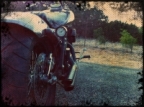
Just getting the bike ready for spring. Trying to clean it up. I got kinda lazy this winter so next year I'll look at getting it painted professionally and a top end.
On the docket this year I have some Taylor wires, IX plugs. Going to upgrade the ignition coils. I'm looking at replacing the shocks, seems like there are only two types...both from progressive... Going to refresh the forks too. Going to have to research how that's done and what are the options.
I have the hannigen fairing too, I was going to try it to see how it looks.
Any comments, feedback, tips are appreciated. PS the FI works like a charm still.
- 82 GPz1100injection
- 77 Kz1075 Supercharged
- 81 Yamaha TR-1
- 81 Yamaha xv920
Calgary
- 77 Kz1075 Supercharged
- 81 Yamaha TR-1
- 81 Yamaha xv920
Calgary
Please Log in or Create an account to join the conversation.
- LarryC
-
- Offline
- User
-
Registered
- Posts: 1241
- Thanks: 309
Re: Making the my 82 GPZ 1100 B2 look shiney again.
28 Mar 2012 01:01
They were a nice motorcycle ") You rarely see on anymore. Good to see someone give one some TLC!
You rarely see on anymore. Good to see someone give one some TLC!
You rarely see on anymore. Good to see someone give one some TLC!
Larry C.
Please Log in or Create an account to join the conversation.
- Mcdroid
-
- Offline
- User
-
Registered
- Gone Kwackers
- Posts: 6823
- Thanks: 461
Re: Making the my 82 GPZ 1100 B2 look shiney again.
28 Mar 2012 05:00
I love B2's and saving them
Michael
Victoria, Texas
1982 GPz750
1977 KZ1000A
1978 KZ1000A
1982 GPz1100
1975 Z2A
Victoria, Texas
1982 GPz750
1977 KZ1000A
1978 KZ1000A
1982 GPz1100
1975 Z2A
Please Log in or Create an account to join the conversation.
- Hollywoodmx
-
Topic Author
- Offline
- User
-
Registered
- Posts: 562
- Thanks: 16
Re: Making the my 82 GPZ 1100 B2 look shiney again.
29 Mar 2012 01:10
Ya I'm really happy with the bike.
I forgot I have the 530 chain conversion stuff too. I have been working too much overtime which has slowed my progress. Next weekend I'll have some new updates.
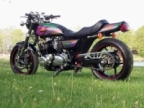
I'll attach what it looked like before.
I forgot I have the 530 chain conversion stuff too. I have been working too much overtime which has slowed my progress. Next weekend I'll have some new updates.
I'll attach what it looked like before.
Attachment IMG-20120112-00062.jpg not found
- 82 GPz1100injection
- 77 Kz1075 Supercharged
- 81 Yamaha TR-1
- 81 Yamaha xv920
Calgary
- 77 Kz1075 Supercharged
- 81 Yamaha TR-1
- 81 Yamaha xv920
Calgary
Please Log in or Create an account to join the conversation.
- Hollywoodmx
-
Topic Author
- Offline
- User
-
Registered
- Posts: 562
- Thanks: 16
Re: Making the my 82 GPZ 1100 B2 look shiney again.
31 Mar 2012 18:35
Making progress here. Done doing the electrolysis on the tank, bye bye rust! I restored the plastics and air box. Started on the calipers and hand controls, the throttle bodies.
To do still,
Clean the swing arm (caked in chain lube).
Finish the chain conversion and install new pimp sprockets.
Install new vacuum and fuel lines.
Brake system flush. (Says dot 3 only? Cant use 4?)
Decide if I want to rock the hannigan fairing or not..
Install new ignition lines
Put everything back together (I hope I remember where everything goes! lol)
Do a seafoam flush. (Always fun seeing that crazy smoke!!)
Change oil again cause sea foam..
- 82 GPz1100injection
- 77 Kz1075 Supercharged
- 81 Yamaha TR-1
- 81 Yamaha xv920
Calgary
- 77 Kz1075 Supercharged
- 81 Yamaha TR-1
- 81 Yamaha xv920
Calgary
Please Log in or Create an account to join the conversation.
- Hollywoodmx
-
Topic Author
- Offline
- User
-
Registered
- Posts: 562
- Thanks: 16
Re: Making the my 82 GPZ 1100 B2 look shiney again.
02 Apr 2012 17:56Attachment IMG-20120401-00231.jpg not found
Attachment IMG-20120401-00230.jpg not found
Making some progress here.
Attachment IMG-20120401-00236.jpg not found
Attachment IMG-20120401-00239.jpg not found
Attachment IMG-20120401-00234.jpg not found
- 82 GPz1100injection
- 77 Kz1075 Supercharged
- 81 Yamaha TR-1
- 81 Yamaha xv920
Calgary
- 77 Kz1075 Supercharged
- 81 Yamaha TR-1
- 81 Yamaha xv920
Calgary
Please Log in or Create an account to join the conversation.
- les holt
-
- Offline
- Vendor
-

Registered
- Posts: 1633
- Thanks: 286
Re: Making the my 82 GPZ 1100 B2 look shiney again.
02 Apr 2012 18:52
Did you paint your calipers? If so, they look like factory colors, what did you use on them?
Great progress! It's looking good.
Les
Great progress! It's looking good.
Les
www.facebook.com/PdmCustomFabrication
76 kz 900 turbo
77 LTD 1000 turbo
2 78 Z1R's
72 H2
kzrider.com/forum/13-bike-related/491552...one-followed-me-home
accelerate.presspublisher.us/issue/issue-6-2012/article/ltd
www.cycleworld.com/2013/09/04/2013-cycle...-concours-bike-show/
76 kz 900 turbo
77 LTD 1000 turbo
2 78 Z1R's
72 H2
kzrider.com/forum/13-bike-related/491552...one-followed-me-home
accelerate.presspublisher.us/issue/issue-6-2012/article/ltd
www.cycleworld.com/2013/09/04/2013-cycle...-concours-bike-show/
Please Log in or Create an account to join the conversation.
- Mine20
-
- Offline
- User
-
Registered
- Metric Maniac
- Posts: 50
- Thanks: 2
Re: Making the my 82 GPZ 1100 B2 look shiney again.
02 Apr 2012 22:49
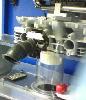
As many different motorcycle sites that I'm on I see a lot of us have the same "paint booths."
Bike looks great man!
Bike looks great man!
2007 Honda Shadow Custom
1978 Kawasaki kz650c2 cafe project
1979 Kawasaki 650sr possible bobber project
1978 Kawasaki kz650c2 cafe project
1979 Kawasaki 650sr possible bobber project
Please Log in or Create an account to join the conversation.
- Hollywoodmx
-
Topic Author
- Offline
- User
-
Registered
- Posts: 562
- Thanks: 16
Re: Making the my 82 GPZ 1100 B2 look shiney again.
04 Apr 2012 00:57les holt wrote: Did you paint your calipers? If so, they look like factory colors, what did you use on them?
Great progress! It's looking good.
Les
Ya I did, I three staged them. First VHT Caliper black which was a good base, then VHT engine enamel gold metallic and tonight I used VHT caliper clear cloat.
Mine20 wrote: As many different motorcycle sites that I'm on I see a lot of us have the same "paint booths."
Bike looks great man!
Ya! lol. Not the best for dust management and a perfect job mind you but its good enough for me this year. Plus Im pretty sure after its all done it's going to look a hell of a lot better than before so that's cool with me.
- 82 GPz1100injection
- 77 Kz1075 Supercharged
- 81 Yamaha TR-1
- 81 Yamaha xv920
Calgary
- 77 Kz1075 Supercharged
- 81 Yamaha TR-1
- 81 Yamaha xv920
Calgary
Please Log in or Create an account to join the conversation.
- Hollywoodmx
-
Topic Author
- Offline
- User
-
Registered
- Posts: 562
- Thanks: 16
Re: Making the my 82 GPZ 1100 B2 look shiney again.
13 Apr 2012 00:11
Stating to put things back together.
Attachment IMG-20120411-00248.jpg not found
Attachment IMG-20120411-00247.jpg not found
Attachment IMG-20120411-00251.jpg not found
Attachment IMG-20120411-00252.jpg not found
- 82 GPz1100injection
- 77 Kz1075 Supercharged
- 81 Yamaha TR-1
- 81 Yamaha xv920
Calgary
- 77 Kz1075 Supercharged
- 81 Yamaha TR-1
- 81 Yamaha xv920
Calgary
Please Log in or Create an account to join the conversation.
- MFolks
-

- Offline
- User
-
Registered
- Posts: 6650
- Thanks: 541
Re: Making the my 82 GPZ 1100 B2 look shiney again.
13 Apr 2012 16:51
I believe you mentioned the FI was still working? Here's the testing specs for the sensors:
Kawasaki Fuel Injection Sensor Specs
Here's from my 1982 GPz1100 B2 factory shop manual:
Air temperature sensor spec(probably the one on the air filter housing, or next to it).
Meter at ohms X 1K ohms ( I use ohms X 2K as it works on my meter)
Disconnect the wiring from the harness, one meter probe to one of the connector pins, the other on the last pin.
Should read 2.0K ohms to 3.0 K ohms at 68 F, if your meter won't read this, try the 20K ohm setting.
A footnote says this reading is true when sensor temperature is 20C (68F), 4.7 K ohms to 7.6 K ohms when 0 C (32 F) and 1.4 K ohms to 2.2 K ohms when 30 C (86 F).
Engine temperature sensor spec:
Again, meter to 2K ohm settings, one meter lead to the push on terminal (remove the wire as it may give a false reading) and the other to a chassis ground(any Black with Yellow stripe wire is part of the ground circuit).
The readings will be the same as the air temperature sensor.
The TPS has an electrical connector, only the first three(3) contacts are used, counting from left to right as you face it.
From my factory shop manual I'm making it easier to get the readings, by using shortcuts).
1. Ignition switch off.
2. Remove the small SS clip holding the cable to the TPS.
3. Using a multimeter set on ohms, range of 2K.
4. Measure between the first electrical contact on the left and the third to the right.
5. It should read between 3.3K ohms to 6.8K ohms.
The next test will cover the range between idle and full throttle:
1. Set the meter's probes on the left contact and the one next to it, as this is the idle position check.
2. Readings should be between 2.1K ohms to 4.2 K ohms
Full throttle check:
1. Same electrical contacts used.
2. With the throttle wide open, readings should be between 0.35 K ohms to 0.71 K ohms, see if the resistance changes smoothly, with no fluctuations or wide variations as the throttle is closed down to the idle position.
3. If there are variations, try cleaning the TPS with the De-Oxit electrical contact cleaner/preservative. Open and close it with the throttle while spraying the cleaner up inside.
Cleaning The Kawasaki TPS
I'd suggest cleaning the Throttle Position Sensor (TPS) too as it's a carbon variable resistor that gets dirty. It's the module with DFI on it below the tank on the right side.
To clean it, first go to Radio Shack or any other electronic supply store and purchase some De-Oxit contact cleaner/preservative.
With the engine off, remove a small SS clip holding the wiring to the TPS and disconnect the cable.Put some newspapers or rags to keep the cleaner off the engine cases. www.deoxit.com is their website.
Spray the De-Oxit up inside the TPS while opening and closing the throttle several times to flush out any carbon residue. Let it dry for a while, then reassemble the TPS cable and retaining clip.
You should notice an improvement in throttle responce.
And the factory shop manual for the Kz1000/Kz1100 "J: engined bikes:
www.kawiworld.com/index.php?option=com_c...icle&id=77&Itemid=99
1982 GPZ1100 B2
General Dynamics/Convair 1983-1993
GLCM BGM-109 Tomahawk, AGM-129A Advanced Cruise Missile (ACM)
General Dynamics/Convair 1983-1993
GLCM BGM-109 Tomahawk, AGM-129A Advanced Cruise Missile (ACM)
Please Log in or Create an account to join the conversation.
Moderators: Street Fighter LTD