
Cafe Racer Project Time...
- Parachutist
-
 Topic Author
- Offline
- User
-

Registered
- Posts: 26
- Thanks: 0
Cafe Racer Project Time...
20 Aug 2011 13:24
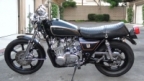
Hello everyone! I’m new to the whole KZ Rider site so take it easy on me if I muck something up as I go along. So about two weeks ago I bought a 1979 KZ650D (13,500 on the odometer) off a buddy of mine with the intent of turning this diamond in the rough into an eye catching café racer. Interestingly enough that same week my wife and I almost bought a 07 Victory Vegas, however, something in my gut told me not to get the Victory just yet. Well a day later I happened to be talking to a buddy about the Victory I was interested in—he also knew I was new to riding motorcycles—and asked me why I just didn’t buy his “650” that he had sitting in the garage (wasn’t sure if it would start). I was somewhat curious, however, keep in mind at this point in time I had never even rode a bike much less try to fix one up. A day later I showed up at his house, fell in love with the bike, and bought it. It was such a rough looking bike, yet it had so much potential if you can just see past the old paint and envision the bike with a few select café modifications.
So I had a bunch of issues trying to get it running, and after making a few rudimentary fixes (e.g., new battery, new spark plugs, ect.), attempted to turn it over but had no luck. At that point I decided I would just take it to a mechanic and see what they thought. Once I got it to the motorcycle shop they did a compression and spark test and said both were good. The results from the diagnostic lead the mechanic to believe that the carbs needed to be cleaned and the tank needed to be flushed. After I agreed to the repairs, the guy called a couple days later and said the carbs were some of the worst he had ever seen and that he needed to get four carb rebuild kits. So after everything was done, a buddy dropped me off, and I had a running bike, and boy was I excited to hear it run for the first time! I mean there was nothing impressive about the exhaust or anything else about the bike. Realistically it was the fact that it was a 32 year old bike, there was no smoke coming out, and it was just purring along like the day it was first started up. Ok, so let me add to that statement by saying there were a few ticking/rattling noises that were pretty distinct. As I was leaving the mechanic told me I should get the cams checked out if I wanted that noise to stop, but I had just spent $600 on a repair bill and wasn’t about to spend any more money (at least not that day).
So I live in Southern California and a few days later got a chance to hit Highway 1 (also known as Pacific Coast Highway), with my buddy (he has a HD Nightster), and I cruised down the coast on this vintage gem enjoying life on the road like never before. By the way, I had just got my motorcycle license and this would have been my first ride aside from the three mile stint I made to get from the motorcycle shop back to the house. Only one word to describe this experience: grandiose. Oh, and did I mention I love this bike?!?!
So after I was able to enjoy riding the motorcycle for a little bit it was time to start fixing her up. Now just so everyone understands my intent, I will be doing a full disassembly, cleaning and inspecting everything, and will then build it from the ground up with the appropriate modifications that will transfer the existing stock look into what I hope is a street ripping café racer. Before I get to the street ripping part though, I have to figure out what the origin of that ticking noise is and how to fix it (I did notice the noise goes away once the bike hits 2500 RPMs). One other note here, I took her to a different mechanic for a second opinion (wanted to hear it was the cams from someone else) to listen to it before I started the disassembly process. After the mechanic listened to it he pulled down on the kick starter (it went all the way down) which really accentuated the noise. He looked up at me and said there is your rattling noise so check out the kick starter assembly (I guess that inspection will be easy enough as I intend to split the case); however, he said there was another low pitch ticking noise emanating from the head region too. I thanked him, explained to him my vision for the bike, and he said if I needed any help or occasional tips when dealing with sticking points just let him know. After hearing that I drove it back to the house and the disassembly started. And yes, don’t worry everyone, I bought the Clymer’s manual to guide me along the disassembly/assembly process. For everything else I have the vast knowledge and experience of KZ owners now reading this post.
I hope you all will enjoy this project and pictures as much as I am going to have fun learning on it.
-Shawn
Attachment 79KZ650D.jpg not found
So I had a bunch of issues trying to get it running, and after making a few rudimentary fixes (e.g., new battery, new spark plugs, ect.), attempted to turn it over but had no luck. At that point I decided I would just take it to a mechanic and see what they thought. Once I got it to the motorcycle shop they did a compression and spark test and said both were good. The results from the diagnostic lead the mechanic to believe that the carbs needed to be cleaned and the tank needed to be flushed. After I agreed to the repairs, the guy called a couple days later and said the carbs were some of the worst he had ever seen and that he needed to get four carb rebuild kits. So after everything was done, a buddy dropped me off, and I had a running bike, and boy was I excited to hear it run for the first time! I mean there was nothing impressive about the exhaust or anything else about the bike. Realistically it was the fact that it was a 32 year old bike, there was no smoke coming out, and it was just purring along like the day it was first started up. Ok, so let me add to that statement by saying there were a few ticking/rattling noises that were pretty distinct. As I was leaving the mechanic told me I should get the cams checked out if I wanted that noise to stop, but I had just spent $600 on a repair bill and wasn’t about to spend any more money (at least not that day).
So I live in Southern California and a few days later got a chance to hit Highway 1 (also known as Pacific Coast Highway), with my buddy (he has a HD Nightster), and I cruised down the coast on this vintage gem enjoying life on the road like never before. By the way, I had just got my motorcycle license and this would have been my first ride aside from the three mile stint I made to get from the motorcycle shop back to the house. Only one word to describe this experience: grandiose. Oh, and did I mention I love this bike?!?!
So after I was able to enjoy riding the motorcycle for a little bit it was time to start fixing her up. Now just so everyone understands my intent, I will be doing a full disassembly, cleaning and inspecting everything, and will then build it from the ground up with the appropriate modifications that will transfer the existing stock look into what I hope is a street ripping café racer. Before I get to the street ripping part though, I have to figure out what the origin of that ticking noise is and how to fix it (I did notice the noise goes away once the bike hits 2500 RPMs). One other note here, I took her to a different mechanic for a second opinion (wanted to hear it was the cams from someone else) to listen to it before I started the disassembly process. After the mechanic listened to it he pulled down on the kick starter (it went all the way down) which really accentuated the noise. He looked up at me and said there is your rattling noise so check out the kick starter assembly (I guess that inspection will be easy enough as I intend to split the case); however, he said there was another low pitch ticking noise emanating from the head region too. I thanked him, explained to him my vision for the bike, and he said if I needed any help or occasional tips when dealing with sticking points just let him know. After hearing that I drove it back to the house and the disassembly started. And yes, don’t worry everyone, I bought the Clymer’s manual to guide me along the disassembly/assembly process. For everything else I have the vast knowledge and experience of KZ owners now reading this post.
I hope you all will enjoy this project and pictures as much as I am going to have fun learning on it.
-Shawn
Attachment DSC00402.JPG not found
Attachment DSC00404.JPG not found
Attachment DSC00405.JPG not found
Attachment DSC00406.JPG not found
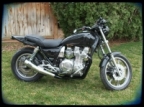
1979 KZ650D2 SR (with coil mod)
Kirker 4 into 1 w/ baffle
VM24s with Velocity Stacks and K&N Filters
Kirker 4 into 1 w/ baffle
VM24s with Velocity Stacks and K&N Filters
Attachments:
Please Log in or Create an account to join the conversation.
- Chaotic Reason
-

- Offline
- User
-
Registered
- Posts: 384
- Thanks: 15
Re: Cafe Racer Project Time...
20 Aug 2011 15:19
Heck of a story mate! Pretty impressive to take the fixer upper over the new victory. I like your style though. It'll also be nice to turn it into just what you want it to be. I look forward to seeing your vision become a reality.
Oh, and welcome to KZR.")
Oh, and welcome to KZR.
Michael
1980 KZ1000 shaft drive
1980 KZ1000 shaft drive
Please Log in or Create an account to join the conversation.
- Marneman
-
- Offline
- User
-
Registered
- Posts: 280
- Thanks: 5
Re: Cafe Racer Project Time...
20 Aug 2011 21:56
Truly a great love story that many of us here can relate to. Dive right in buddy, damn the torpedos! Full speed ahead. This site and a factory service manual for my bike (the best investment you can make, just get one alright)made me confident to attempt all my own repairs on mine.
Good luck, and welcome to the site")
Good luck, and welcome to the site
77 KZ1000-A1 "Bushido" Project
82 KZ1000 LTD "Terri Lee"
You know what, I don't have a one to some other number of douche-bag scale. So.. Six!
82 KZ1000 LTD "Terri Lee"
You know what, I don't have a one to some other number of douche-bag scale. So.. Six!
Please Log in or Create an account to join the conversation.
- rstnick
-

- Offline
- User
-
Registered
- Posts: 4493
- Thanks: 445
Re: Cafe Racer Project Time...
21 Aug 2011 00:06
Welcome Shawn.
Nice looking kz you found yourself there.
Between this site, the 650 link in my signature, and this Cafe site: www.dotheton.com/ , you'll have lots of inspiration and help.
")
Nice looking kz you found yourself there.
Between this site, the 650 link in my signature, and this Cafe site: www.dotheton.com/ , you'll have lots of inspiration and help.
Rob
CANADA
Need a key for your Kawasaki? PM me
1978 KZ650 C2, 130K kms, Delkevic ex, EI, CVK32, PMC easy clutch, ATK fork brace, steering damper, braced swingarm, ZRX shocks, 18" Z1R front wheel.
2000 ZRX1100
2011 Ninja 250R - Wife's
2005 z750s
1978 KZ1000 project
1983 KZ1000R2 Project
CANADA
Need a key for your Kawasaki? PM me
1978 KZ650 C2, 130K kms, Delkevic ex, EI, CVK32, PMC easy clutch, ATK fork brace, steering damper, braced swingarm, ZRX shocks, 18" Z1R front wheel.
2000 ZRX1100
2011 Ninja 250R - Wife's
2005 z750s
1978 KZ1000 project
1983 KZ1000R2 Project
Please Log in or Create an account to join the conversation.
- mtbspeedfreak
-

- Offline
- User
-
Registered
- Posts: 1413
- Thanks: 36
Re: Cafe Racer Project Time...
21 Aug 2011 15:40
Congrats on the score! These KZs make great first bikes- nothing too complex about them, pretty easy to ride and once they're cleaned up, you'll get compliments!
There are many of us in the Southern California area, we do occasional group rides so stay tuned for one. I'd say it's about time for another!
Also, if you don't have the factory service manual, go ahead and pick that up. It is much better than "aftermarket" manuals (Clymers, etc.).
Lastly, and most importantly, it is HIGHLY recommended that you should take the Motorcycle Safety Foundation's Basic Rider's course considering this is your first bike. In California, you'll probably have to pay, but I assure you that it is money well spent.
2000 ZRX 1100
1976 KZ 900- Daily Driver
1980 LTD 550- Dalton Highway survivor!
If it has tits or tires, it'll give you problems!
1976 KZ 900- Daily Driver
1980 LTD 550- Dalton Highway survivor!
If it has tits or tires, it'll give you problems!
Please Log in or Create an account to join the conversation.
- Parachutist
-
Topic Author
- Offline
- User
-
Registered
- Posts: 26
- Thanks: 0
Re: Cafe Racer Project Time...
25 Aug 2011 01:17 - 25 Aug 2011 01:21
Alright everyone finally got a free minute to jump on here and catch up. Thanks everyone for the warm welcome to KZR, the shared enthusiasm, and the open-ended advice with regard to this project. So real quick before I get into the updates on the bike I wanted to address “mtbspeedfreak” and the topic of taking the MSF course; I have already completed the BRC and am due to complete the follow-on course in the next couple months. Thanks for the information and looking out for my safety. That course really gave me a familiarization with riding and helped me apply the principals during the ride I took on the 101 and mentioned in the first post. It will really come in handy though once I get this bike back together.
Now then, on to the updates:
Overall the disassembly part went pretty well. Then again, anything is easy to take apart, it’s putting it back together that can lead to issues surfacing. I would say everything was disassembled in about two day’s time total. Keep in mind that I was pretty meticulous about making sure everything that was pulled off was put into a plastic bag and catalogued appropriately which really sucked up my time. Below are some pics of the progress until it was just a frame.
The engine became a real chore; especially getting the clutch hub nut and flywheel off. I tried a breaker bar having no luck so I ended up buying a DeWalt impact wrench so I could move along on the disassembly (luckily I found a lot of useful advice from old KZR topics about how to remove those parts). Once I zapped it with the wrench those pieces popped right off. As I spent more time breaking down the engine I kept seeing how bad everything looked on the outside. I have never seen such a botched paint job like this, but then again, if one doesn’t prep the block properly then it’s not too farfetched to believe a paint job could end up the way it did. However, it didn’t help that the there was chain grease spackled all over either. The grease was so bad it took me 15 minutes to locate the neutral connection switch (where it enters the case in front of the clutch) because it had about one inch of grease on it. Luckily I am going the distance and splitting this bad boy open which will give me the opportunity to properly clean everything on the case and turn it into something that isn’t such an eye sore. Here are a few pics below:
So all the internals looked pretty good as I worked my way from the cylinder head down; I will do a more detailed inspection once everything is laid out. Once I removed the cylinder head the valves were pretty gnarly, but I suppose that is to be expected of a 32 year old motorcycle. Both the intake and exhaust valve seats had some pitting (the exhaust were really bad), but I am hoping some good ole fashioned lapping will smooth those right out. I don’t really want to have to machine them if at all possible because that would mean I have to deal with the valve adjustment issue on the back end. That might happen regardless but let’s hope not for the time being. The pistons came off pretty easy. They looked to be in good condition, and will hopefully everything will be able to be reused. Once the case was split everything inside looked to be in pretty good condition. Getting the kickstater assembly out of the case was a real chore though, but I finally got it out. Since we’re on the topic of the kickstarter assembly I took a look at it and couldn’t really find anything mechanically wrong with it. Once everything starts coming back together I will do a function check and see if I can diagnose any additional issues.
[attachment:10]C:\fakepath\DSC00433.JPG[/attachment]
[attachment:11]C:\fakepath\DSC00437.JPG[/attachment]
[attachment:12]C:\fakepath\DSC00443.JPG[/attachment]
[attachment:13]C:\fakepath\DSC00444.JPG[/attachment]
The cylinder head, main cylinder, and crankcase were all dropped off at the machine shop to get cleaned; the main cylinder and the valve stems will also get bead blasted. Additionally, the main frame, battery box, swing arm, and front/rear wheels were also taken to get sandblasted and get power coated. That’s all I have for you guys now. Until next time…
-Shawn
Now then, on to the updates:
Overall the disassembly part went pretty well. Then again, anything is easy to take apart, it’s putting it back together that can lead to issues surfacing. I would say everything was disassembled in about two day’s time total. Keep in mind that I was pretty meticulous about making sure everything that was pulled off was put into a plastic bag and catalogued appropriately which really sucked up my time. Below are some pics of the progress until it was just a frame.
Attachment DSC00415.JPG not found
Attachment DSC00418.JPG not found
Attachment DSC00421.JPG not found
The engine became a real chore; especially getting the clutch hub nut and flywheel off. I tried a breaker bar having no luck so I ended up buying a DeWalt impact wrench so I could move along on the disassembly (luckily I found a lot of useful advice from old KZR topics about how to remove those parts). Once I zapped it with the wrench those pieces popped right off. As I spent more time breaking down the engine I kept seeing how bad everything looked on the outside. I have never seen such a botched paint job like this, but then again, if one doesn’t prep the block properly then it’s not too farfetched to believe a paint job could end up the way it did. However, it didn’t help that the there was chain grease spackled all over either. The grease was so bad it took me 15 minutes to locate the neutral connection switch (where it enters the case in front of the clutch) because it had about one inch of grease on it. Luckily I am going the distance and splitting this bad boy open which will give me the opportunity to properly clean everything on the case and turn it into something that isn’t such an eye sore. Here are a few pics below:
Attachment DSC00413.JPG not found
Attachment DSC00414.JPG not found
So all the internals looked pretty good as I worked my way from the cylinder head down; I will do a more detailed inspection once everything is laid out. Once I removed the cylinder head the valves were pretty gnarly, but I suppose that is to be expected of a 32 year old motorcycle. Both the intake and exhaust valve seats had some pitting (the exhaust were really bad), but I am hoping some good ole fashioned lapping will smooth those right out. I don’t really want to have to machine them if at all possible because that would mean I have to deal with the valve adjustment issue on the back end. That might happen regardless but let’s hope not for the time being. The pistons came off pretty easy. They looked to be in good condition, and will hopefully everything will be able to be reused. Once the case was split everything inside looked to be in pretty good condition. Getting the kickstater assembly out of the case was a real chore though, but I finally got it out. Since we’re on the topic of the kickstarter assembly I took a look at it and couldn’t really find anything mechanically wrong with it. Once everything starts coming back together I will do a function check and see if I can diagnose any additional issues.
Attachment DSC00431.JPG not found
Attachment DSC00425.JPG not found
Attachment DSC00426.JPG not found
Attachment DSC00429.JPG not found
[attachment:10]C:\fakepath\DSC00433.JPG[/attachment]
[attachment:11]C:\fakepath\DSC00437.JPG[/attachment]
[attachment:12]C:\fakepath\DSC00443.JPG[/attachment]
[attachment:13]C:\fakepath\DSC00444.JPG[/attachment]
The cylinder head, main cylinder, and crankcase were all dropped off at the machine shop to get cleaned; the main cylinder and the valve stems will also get bead blasted. Additionally, the main frame, battery box, swing arm, and front/rear wheels were also taken to get sandblasted and get power coated. That’s all I have for you guys now. Until next time…
-Shawn
1979 KZ650D2 SR (with coil mod)
Kirker 4 into 1 w/ baffle
VM24s with Velocity Stacks and K&N Filters
Kirker 4 into 1 w/ baffle
VM24s with Velocity Stacks and K&N Filters
Attachments:
Last edit: 25 Aug 2011 01:21 by Parachutist.
Please Log in or Create an account to join the conversation.
- T_Dub
-

- Offline
- User
-
Registered
- Posts: 1445
- Thanks: 25
Re: Cafe Racer Project Time...
25 Aug 2011 08:52
I like your style. Tear it down, clean it up. That'll be a beautiful 650 when you're done!
1977 KZ650B1
-810cc
-Cavanaugh Racing Head
-Mikuni RS34's
-GPR Muffler
-810cc
-Cavanaugh Racing Head
-Mikuni RS34's
-GPR Muffler
Please Log in or Create an account to join the conversation.
Moderators: Street Fighter LTD