
Weekend Face-lift on a small budget.
- MajDSaster
-
 Topic Author
- Offline
- User
-

Registered
- Posts: 62
- Thanks: 1
Weekend Face-lift on a small budget.
09 May 2010 11:45
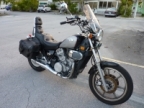
If I had known that my, now ex-wife, was going to get rid of me, I would not have got rid of my old Kz1000 in 2004. When I saw this 1981 LTD for sale, just up the street from me in 2008, I could not help myself and bought it. It needs work, but it runs.

I recently ordered a new Saddleman seat cover and decided to give the bike a quick, weekend face-lift. Being as I have been unemployed for a while, I had to do this on a miniscule budget, which meant spray cans.
The gas tank had a spot on the lower right corner that weeped. This was from the seat rubbing against the tank and is apparently common to the bike as I had the same problem with my old one, when I first bought it. After flushing out the tank, I sanded the spot clean and used a high wattage soldering iron to patch it. I then sanded the solder patch smooth. I was really surprised when I refilled the tank and discovered that my patch job worked!
After removing the Kawasaki nameplates, in order to clear away some rust, I used Squadron Green Modeling Putty to fill in the brackets, (I told you I’m unemployed!) and followed that up with a coat of light grey primer. While I was at it, I did a quick sanding job on the side covers and primed those too. It didn’t take long for the primer to dry as it was a warm and sunny day so I soon applied a coat of gloss black and let them sit in the sun, while praying that no one came tearing up the dirt road to raise a dust cloud.
It’s not the greatest paint job, but it will get me through the summer.
Total time from primer coat to riding was about three hours.

The sissy bar pad was getting pretty crappy so I took it off. As I removed the screws that held it on, I could hear them grinding inside. The threaded metal inserts that they screwed into were all rusted away and the plywood back, inside the pad, was rotted.
So I cut out and drilled a new plywood back, installed a pair of new threaded inserts for the screws and put the pad back together.
The back of the pad was originally covered with a faded and fraying carpet-like material so I cut out a new cover from a sheet of leather, dyed it black and attached it with brass upholstery tacks. I found a small metal eagle at a yard sale for $0.25 so I cleaned it up and painted it with brass paint.

Finally, I test fitted the new seat cover onto the original foam. It fit ok, but the cross seams did not line up with the step. I whacked the bottom of the seat pan with a ball peen hammer where it was rubbing on the gas tank, (and also glued leather patches onto the corners of the gas tank). Using a VERY sharp carving knife, I cut into the foam, removing about an inch, to move the step further back. This would give me a little bit more legroom. I also increased the angle of the step. When I refitted the cover, the seam lined up perfectly with the lower edge of the step, as you can see in the picture. Increasing the angle of the step made it feel more comfortable to me.
I also removed the police-style crash bar that was on the bike.

All in all I am pleased with the results of my low budget face-lift
Seat Cover:
$49.00
One spray can of primer:
$2.79
One spray can Gloss Black:
$1.29
One Pkg Brass Upholstery Tacks: ---- $2.59
Assorted Brass Cap Nuts & Washers: - $4.50
Two Threaded Inserts:
$4.58
One Decorative Metal Eagle:
$0.25
Total:
$65.00
I recently ordered a new Saddleman seat cover and decided to give the bike a quick, weekend face-lift. Being as I have been unemployed for a while, I had to do this on a miniscule budget, which meant spray cans.
The gas tank had a spot on the lower right corner that weeped. This was from the seat rubbing against the tank and is apparently common to the bike as I had the same problem with my old one, when I first bought it. After flushing out the tank, I sanded the spot clean and used a high wattage soldering iron to patch it. I then sanded the solder patch smooth. I was really surprised when I refilled the tank and discovered that my patch job worked!
After removing the Kawasaki nameplates, in order to clear away some rust, I used Squadron Green Modeling Putty to fill in the brackets, (I told you I’m unemployed!) and followed that up with a coat of light grey primer. While I was at it, I did a quick sanding job on the side covers and primed those too. It didn’t take long for the primer to dry as it was a warm and sunny day so I soon applied a coat of gloss black and let them sit in the sun, while praying that no one came tearing up the dirt road to raise a dust cloud.
It’s not the greatest paint job, but it will get me through the summer.
Total time from primer coat to riding was about three hours.
The sissy bar pad was getting pretty crappy so I took it off. As I removed the screws that held it on, I could hear them grinding inside. The threaded metal inserts that they screwed into were all rusted away and the plywood back, inside the pad, was rotted.
So I cut out and drilled a new plywood back, installed a pair of new threaded inserts for the screws and put the pad back together.
The back of the pad was originally covered with a faded and fraying carpet-like material so I cut out a new cover from a sheet of leather, dyed it black and attached it with brass upholstery tacks. I found a small metal eagle at a yard sale for $0.25 so I cleaned it up and painted it with brass paint.
Finally, I test fitted the new seat cover onto the original foam. It fit ok, but the cross seams did not line up with the step. I whacked the bottom of the seat pan with a ball peen hammer where it was rubbing on the gas tank, (and also glued leather patches onto the corners of the gas tank). Using a VERY sharp carving knife, I cut into the foam, removing about an inch, to move the step further back. This would give me a little bit more legroom. I also increased the angle of the step. When I refitted the cover, the seam lined up perfectly with the lower edge of the step, as you can see in the picture. Increasing the angle of the step made it feel more comfortable to me.
I also removed the police-style crash bar that was on the bike.
All in all I am pleased with the results of my low budget face-lift
Seat Cover:
$49.00
One spray can of primer:
$2.79
One spray can Gloss Black:
$1.29
One Pkg Brass Upholstery Tacks: ---- $2.59
Assorted Brass Cap Nuts & Washers: - $4.50
Two Threaded Inserts:
$4.58
One Decorative Metal Eagle:
$0.25
Total:
$65.00
Current Ride: 2005 Kawasaki Vulcan 750
4th Ride: 1981 Kz1000 LTD (2008 - Storage)
3rd Ride: Wife (1999 - 2005)
2nd Ride: 1982 Kz1000 LTD (1983 - 2004)
1st Ride: 1977 Yamaha SX-650 (1981 - 1983)
4th Ride: 1981 Kz1000 LTD (2008 - Storage)
3rd Ride: Wife (1999 - 2005)
2nd Ride: 1982 Kz1000 LTD (1983 - 2004)
1st Ride: 1977 Yamaha SX-650 (1981 - 1983)
Please Log in or Create an account to join the conversation.
- csrjoe
-

- Offline
- User
-
Registered
- Posts: 89
- Thanks: 0
Re: Weekend Face-lift on a small budget.
09 May 2010 12:15
oh oh my seat is starting to rip at the seam, where can I order a seat cover.
Please Log in or Create an account to join the conversation.
- Bad Dad
-

- Offline
- User
-
Registered
- Posts: 195
- Thanks: 0
Re: Weekend Face-lift on a small budget.
09 May 2010 12:21All in all I am pleased with the results of my low budget face-lift
Seat Cover:
$49.00
One spray can of primer:
$2.79
One spray can Gloss Black:
$1.29
One Pkg Brass Upholstery Tacks: ---- $2.59
Assorted Brass Cap Nuts & Washers: - $4.50
Two Threaded Inserts:
$4.58
One Decorative Metal Eagle:
$0.25
Total:
$65.00
Priceless....
")
Have fun riding it... good luck with the job hunt!
76 KZ900LTD
82 GPz750R1
01 VULCAN 800A-CHOPPED
76 IRONHEAD-CHOPPED
77 RD 400 Cafe
82 GPz750R1
01 VULCAN 800A-CHOPPED
76 IRONHEAD-CHOPPED
77 RD 400 Cafe
Please Log in or Create an account to join the conversation.
- Patton
-

- Offline
- KZr Legend
-

Registered
- Posts: 18567
- Thanks: 2103
Re: Weekend Face-lift on a small budget.
09 May 2010 12:29
csrjoe wrote:
Z1 Enterprises carries seat cover replacements for some models.
Good Fortune!
oh oh my seat is starting to rip at the seam, where can I order a seat cover.
Z1 Enterprises carries seat cover replacements for some models.
Good Fortune!
1973 Z1
KZ900 LTD
KZ900 LTD
Please Log in or Create an account to join the conversation.
- MajDSaster
-
Topic Author
- Offline
- User
-
Registered
- Posts: 62
- Thanks: 1
Re: Weekend Face-lift on a small budget.
09 May 2010 14:24
csrjoe wrote:
I ordered mine from DennisKirk.com
(hope it's ok to put that url on here.)
oh oh my seat is starting to rip at the seam, where can I order a seat cover.
I ordered mine from DennisKirk.com
(hope it's ok to put that url on here.)
Current Ride: 2005 Kawasaki Vulcan 750
4th Ride: 1981 Kz1000 LTD (2008 - Storage)
3rd Ride: Wife (1999 - 2005)
2nd Ride: 1982 Kz1000 LTD (1983 - 2004)
1st Ride: 1977 Yamaha SX-650 (1981 - 1983)
4th Ride: 1981 Kz1000 LTD (2008 - Storage)
3rd Ride: Wife (1999 - 2005)
2nd Ride: 1982 Kz1000 LTD (1983 - 2004)
1st Ride: 1977 Yamaha SX-650 (1981 - 1983)
Please Log in or Create an account to join the conversation.
- Mcdroid
-
- Offline
- User
-
Registered
- Gone Kwackers
- Posts: 6823
- Thanks: 461
Re: Weekend Face-lift on a small budget.
09 May 2010 15:28
You done good. I sympathize with the wife thing...took three times for me to find a keeper.
Michael
Victoria, Texas
1982 GPz750
1977 KZ1000A
1978 KZ1000A
1982 GPz1100
1975 Z2A
Victoria, Texas
1982 GPz750
1977 KZ1000A
1978 KZ1000A
1982 GPz1100
1975 Z2A
Please Log in or Create an account to join the conversation.
- hocbj23
-
- User
-
Public
- Thanks: 0
Re: Weekend Face-lift on a small budget.
09 May 2010 16:31
cool work on a small budget. U done good.BJ
Please Log in or Create an account to join the conversation.
- MajDSaster
-
Topic Author
- Offline
- User
-
Registered
- Posts: 62
- Thanks: 1
Re: The Face-lift on a small budget... Continued
12 May 2010 20:13 - 12 May 2010 20:16
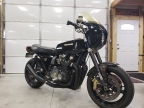
OK. I've had this pair of old VW back-up lights for years and always knew I'd use em for something, someday.
They're pretty well made. All chromed metal. Real glass lenses with a decent dispersal pattern. No plastic in these babies.

I had a piece of copper pipe with a one inch inside diameter in my shop, but was concerned that copper, being relatively soft, will easily deform as the bolts are tightened so I cut a section of one inch diameter hardwood dowel and slid it into the pipe and drilled the mounting holes. In hindsight, I should have drilled an extra hole for a small screw to hold the dowel in place, but I didn’t.
I flattened the ends of the pipe and ground them round on a bench grinder, then drilled the holes for the lights.
Hanging it on a piece of wire, I hit it with some spray primer and then shot it with some glass black, (the same $1.29 can I used on the bike). When it was dry enough to handle, I went to mount it on the bike and realized I’d left the dowel on the bench! ARRRRGH!(This is probably why I don’t work on the space shuttle or do brain surgery)

Now I just need to wire it up. I considered just wiring directly to the battery and mounting a toggle somewhere but ideally, I’d like to connect it to the high-beam circuit.
Guess I’ll have to pull the headlight and look at the wiring.

These little lights are surprisingly bright and after having an EXTREMELY close call with a moose on the way home one night, I thought it might be handy to angle these out a little on each side. These New Hampshire country roads are mighty dark and there’s a lot of critters out there.
They're pretty well made. All chromed metal. Real glass lenses with a decent dispersal pattern. No plastic in these babies.
I had a piece of copper pipe with a one inch inside diameter in my shop, but was concerned that copper, being relatively soft, will easily deform as the bolts are tightened so I cut a section of one inch diameter hardwood dowel and slid it into the pipe and drilled the mounting holes. In hindsight, I should have drilled an extra hole for a small screw to hold the dowel in place, but I didn’t.
I flattened the ends of the pipe and ground them round on a bench grinder, then drilled the holes for the lights.
Hanging it on a piece of wire, I hit it with some spray primer and then shot it with some glass black, (the same $1.29 can I used on the bike). When it was dry enough to handle, I went to mount it on the bike and realized I’d left the dowel on the bench! ARRRRGH!(This is probably why I don’t work on the space shuttle or do brain surgery)
Now I just need to wire it up. I considered just wiring directly to the battery and mounting a toggle somewhere but ideally, I’d like to connect it to the high-beam circuit.
Guess I’ll have to pull the headlight and look at the wiring.
These little lights are surprisingly bright and after having an EXTREMELY close call with a moose on the way home one night, I thought it might be handy to angle these out a little on each side. These New Hampshire country roads are mighty dark and there’s a lot of critters out there.
Current Ride: 2005 Kawasaki Vulcan 750
4th Ride: 1981 Kz1000 LTD (2008 - Storage)
3rd Ride: Wife (1999 - 2005)
2nd Ride: 1982 Kz1000 LTD (1983 - 2004)
1st Ride: 1977 Yamaha SX-650 (1981 - 1983)
4th Ride: 1981 Kz1000 LTD (2008 - Storage)
3rd Ride: Wife (1999 - 2005)
2nd Ride: 1982 Kz1000 LTD (1983 - 2004)
1st Ride: 1977 Yamaha SX-650 (1981 - 1983)
Last edit: 12 May 2010 20:16 by MajDSaster. Reason: typo
Please Log in or Create an account to join the conversation.
- MajDSaster
-
Topic Author
- Offline
- User
-
Registered
- Posts: 62
- Thanks: 1
Re: The Face-lift on a small budget... Continued
27 Oct 2011 13:32
Well, the saga of my 'vintage' machine and my meager funds continues. It has been over a year since I posted my ‘Weekend Facelift on a shoestring budget’ essay and pictures. For a while, due to a continuing, intermittent problem and a lack of finances, I was almost ready to give up on this machine. In the fall of 2009 its performance had dropped so much that I just put it in storage. On the day I rode it over to my storage unit, about fourteen miles from where I live, I could be pretty sure I was the only bike on the road in New Hampshire that day, as it was December 20th and about 21 degrees. A friend followed me in his truck and on the way home, I was glad he had a good working heater.
This Summer I finally took it out of storage and after charging up the battery, got it started. After topping the cells with water, I was surprised that the battery took a charge at all as it was bone dry when I took it out of the bike to take home and put on the charger. Even though it took a charge, it was weak and I knew I’d have to get a new battery.
That first day back on the road, the bike ran ok for most of the day but on the way home, my old gremlin reared it’s head again as the bike lost power and felt as though it was running on two cylinders. This had been a nagging problem since I bought the bike in 2008 and nothing seemed to fix it.
I installed a new battery and all was well for a couple of days but then the battery ran down and I had to put the charger on it every night. I took it to my mechanic who originally thought it might be a bad regulator but eventually tracked it down to a fault in the wiring harness from the alternator. The harness had gotten pinched between two parts of the engine casings and had damaged a wire, probably during a previous disassembly.
Since he repaired the wiring harness, the bike has run all summer without so much as a hic-up. No gagging, no stuttering, no missing. It now starts every day with no problem.
With the bike running more reliably, I felt inspired to do some cosmetic work so I removed the exhaust system, intending to clean it up and give it a coat of high-temperature BBQ and woodstove paint. As I removed the pipes and mufflers there was a lot of flex between the two halves and I realized that the crossover pipe connections were loose. To further my surprise, I discovered the left side exhaust was broken where the two pipes come together and join the muffler. This was normally covered with a chrome heat shield. The heat shield has clamps at each end and was literally holding the exhaust system together.
A friend did a great job of welding the exhaust back together and I ordered a set of 4 copper exhaust gaskets. While I was at it, I ordered a set of 8 new Exhaust Pipe Collars, as the original were fairly rusted and corroded. A stop at the local hardware store produced 8 new Hardened 8mm Flange Nuts to put the whole system back together.

Taking the exhaust system to the local coin operated car wash, I sprayed the pipes and mufflers down with engine cleaner and power washed them off. After a good wipe down, at home, I gave the whole system a couple of coats of black, satin-finish, high temperature, BBQ and woodstove paint.
The paint has a tendency to rub off the chrome easily until you run the engine and heat up the pipes and then the hi-temp paint bonds quite well.
I left the heat shields chrome just because they we in good shape and I liked the contrast.
The bike not only is running good now, it also sounds better and even feels like it has a little more power. Apparently, fixing those exhaust leaks was worth the effort.

This Summer I finally took it out of storage and after charging up the battery, got it started. After topping the cells with water, I was surprised that the battery took a charge at all as it was bone dry when I took it out of the bike to take home and put on the charger. Even though it took a charge, it was weak and I knew I’d have to get a new battery.
That first day back on the road, the bike ran ok for most of the day but on the way home, my old gremlin reared it’s head again as the bike lost power and felt as though it was running on two cylinders. This had been a nagging problem since I bought the bike in 2008 and nothing seemed to fix it.
I installed a new battery and all was well for a couple of days but then the battery ran down and I had to put the charger on it every night. I took it to my mechanic who originally thought it might be a bad regulator but eventually tracked it down to a fault in the wiring harness from the alternator. The harness had gotten pinched between two parts of the engine casings and had damaged a wire, probably during a previous disassembly.
Since he repaired the wiring harness, the bike has run all summer without so much as a hic-up. No gagging, no stuttering, no missing. It now starts every day with no problem.
With the bike running more reliably, I felt inspired to do some cosmetic work so I removed the exhaust system, intending to clean it up and give it a coat of high-temperature BBQ and woodstove paint. As I removed the pipes and mufflers there was a lot of flex between the two halves and I realized that the crossover pipe connections were loose. To further my surprise, I discovered the left side exhaust was broken where the two pipes come together and join the muffler. This was normally covered with a chrome heat shield. The heat shield has clamps at each end and was literally holding the exhaust system together.
A friend did a great job of welding the exhaust back together and I ordered a set of 4 copper exhaust gaskets. While I was at it, I ordered a set of 8 new Exhaust Pipe Collars, as the original were fairly rusted and corroded. A stop at the local hardware store produced 8 new Hardened 8mm Flange Nuts to put the whole system back together.
Taking the exhaust system to the local coin operated car wash, I sprayed the pipes and mufflers down with engine cleaner and power washed them off. After a good wipe down, at home, I gave the whole system a couple of coats of black, satin-finish, high temperature, BBQ and woodstove paint.
The paint has a tendency to rub off the chrome easily until you run the engine and heat up the pipes and then the hi-temp paint bonds quite well.
I left the heat shields chrome just because they we in good shape and I liked the contrast.
The bike not only is running good now, it also sounds better and even feels like it has a little more power. Apparently, fixing those exhaust leaks was worth the effort.
Current Ride: 2005 Kawasaki Vulcan 750
4th Ride: 1981 Kz1000 LTD (2008 - Storage)
3rd Ride: Wife (1999 - 2005)
2nd Ride: 1982 Kz1000 LTD (1983 - 2004)
1st Ride: 1977 Yamaha SX-650 (1981 - 1983)
4th Ride: 1981 Kz1000 LTD (2008 - Storage)
3rd Ride: Wife (1999 - 2005)
2nd Ride: 1982 Kz1000 LTD (1983 - 2004)
1st Ride: 1977 Yamaha SX-650 (1981 - 1983)
Please Log in or Create an account to join the conversation.
- 531blackbanshee
-
- Offline
- Vendor
-

Vendors
- Posts: 7444
- Thanks: 796
Re: The Face-lift on a small budget... Continued
27 Oct 2011 16:52
glad it is working out for you.
leon
leon
skiatook,oklahoma 1980 z1r,1978 kz 1000 z1r x 3,
1976 kz 900 x 3
i make what i can,and save the rest!
billybiltit.blogspot.com/
www.kzrider.com/forum/5-chassis/325862-triple-tree-custom-work
kzrider.com/forum/5-chassis/294594-frame-bracing?limitstart=0
1976 kz 900 x 3
i make what i can,and save the rest!
billybiltit.blogspot.com/
www.kzrider.com/forum/5-chassis/325862-triple-tree-custom-work
kzrider.com/forum/5-chassis/294594-frame-bracing?limitstart=0
Please Log in or Create an account to join the conversation.
Moderators: Street Fighter LTD