Welcome, Guest
Username: Password: Remember me

TOPIC:

Using "Simple Green" on my Z1R's engine 29 Mar 2013 08:02 #579416

  • turboking
  • turboking's Avatar
  • Offline
  • User
  • Posts: 631
  • Thank you received: 106
My .02......I don't like any plating on aluminum parts :blush: , I don't care who plated it. Eventually the chrome will peel/bubble etc... it's a matter of time :huh:
2005 Kawasaki mean streak
2000 325 H.P. mcXpress turbo Hayabusa
1979 kz 1000 mk II ATP turbo
1975 Z1 960 cc Mr. Turbo
1975 Z1 1428 big block ATP turbo
1976 Kz900 1103 cc ATP turbo
1985 GS 1150E
1983 GS 1100E
1997 Suzuki Bandit 1200S
2001 Kawasaki EX 500 Ninja
1972 Honda cb750 (836cc turbo)

Please Log in or Create an account to join the conversation.

Using "Simple Green" on my Z1R's engine 29 Mar 2013 09:23 #579421

  • pig9r
  • pig9r's Avatar
  • Offline
  • User
  • Posts: 64
  • Thank you received: 10
That compressor will do fine. Depending on what pressure you are working with you might have to wait for it every once in a while but it is a major advancement over your previous one. Since you are committed to doing it right by buying the right equipment why don't you take the time to remove the motor from the frame first? No way you can do it right with it in the frame.

Please Log in or Create an account to join the conversation.

Using "Simple Green" on my Z1R's engine 29 Mar 2013 09:29 #579422

  • 650ed
  • 650ed's Avatar
  • Offline
  • User
  • Posts: 15344
  • Thank you received: 2829

turboking wrote:
go for used unchromed covers . chrome plated aluminum that's peeling is a bitch to remove and the covers are probably pitted very bad. replacing these covers has to be a lot cheaper and a lot less aggravating in the long run......my.02

My .02......I don't like any plating on aluminum parts :blush: , I don't care who plated it. Eventually the chrome will peel/bubble etc... it's a matter of time :huh:


+1 ! Plus polished aluminum looks better on an engine because it matches the cases, head, & cylinders (my .02).
1977 KZ650-C1 Original Owner - Stock (with additional invisible FIAMM horn)
The following user(s) said Thank You: wireman

Please Log in or Create an account to join the conversation.

Last edit: by 650ed.

Using "Simple Green" on my Z1R's engine 29 Mar 2013 09:54 #579428

  • nivlac
  • nivlac's Avatar
  • Offline
  • User
  • Posts: 109
  • Thank you received: 5
I agree with all the above. The metal under the chrome may be damage beyond repair. Let me say however about the compressor. I bought one just like it from HD as I said before and used a media blaster from HF like the one pictured above. I was working on the front wheel wells of a 67 Mustang and when I kicked it on it cleaned house. I didn't complete the wheel wells with the blaster because of the mess it would have created on the rest of car. I was in a back asswards restoration with a new engine and transmission installed. But looking back on it I think the the air flow could have been turned DOWN enough to manage the work and still remove the crap. Having said all that the compressor and the media blaster (I was using silica sand)worked superbly. It removed 45 years of road grime, tar, and asphalt in seconds. But as I said I only used for a minute or two and realized I might damage other parts if I continued.
Additionally I use the compressor nonstop on other non related projects most recently I just painted the jams and trunk space of the same mustang and without that compressor, I would have been forced into another purchase.
1983 kz1100
1979 cb650

Please Log in or Create an account to join the conversation.

Last edit: by nivlac.

Using "Simple Green" on my Z1R's engine 29 Mar 2013 10:33 #579435

  • Roadflyer
  • Roadflyer's Avatar
  • Offline
  • User
  • Posts: 157
  • Thank you received: 13
OK, here's exactly what I did and a picture of the results.
I have a 5 hp 40 gal compressor and the exact same sandblaster as you.
The compressor ran steady non stop and left me with about 50 psi set with the reg at the blaster.
I used the sand from my pool filter as I was changing it out anyway.
I taped off all the shiny parts, stuffed rags in the ports then duct tape, more rags and more duct tape- it was sealed!!!
Blasted the whole engine while out of the frame- there is no way I could have done a decent job in frame. Sandblasters love hard crispy stuff, not so much on the softer tape and rubber.
When I was done, I pressure washer all the sand and dust off, re taped all the shiny bits and painted it with PJ1 satin black engine paint.
After that set, I took all the covers off and sanded them with my orbital sander, use 220 to get through the damage and 320 to smooth it out. And half a day on the buffer wheel attached to my cheepie drill press that screams on high speed. also added a polished stainless allen bolt kit from Z1 and this is the result. ( my engine was about half as bad as your to start, it sat outdoors uncovered near the ocean on Vancouver island for 8 years)

Attachment kzmotor001.JPG not found


and this was
1979 kz1000 shaftie rebuild project
1045 wiseco 10.25-1 pistons
Kenny Harmon 380 lift cams
Attachments:

Please Log in or Create an account to join the conversation.

Using "Simple Green" on my Z1R's engine 29 Mar 2013 11:32 #579448

  • newOld_kz1000
  • newOld_kz1000's Avatar Topic Author
  • Offline
  • User
  • FlimFlamFlibbityFlee !! BoonFryedShickaMuhZee !!
  • Posts: 751
  • Thank you received: 20
Thanks all -- especially the very-insightful points from a couple of you pros that "even if you remove the white crud you won't like what's left, the surface of those engine covers is scarred" which confirms that buying a set of used-but-never-been-chromed covers is the way to go.
Just for the sake of experience and for closure I'll blast my current engine covers and post photos of the results, I'm sure that my existing scarred engine covers are not going to return to my engine.

The battle plan now is to proceed to buy the 11.5cfm compressor, also thanks *very* highly to those of you who have the same media blaster model that I have, good gawd that was cool, I know now I'm headed in the right direction.

And thanks Roadflyer for the MKII engine revival photo -- that sucker was inspiring. Beautiful job and the fact that you avoided disassembly and the result looks that good -- that's exactly what I'm after. Thanks for the tips on sealing off all the openings.

1978 kz1000 A2 with Kerker
1980 Z1 Classic with Kerker

Please Log in or Create an account to join the conversation.

Using "Simple Green" on my Z1R's engine 29 Mar 2013 12:39 #579452

  • Kidkawie
  • Kidkawie's Avatar
  • Offline
  • User
  • I bleed premix
  • Posts: 1919
  • Thank you received: 245
I'd be interested in the engraved parts if you remove them, especially the fork lowers.

For the engine, there's no easy way to clean that oxidation/paint off. You need to use elbow grease.

It took me 7 days (no exaggeration) to clean this engine up. I used: paint stripper, mineral spirits, degreaser, brake clean, mag wheel cleaner, soda blast, wire wheels, dremel, air tools, wire brushes, metal files, jewelers files, Scotchbrite pads, Scotchbrite discs, brillo pads, and probably some more stuff I'm forgetting.

You can't just spray something on that to make it look good. Sand is too coarse and will make the surface of the engine rough. Looks like the cam cover (like mine) is too far gone. They are a bitch to polish too.


1975 Z1 900
1994 KX250 Supermoto
2004 KX125

Please Log in or Create an account to join the conversation.

Using "Simple Green" on my Z1R's engine 29 Mar 2013 12:54 #579453

  • bluej58
  • bluej58's Avatar
  • Offline
  • Sustaining Member
  • The chrome don't get you home
  • Posts: 2484
  • Thank you received: 511
Please don't take this the wrong way Kidkawie, but your jugs look real nice :laugh:

What kind of paint stripper did you use ?

JD
78 KZ1000 A2A

Please Log in or Create an account to join the conversation.

Using "Simple Green" on my Z1R's engine 29 Mar 2013 12:56 #579454

  • Grumpy Ole Artist
  • Grumpy Ole Artist's Avatar
  • Offline
  • User
  • Eschew Obfuscation!
  • Posts: 497
  • Thank you received: 62
Not sure of protocol here...Don't mean to "hijack" thread...Saw OMR's results and was inspired...Golly that crankcase looks brand new! Hoping for that kind of results...Did not leave on for 24, but going to give it another try...Roadflyer and KidaKawie, those engines are beautiful...And +1 on the engraving...kinda like an old Colt presentation pistol...very pretty!
1978 KZ650 B2
Former rides...1976 CB360T, 1985 Shadow 700, 1985 GPZ750Turbo
Attachments:

Please Log in or Create an account to join the conversation.

Using "Simple Green" on my Z1R's engine 29 Mar 2013 12:57 #579455

  • Kidkawie
  • Kidkawie's Avatar
  • Offline
  • User
  • I bleed premix
  • Posts: 1919
  • Thank you received: 245
Thanks.

I used the gel type found at Lowes. I don't know what type engine paint the previous owner used but it was like armor plate.
1975 Z1 900
1994 KX250 Supermoto
2004 KX125

Please Log in or Create an account to join the conversation.

Using "Simple Green" on my Z1R's engine 29 Mar 2013 13:19 #579459

  • bluej58
  • bluej58's Avatar
  • Offline
  • Sustaining Member
  • The chrome don't get you home
  • Posts: 2484
  • Thank you received: 511
My spare 1000 engine needs paint removed so I've been watching this thread closely.
I think paint stripper and elbow grease is the way I'll go.

I'm not having to deal with any plating and paint on my sons 650 so I'm melting the grime off with the WD-40 and a scotch brite pad followed up by Mothers aluminum polish then on to aircraft polish and we are getting real good results.

The WD loosens up everything and leaves a dull finish with some dark spots in it , the Mothers is removing most of the dark spots and when I applied the first part of the air craft polish, WOW!
I still have to apply the conditioner but will wait till everything else is caught up.

Before polishing the jugs and casings I will take the engine out side and give it a good spray down with engine cleaner and rise with water.

I'm using it on the carbs too ,trying to keep it out of the ports and wiping it off with paper towels.
Finishing up with carb cleaner and getting good results.

Sorry for the crappy after pic I need a new phone :lol:


78 KZ1000 A2A
Attachments:

Please Log in or Create an account to join the conversation.

Last edit: by bluej58.

Using "Simple Green" on my Z1R's engine 03 Apr 2013 04:25 #580351

  • newOld_kz1000
  • newOld_kz1000's Avatar Topic Author
  • Offline
  • User
  • FlimFlamFlibbityFlee !! BoonFryedShickaMuhZee !!
  • Posts: 751
  • Thank you received: 20
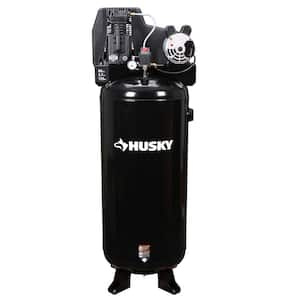
The new 11.5cfm compressor is safely positioned in the garage, $550 from Home Depot, the dang thing did not include a power cord. The red knob in the top middle of the photograph is just above where the power cord gets plugged in.


The reason no power cord is shipped: the new, latest national electric code apparently requires that this unit and others running 240volts AC be plugged into a wall-mounted 240vac 'locking' receptacle. Up until just a couple-three years ago, you could buy a power cord used for electric 240vac clothes dryers like the one you have in your house.

I have to install a new 240vac breaker into my house's circuit breaker panel, then run about 100 feet of 10 gauge (thick copper) wire back to the garage. Then install the required 'lockout' plug then add a power cord to the compressor.

The electricians round here want $1250 for that job, sheesh. :ohmy: :sick: :pinch:

I'll be thus purchasing all the parts -- 10gauge wire, breaker, junction box, 240vac lockout receptacle and installing all that myself, then will have the electrician simply install a 240vac breaker into my house's panel.

*Not* going to pay twice again what the compressor cost just for the wiring.


HERE ARE THE PARTS AND COSTS, SOURCED FROM HOME DEPOT:

1) 100ft of *outdoor* (more robust, methinks) 10/3 (10 gauge, 3-wire) electric cable -- $98 U.S. DOLLARS.


2) one 20-amp, 2-pole 240vac breaker, type "Square-D" (my house panel is a Square-D panel) -- the compressor only pulls 15amps so I'm thinking a 20amp breaker should be fine -- $34 U.S. DOLLARS:


3) one 20-amp industrial 240vac 'lockout' connector (cannot use a house clothes dryer 240vac plug as per the new electical code in the U.S.) -- $18 U.S. DOLLARS


4) one 20-amp 240vac 'turnlock' plug that will be wired to my compressor and will ultimately plug the compressor into the newly-installed 'lockout' receptacle on the wall in the garage -- $18 U.S. DOLLARS


TOTAL PARTS COST: $98 + $34 + $18 + $18 = $168

If I weren't such a coward I'd put the dang 240vac breaker into the panel and connect it myself, however I've been shocked before -- I'll tell you what that feels like. Your memory stops. You suddenly regain awareness of your surroundings but the extra electricity in your body messes up your memory, stops it from working. There I was, chatting with my fellow electronics techs and assisting in troubleshooting an electrical issue on a piece of equipment -- I was chatting away then the next thing I knew they were staring at me and saying 'Are you alright?' From the time the shock began up until they asked if I was okay, that few seconds, my consciousness was just as blank as if I'd been in a deep sleep.

It was after that experience I realized that dying by electric chair was probably humane after all, as the victim had no awareness of it.

So I'll hire an electrician to put the 240vac breaker into the house panel and check all my connections and wiring -- that will cost no more than $200, probably only $100.

Once the compressor is powered I hope to show some outrageously cool results from blasting the engine. I've almost acquired all the used, never-been-chromed engine covers on ebay these past few days.
1978 kz1000 A2 with Kerker
1980 Z1 Classic with Kerker

Please Log in or Create an account to join the conversation.

Last edit: by newOld_kz1000.
Powered by Kunena Forum