Welcome, Guest
Username: Password: Remember me

TOPIC:

1981 KZ1000 J-to-K build 06 Apr 2017 16:25 #758658

  • VTEC
  • VTEC's Avatar
  • Offline
  • User
  • Posts: 558
  • Thank you received: 80
Use a metric 10.9 flange bolt. That's the equivalent to grade 8.

Never used thread lock with a helicoil, and never liked them to begin with; Time-Sert is a stronger repair.

As far as blasting grit is concerned, even more important than clearing bolt holes is clearing oil passages. I've seen it first hand an oil passage to a cam journal plugged solid with blasting media.
KZ1000-K2
ZRX1100
XR400R

Please Log in or Create an account to join the conversation.

1981 KZ1000 J-to-K build 06 Apr 2017 19:40 #758672

  • Shdwdrgn
  • Shdwdrgn's Avatar Topic Author
  • Offline
  • User
  • Posts: 611
  • Thank you received: 24
@Dr. Gamma -- yeah that's what I have in there now, but i haven't ever seen those exact bolts for sale in a store. Now I HAVE seen regular flange bolts, where the flange is more flared out and not square at the shoulders like these are. Of course if I got the regular bolts I could always reduce them slightly in the lathe, but it seems that a hardened bolt is required here. I've had answers to use both the 8.8 and 10.9 bolts, and based on the "7" stamped on the existing bolts it may be that the originals were 8.8's.

@VTEC -- one thing about the blasting on the head, I was extremely careful about not blasting anything on the inside portions. I left all the bearings in place (taped over, though). Nothing should have been sprayed directly into the oil passages, but hey, shit happens. When I pull the head off I'll look over everything closely before I slap it back on again.
1981 KZ1000-JK1
She's a beautiful mess, and I've made her all mine

Please Log in or Create an account to join the conversation.

1981 KZ1000 J-to-K build 06 Apr 2017 20:35 #758679

  • Nessism
  • Nessism's Avatar
  • Away
  • Sustaining Member
  • Posts: 7294
  • Thank you received: 2680
The cylinder head has blind oil passages that are very difficult to clean out if you get blasting grit down in there. I posted a thread here a couple years ago about it and several guys said my concern was silly. I think not!

When blasting the head on my 750 I used SODA for that reason. Even still, I washed out the head and spent a couple of hours cleaning it.

Carb cleaner will help clean those blind bolt holes but not as good as compressed air. Use both, just don't get the carb cleaner in your face (trust me, it's easy to do). After you are sure there is no more grease down in the passages you can switch over to simple green and spray that down all the passages, followed by high pressure water.

Shoot a bunch of cleaner down all the oil passages in the head and follow that up with a brush. Scrub, scrub, scrub. Shoot the cleaner and then chase it with compressed air. You will feel grit coming back out and peppering your hand.

Good luck


The following user(s) said Thank You: GPz550D1

Please Log in or Create an account to join the conversation.

Last edit: by Nessism.

1981 KZ1000 J-to-K build 17 Apr 2017 09:46 #759409

  • Shdwdrgn
  • Shdwdrgn's Avatar Topic Author
  • Offline
  • User
  • Posts: 611
  • Thank you received: 24
Well this weekend certainly had its ups and downs. I got the able of the drill press squared up and then drilled and tapped the holes. The helicoil went in pretty smoothly and didn't cause any problems. And when I put the head back on the bike all the helicoiled holes torqued up without a problem... And then as I finished it up I had three more holes strip out. AARRGGG! So next weekend I'll repeat the same process and hope for the best.

I did discover one serious problem though. Those handful of bolts I mentioned that have the number 7 on the head? They're the wrong bolt, and about 3/16" longer than the proper bolts. Probably explains why several stripped out on the first round, but I made sure I was using all the right bolts this time around. *Hopefully* once I get these last holes patched up I won't have any more problems and I can finally get the top end finished up, but I tell ya, having more of them strip out on me really killed my spirits yesterday. Fortunately I have three more helicoils left (glad I ordered extras!) but all the sand is out of the threads now so there shouldn't be any more damage after this.

While I had it apart again, I did take the air hose to the oil passages. The air by itself didn't do much, but I found WD40 seemed to capture the sand. Also worked good in the blind holes I was doing the helicoil in, allowing me to blow out all the metal shavings.
1981 KZ1000-JK1
She's a beautiful mess, and I've made her all mine

Please Log in or Create an account to join the conversation.

1981 KZ1000 J-to-K build 23 Apr 2017 16:20 #760061

  • Shdwdrgn
  • Shdwdrgn's Avatar Topic Author
  • Offline
  • User
  • Posts: 611
  • Thank you received: 24
Finally! Got the head finished and all torqued down, double-checked the chain position by rotating the crank, then buttoned up the top. That had its own frustrations, I could not for the life of me find the bag of bolts for the head cover. Started digging through the other engine to get a few bolts in place to seat the gasket, then I finally figured out what I had done with the original bolts -- they were in a tupperware container instead of a ziplock like I had done with most of the other bolts. Got all of the bolts snugged down and pulled the sheet back over it again to keep water from the sprinklers out of the intake or exhaust ports.

I also still need to finish the side cover that has the oil level glass. Never step is doing some practice shots with latex in the air brush so I can get the small scales added. If that works well I'll probably use the air brush to do my tank and fenders also. Mose rain and even a chance of snow through this coming week, but maybe tomorrow evening I can get the filler putty on the side of the tank to finish covering the emblem holes. Give it a week for the rain to pass and I can get it sanding down flat and shoot a final coat of primer. And I should look up that guy that does the sand blasting so I can get the fenders and pipes stripped down and also primered.

Looks like I'll be going back and forth between painting and electrical for awhile now. Hmm and it occurs to me that now that the head is finished, I should get the carbs off the workbench and onto the bike. But my brain is fried after all the stress about getting the head finished, so they'll have to wait...
1981 KZ1000-JK1
She's a beautiful mess, and I've made her all mine

Please Log in or Create an account to join the conversation.

1981 KZ1000 J-to-K build 06 May 2017 14:32 #761302

  • Shdwdrgn
  • Shdwdrgn's Avatar Topic Author
  • Offline
  • User
  • Posts: 611
  • Thank you received: 24
I had another thread discussing problems with the getting the carb in place. Basically the airbox boots are shot, but I had a bunch of hefty bills pop up this month so I can get them replaced right away. In the meantime...

Surprisingly the wiring harness looks to be in decent shape, with the exception of a couple yellow wires that look like they were chopped off. Some of it was coming unwrapped so I found a self-fusing silicon tape to wrap it up. Looks decent enough, but time will tell if it holds. Checking back at all my old photos, I think I have a good idea how it's supposed to fish through the frame. I think I just need to loosely zip-tie it in place until I can get new boots for the air box and get the carb in place. There's a lot of little wires that hook up around the engine, and several little doo-dads that I need to get figured out, so that should keep me busy for the weekend. Hopefully by the time I have the parts to finish the intake I'll most of the electrical finished. At this point I'm not even sure if I have a key for either ignition switch, and I know none of the other keyed items match. I think eventually I'll just replace the whole set.

One possibly good thing -- I have four coils that should all be 'functional'. I think there's a resistance test I can do to check which ones might be in the best condition, so I'll have to try and find that.

Over 90 degrees out today, and it was in the 60's yesterday. Had to come in for a bit, time to head back out now...
1981 KZ1000-JK1
She's a beautiful mess, and I've made her all mine

Please Log in or Create an account to join the conversation.

1981 KZ1000 J-to-K build 06 Jun 2017 12:12 #763726

  • Shdwdrgn
  • Shdwdrgn's Avatar Topic Author
  • Offline
  • User
  • Posts: 611
  • Thank you received: 24
A small update... I finished cleaning and priming the gas tank this weekend. Getting a coat of light gray primer on it really shows off the scratches that were in the heavier red primer coat, and there's some obvious indents where the badges originally sat. I think I'll have to apply some more filler around the badge area so I can round it out to match the profile of the rest of the tank, and I switched my sanding block over to 220-grit paper (I was using 100 previously) to really start smoothing out the finish. One thing working for me though -- the color I am using has some metal flake to it which will help hide any imperfections, but I still need it smooth enough for the final clearcoat to come out without flaws.

Since I had the air box off, I cleaned it up and coated it with some rubber undercoat paint. It comes out a nice flat black, slightly textured, that stands out from the glossy black frame. It mostly won't show anyway, but it looks a lot better than the faded black plastic. I'm trying to decide if I want to paint the cover plates in cast-iron or glossy black, but I'm leaning towards the black since they are right next to the side covers which will be the same copper orange color as the tank.

The new carb boots arrived yesterday. I'm going to work with them tonight in the garage, at least get them fitted into the air box. There's a storm rolling in though, so I probably won't be able to get everything back on the bike tonight. Coming in to the weekend I want to sandblast and paint some of the smaller chrome pieces and then get more work done on the electrical. Once the airbox and carbs are back in place I can try to get more of the small electrical pieces bolted in place around the battery box and try to figure out what all these wires were supposed to go to.

Oh yeah, I still need to find something to replace the rubber around the center of the clocks. The speedo was painted last year and is ready for reassembly, the tach won't take long to bring up to the same place. I just need to find a flexible material that won't quickly break down in the sun.
1981 KZ1000-JK1
She's a beautiful mess, and I've made her all mine

Please Log in or Create an account to join the conversation.

1981 KZ1000 J-to-K build 07 Jun 2017 06:39 #763802

  • 531blackbanshee
  • 531blackbanshee's Avatar
  • Offline
  • Vendor
  • Posts: 7447
  • Thank you received: 797
seems replacement rubber for some of the odd bits is the hardest to find.

keep up the progress,

leon
skiatook,oklahoma 1980 z1r,1978 kz 1000 z1r x 3,
1976 kz 900 x 3
i make what i can,and save the rest!

billybiltit.blogspot.com/

www.kzrider.com/forum/5-chassis/325862-triple-tree-custom-work

kzrider.com/forum/5-chassis/294594-frame-bracing?limitstart=0
The following user(s) said Thank You: GPz550D1

Please Log in or Create an account to join the conversation.

1981 KZ1000 J-to-K build 07 Jun 2017 08:26 #763816

  • Shdwdrgn
  • Shdwdrgn's Avatar Topic Author
  • Offline
  • User
  • Posts: 611
  • Thank you received: 24
Finding the pieces has been fairly easy so far, I've picked up most stuff from Partzilla and had quick delivery. Some pieces are rather expensive, but at least they're just a one-time replacement.

The storm blew off yesterday so I was able to get everything back on the bike when I got home. It was a LOT easier to work with the carb when the rubber boots are flexible! Things were a bit tighter this time trying to work with the wiring harness in place, but I think I got everything seated in their proper positions. Got the springs in place on the new boots, but I need to pick up some new hose clamps for the front side. Hmm I need to grab a new air filter soon as well. For now though I need to split my time between the gas tank and the wiring harness. If I can get the engine ready and started up, it will light a fire under my ass to really get moving with the rest of the smaller details...
1981 KZ1000-JK1
She's a beautiful mess, and I've made her all mine

Please Log in or Create an account to join the conversation.

1981 KZ1000 J-to-K build 15 Jun 2017 14:29 #764453

  • Shdwdrgn
  • Shdwdrgn's Avatar Topic Author
  • Offline
  • User
  • Posts: 611
  • Thank you received: 24
For anyone else who comes along to this thread, make note that the VHT high-temp primer is NOT suitable for any pieces you need to sand and smooth. :( 
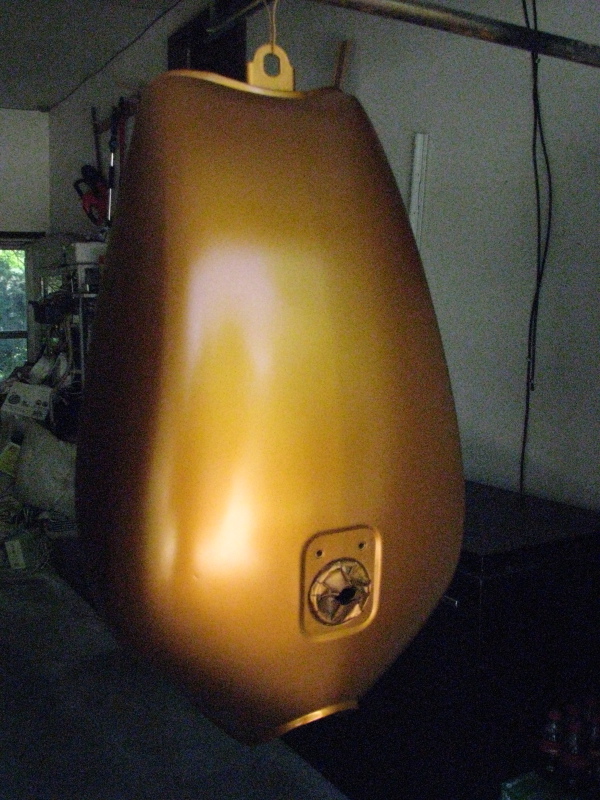
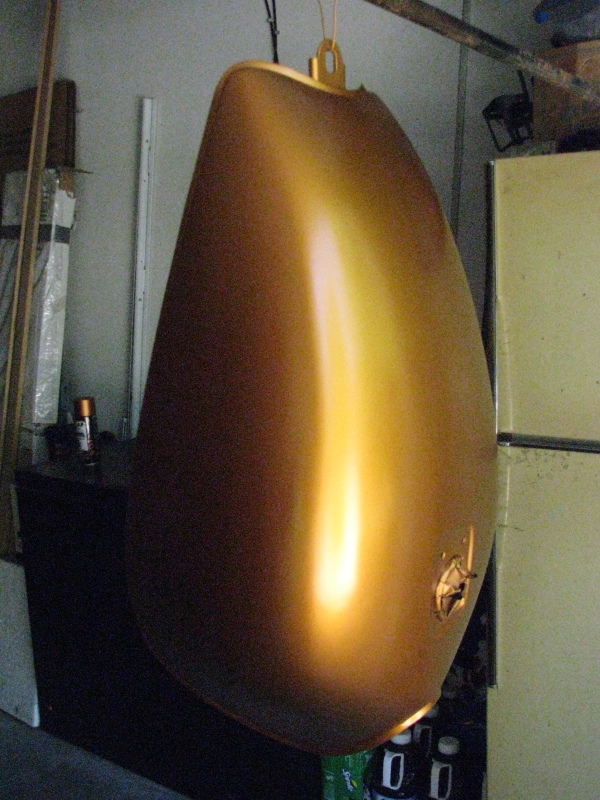
The first coat on my tank was done, what, about three weeks ago? The primer is still gumming up the sandpaper or peeling up chunks. Not good at all! I finally gave up trying to smooth out the surface and just did a brushing of the sandpaper over the entire surface to knock down some of the overspray, then wiped it down with some paper towels and hung the tank back up again. I went back to my usual primer -- rustoleum self-etching -- gave the tank a full coat and let it sit for a couple hours, then wet-sanded the whole thing. Finally got a the finish I was expecting with a whole lot less waiting period. There's still a few rough spots in the primer that needed filled so I gave them a heavier coat and will let it sit overnight before sanding again, but overall the wet surface was looking really good. Temps will be in the upper 90's the next couple days but drop back to the 80's on Sunday so I'm hoping to get the first coats of paint on the tank then.

Still haven't had a chance to get back to the wiring. Busy dealing with doctors for myself and my wife. Not fun, and hard on the checkbook.

Oh but I've been trying out some things with the air brush. Discovered an O-ring has squished, giving a pulsing output, probably explains the troubles I've been having. New part should arrive any day now, and I picked up some enamel paint to start doing scales with. If I can get a good test piece done, then I'll finish off that last engine cover plate and get it on the bike... then finally add oil! So while not a lot of progress, some small things are getting closer.
1981 KZ1000-JK1
She's a beautiful mess, and I've made her all mine

Please Log in or Create an account to join the conversation.

1981 KZ1000 J-to-K build 17 Jun 2017 17:36 #764610

  • Shdwdrgn
  • Shdwdrgn's Avatar Topic Author
  • Offline
  • User
  • Posts: 611
  • Thank you received: 24
I finished sanding the tank today. Wet-sanded with a 320-grit foam block, the last coat of primer filled in the scratches and it looks pretty good when looking at the wet surface. Got it cleaned and dried off, but way too much humidity today for paint. Tomorrow looks promising, about 80 degrees and 30% humidity after lunch, I can definitely work with that, but I do need to go grab a fresh can of paint. In the meantime I also have a pair of side covers to work on here, and one had emblem holes that need filled. I should be able to get some primer on them tomorrow as well, maybe even a coat of paint.

With the humidity and the storm clouds hanging overhead all day, the mosquitoes were thick outside. Just wasn't possible to try and concentrate on the wiring while being eaten alive. I really hope tomorrow is better.
1981 KZ1000-JK1
She's a beautiful mess, and I've made her all mine

Please Log in or Create an account to join the conversation.

1981 KZ1000 J-to-K build 18 Jun 2017 16:31 #764713

  • Shdwdrgn
  • Shdwdrgn's Avatar Topic Author
  • Offline
  • User
  • Posts: 611
  • Thank you received: 24
Got the first few coats laid down, the conditions were perfect so the paint went on very nice. Unfortunately the color brought out some flaws that I had missed, but maybe the wet-sanding will clean it up a little more. I'm not going to mess with it any further though, I need to just get this thing running so I can actually start enjoying it! Anyway, finally seeing this color on a large surface, yeah I'm really liking it. Unfortunately I forgot to change the camera setting so the pics came out grainy... I'll try to do better next time.


Also did some work on the side panels. The one that had the emblem holes also has a little damage around the edges. Gave the whole thing a good sanding and added a bit more putty to smooth out some marks. Also one of the mounting clips has created a crack in the side of the panel, so I need to get some extra plastic in there to strengthen it. The other side is in good shape but the original paint has a lot of cracks so I'll take some heavy sandpaper to break that down and start with a good smooth surface. Maybe I'll get them in primer this week and be ready for paint next weekend.
1981 KZ1000-JK1
She's a beautiful mess, and I've made her all mine
The following user(s) said Thank You: GPz550D1

Please Log in or Create an account to join the conversation.

Powered by Kunena Forum