Welcome, Guest
Username: Password: Remember me

TOPIC:

Advice on this Kz550 31 Jul 2016 07:28 #736811

  • martin_csr
  • martin_csr's Avatar
  • Offline
  • User
  • Posts: 7988
  • Thank you received: 1624
Thanks for the corrections. By any chance, before the Kaw site changed, were you able to use the Kawasaki.com diagrams to note the differences? Or are these observations primarily only obtainable first hand by looking at the parts.

Please Log in or Create an account to join the conversation.

Last edit: by martin_csr.

Advice on this Kz550 31 Jul 2016 07:35 #736812

  • loudhvx
  • loudhvx's Avatar
  • Offline
  • KZr Legend
  • Posts: 10868
  • Thank you received: 1615
I edited my post, and am not as sure as I was. I didn't study the airboxes prior to the re-vamp of the online parts system. There's a lot of gaps in the info now. "Remarks" previously expressed if a part was for a particular model designation, A, C, D etc., but now it only seems to say US or Canada.

Hard to trust anything but holding the part in hand, anymore.

Please Log in or Create an account to join the conversation.

Last edit: by loudhvx.

Advice on this Kz550 31 Jul 2016 07:53 #736814

  • martin_csr
  • martin_csr's Avatar
  • Offline
  • User
  • Posts: 7988
  • Thank you received: 1624
It gets confusing sometimes. hee. Was the A4 sold in the USA?
Kwasaki.com only lists the Canadian airbox part number for the 550-A4.
11010-1161 FILTER-ASSY-AIR,NO-AP (Canada) | CN.
Any idea what AP means?

Please Log in or Create an account to join the conversation.

Last edit: by martin_csr.

Advice on this Kz550 31 Jul 2016 07:57 #736815

  • loudhvx
  • loudhvx's Avatar
  • Offline
  • KZr Legend
  • Posts: 10868
  • Thank you received: 1615
Image searches don't return any photos of the -1054 or the -1160.

But this photo by Ihemrick (Kzrider member) shows the Ltd C model airbox inlet standing proud of the frame rails. On the A and D models, the inlet is below the frame rails. The frame rails are lower on the C model, so I assumed the airbox had to be different accordingly. But now seeing that it sticks up above the frame rails, I suppose it is possible to use the same airbox as the A and D models. At least, I can't rule it out as different. Kawasaki does like to use the same part if it can.


Attachments:

Please Log in or Create an account to join the conversation.

Advice on this Kz550 31 Jul 2016 08:00 #736816

  • loudhvx
  • loudhvx's Avatar
  • Offline
  • KZr Legend
  • Posts: 10868
  • Thank you received: 1615
Yes, the A4 was sold in the U.S. I'm not sure when Canada got the same smog parts the U.S. got, but the difference in the airbox would be a big hole up near the top where clean air is extracted through a hose to feed into the exhaust ports. AP = Air Port?

Please Log in or Create an account to join the conversation.

Advice on this Kz550 31 Jul 2016 08:06 #736817

  • wrenchmonkey
  • wrenchmonkey's Avatar
  • Offline
  • User
  • Posts: 568
  • Thank you received: 75
The shims used in the 550 are the 13mm diameter. I got [ the kit I use for my 550 and 650 here ] on Amazon. It was under $70.
Assuming you find you have to adjust your valve gaps, you may find that some of the existing shims removed will end up being useful in other locations. Example: Cylinder 1, intake is changed for a new shim; that removed shim may be what's needed on Cylinder 3 to get it into specification.
So it's handy to have a micrometer or vernier caliper so you can measure the shims you remove IN CASE their inked sizes are no longer readable. Otherwise, the shims should all be labelled for their thickness in metric.
Shims increase in size by .5mm so when you are measuring your gaps, you will only be adjusting them (with new shims) by + or - .5mm, thus, the feeler gauges only need be in the next size up or down of .5mm. Once I understood this, it made measuring a lot easier for me as I didn't need to know the exact gap/feeler guage, only the "next size" of shim.

Of course, the measuring phase of this is easy because all you are doing is rotating the engine manually to put the cam lobes in position to be measured. However, if you find that a valve gap is no longer within tolerance, you will have to note this (ie: cyl #1, IN or cyl #2 EX) and the existing gap you are able to read. THEN, once you have all your measures made and know which valve gaps you have to adjust, you will have to remove the cam shafts. At this point, you'll want to rotate the engine to a known position so the cam shaft timing marks are going to be in view (as viewed from the right side of engine). Then, you can remove one cam shaft at a time, pop-out the lifters (with a suction cup or magnet) and swap your shims. The shims typically stick to the inside of the lifter but fit into the recess of the valve stem spring retainer disc.
Have some motorcycle spec'd, motor oil handy to lube-up various parts as you go - shims, lifter cups, et cetera.

To be honest, it took me several attempts, my first time ever, to get this all down to a simple process that it is - adjusting the lifter-to-cam-lobe gap to within a tolerance - typically changing shims for thinner shims to open-up this gap... I pulled a lyzdexic moment and increased my shims exactly what I should have decreased them. I dunno. Maybe it was just the damn heat in the garage making me foggy. Bottom line: clear head, correct tools, good Factory Shop Manual and you'll be able to do it successfully.

Here's some pics from my first time on the 550a to help you visualize what you're about to do:


Attachments:

Please Log in or Create an account to join the conversation.

Advice on this Kz550 31 Jul 2016 08:21 #736818

  • loudhvx
  • loudhvx's Avatar
  • Offline
  • KZr Legend
  • Posts: 10868
  • Thank you received: 1615
The new Kawasaki parts fiches are giving me a headache.

The 82 and 83 Kz550A3-A4 models share a parts fiche, but when you look at that same parts fiche image by looking up the different years, the part-number listings are different. Why couldn't they have left it the way it was intended, where the remarks would explain the differences, so it was all in one place, rather than jumping through 10 hoops to get things sorted?

Ok, I think I got it straightened out (and Martin had it right all along, sorry about that):
11010-1103 airbox for A1-A3, D1, and C1-C4 in USA.
11010-1104 airbox for A1-A3, D1, and C1-C4 in Canada.
11010-1054 alternate number for A1-A2 and C1-C2 in Canada.

11010-1160 airbox for A4 in USA.
11010-1161 airbox for A4 in Canada.

I still have to check why it seems the Canadian airbox has two numbers. -1104 and -1054
Edit: Bah...can't figure that one out.

Please Log in or Create an account to join the conversation.

Last edit: by loudhvx.

Advice on this Kz550 31 Jul 2016 09:47 #736822

  • Mcren
  • Mcren's Avatar Topic Author
  • Offline
  • User
  • Posts: 87
  • Thank you received: 4
I guess I will be sticking with the pods until I am able to locate an airbox, I appreciate the verification on the different models not fitting mine loudhvx.I was going to jump the gun and buy one I saw on Ebay glad I did not. Ahh great find wrenchmonkey,The shim kit on amazon does look like a worthy investment to have later on for the next time around the shims need to be changed as well Ill look into getting it. Again, I appreciate the input from everyone feels great to know I can come here with my questions.
1983 KZ550- A4

Please Log in or Create an account to join the conversation.

Advice on this Kz550 03 Aug 2016 10:48 #737235

  • Mcren
  • Mcren's Avatar Topic Author
  • Offline
  • User
  • Posts: 87
  • Thank you received: 4
My feeler gauge came in the mail today along with the shim kit., I managed to get to the cam lobes earlier this week. I also had to remove the carburetors to get a good working area around the tensioner. Rotating the crankshaft seem to be a bit difficult, I did not remove the sparkplugs... but I measured all 8 clearances, fours times in fact (since I had two different gauges). Hopefully the drag putting the feeler gauge in and removing it was the specified drag that was described in the manual.

On a side note removing the right side cover for the crankshaft and to my surprise there was no gasket. Also the cover is a bit beat up.

Exhaust
.229/.23
.178/.18
.178/.18
.203/.20

Intake
.152/.15
.127/.13
.203/.20
.178/.18
1983 KZ550- A4

Please Log in or Create an account to join the conversation.

Re:Advice on this Kz550 03 Aug 2016 10:50 #737236

  • Mcren
  • Mcren's Avatar Topic Author
  • Offline
  • User
  • Posts: 87
  • Thank you received: 4


Sent from my D5803 using Tapatalk
1983 KZ550- A4

Please Log in or Create an account to join the conversation.

Re:Advice on this Kz550 03 Aug 2016 13:16 #737256

  • carwash
  • carwash's Avatar
  • Offline
  • User
  • Posts: 101
  • Thank you received: 1
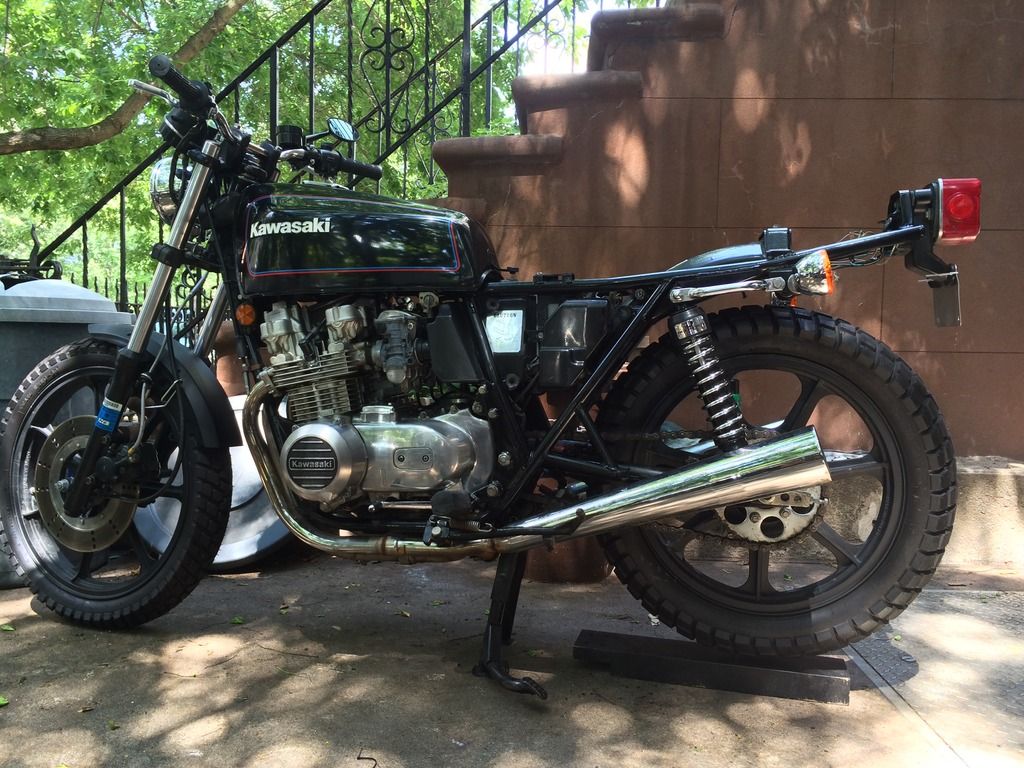
Hey Mcren, fellow KZ550A owner here, I'm in Brooklyn. Not a lot of these around. I remember seeing yours on Craigslist a few weeks ago. I picked mine up this winter. It's needed a few little things here and there, but a pretty solid bike and a blast to ride. These bikes have a fairly steep rake angle and handle beautifully.
Let me know if you want to meet up sometime and compare notes. Also as it goes with vintage bike ownership, I'm amassing a small pile of extra parts, so who knows, maybe I'll have something you need/want for your bike. I do have a 4 into 1 Mac header for this model I"m not using.
Anyhow, happy wrenching!
1980 KZ550A
1980 CB750F

Please Log in or Create an account to join the conversation.

Re:Advice on this Kz550 03 Aug 2016 13:20 #737257

  • carwash
  • carwash's Avatar
  • Offline
  • User
  • Posts: 101
  • Thank you received: 1
Also, in a couple of your pics it looks like you have only one throttle cable?
1980 KZ550A
1980 CB750F

Please Log in or Create an account to join the conversation.

Powered by Kunena Forum