Welcome, Guest
Username: Password: Remember me
  • Page:
  • 1
  • 2

TOPIC:

KZ750 LTD Hole in Engine 29 Mar 2006 08:03 #35162

  • steell
  • steell's Avatar
  • Offline
  • User
  • Posts: 6850
  • Thank you received: 207
KD9JUR

Please Log in or Create an account to join the conversation.

KZ750 LTD Hole in Engine 29 Mar 2006 08:28 #35168

  • VAkzbikeguy
  • VAkzbikeguy's Avatar Topic Author
  • Offline
  • User
  • Posts: 17
  • Thank you received: 0
Thanks for blowing up the pic steell.

Wiredgeorge, thanks for your advice about splitting the cases. I am new to this and was under the impression that I have to take off the head and block in order to work on the crankcase. My personal opinion is that it gives me an opportunity to go over every inch of the motor and inspect/fix/replace as necessary.

I was going to work on it last night but realized that I wasn't prepared enough. I need more storage bins to keep bits organized as they come off the motor, and I need a set of calipers to measure things as I pull them off to check tolerances. Sears, here I come.

Unfortunately, tonight will be a wash, because I have a happy hour to go to after work. Hopefully, I'll have time Thursday and Friday evenings. Of course, Saturday will be a great day to work considering the wifey will be away. ;)

Please Log in or Create an account to join the conversation.

KZ750 LTD Hole in Engine 29 Mar 2006 09:53 #35190

  • steell
  • steell's Avatar
  • Offline
  • User
  • Posts: 6850
  • Thank you received: 207
I just linked to your post in the New Members forum with the pic in it :)

Just for grins you could remove the spark plug directly above that hole and stick a piece of wire down in there to see if there is even a piston left.

IMHO, either there is no piston left, or it is all the way at the top of the bore, my guess is there is no piston there (it's in pieces at the bottom).

I have actually seen a four cylinder Indian that was being used in hillclimbs that had the #4 rod and piston removed and was being raced as a 3 cylinder :)

People do strange things :D
KD9JUR

Please Log in or Create an account to join the conversation.

KZ750 LTD Hole in Engine 29 Mar 2006 11:44 #35213

  • farmer fred
  • farmer fred's Avatar
  • Offline
  • User
  • Posts: 24
  • Thank you received: 0
Is it possible that the hole was caused by something off the starter drive or the chain?

Please Log in or Create an account to join the conversation.

KZ750 LTD Hole in Engine 29 Mar 2006 11:53 #35216

  • RomSpaceKnight
  • RomSpaceKnight's Avatar
  • Offline
  • User
  • Posts: 452
  • Thank you received: 2
Steell is correct, my bad. Did not realize discussion was upper and lower crankcases. Probably would not be the best idea to mix and match. If you do Plastigage strips are amazing for checking clearances. Everything else I said applies "Check everything for broken pieces, metal fragments and damage".

Please Log in or Create an account to join the conversation.

KZ750 LTD Hole in Engine 29 Mar 2006 14:23 #35250

  • steell
  • steell's Avatar
  • Offline
  • User
  • Posts: 6850
  • Thank you received: 207
farmer fred wrote:

Is it possible that the hole was caused by something off the starter drive or the chain?


The starter drive is at the opposite end of the chrome cover from the hole and the starter drives the engine countershaft directly, and the countershaft drives the crankshaft via the primary chain right at the opposite end of the chrome (starter) cover from the hole.

There is nothing in that area to make that hole except the rod, and the hole is real close to being inline with the rod (I can't say for sure though, because it's a pic).

The hole being round indicates the rod did not sieze to the crank and break, because if it had done that the hole would have been a slot. :)
KD9JUR

Please Log in or Create an account to join the conversation.

KZ750 LTD Hole in Engine 30 Mar 2006 16:05 #35527

  • VAkzbikeguy
  • VAkzbikeguy's Avatar Topic Author
  • Offline
  • User
  • Posts: 17
  • Thank you received: 0
I started getting into the engine a bit after work today and got stuck.

The manual I have says to remove the shims and valve stems before removing the cylinder head. Unfortunately, the manual doesn't say HOW to remove those parts.

I tried turning the shiney thingies (<~ very technical term) inside the cylinder head but they don't seem to do anything. The picture in the manual wasn't that great. It did look as though the shims were quite a bit smaller than the shiney thingies.


Any ideas? Should I just proceed to remove the head?

Post edited by: vakzbikeguy, at: 2006/03/30 19:15

Please Log in or Create an account to join the conversation.

KZ750 LTD Hole in Engine 30 Mar 2006 16:38 #35540

  • wireman
  • wireman's Avatar
  • Visitor
leave the buckets in there and just pull the head off.if everything looks normal then pull the cylinder off you should be seeing some carnage by then.:whistle: goodluck,happy wrenching!

Please Log in or Create an account to join the conversation.

KZ750 LTD Hole in Engine 30 Mar 2006 16:39 #35541

  • OKC_Kent
  • OKC_Kent's Avatar
  • Offline
  • User
  • Posts: 1716
  • Thank you received: 20
From what I see in the picture, you are at the point where you remove the head. You can't remove the "valve stems" without a valve compressor, which won't work until you pull the head off completely. This engine uses under the bucket shims, yes? If so those "shiny thingies" are the buckets, and a magnet will pull them up for removal.
Oklahoma City, OK
78 KZ650 B2 82,000+ miles

Please Log in or Create an account to join the conversation.

KZ750 LTD Hole in Engine 30 Mar 2006 17:52 #35567

  • VAkzbikeguy
  • VAkzbikeguy's Avatar Topic Author
  • Offline
  • User
  • Posts: 17
  • Thank you received: 0
Okay...I'm an idiot. :laugh: I figured out what the book was talking about. I pulled out the "buckets" (aka valve lifters?) and shims (left the shims in the buckets actually). And then....drum roll please...I pulled off the head and block to reveal what OKC_Kent so aptly called "the carnage".

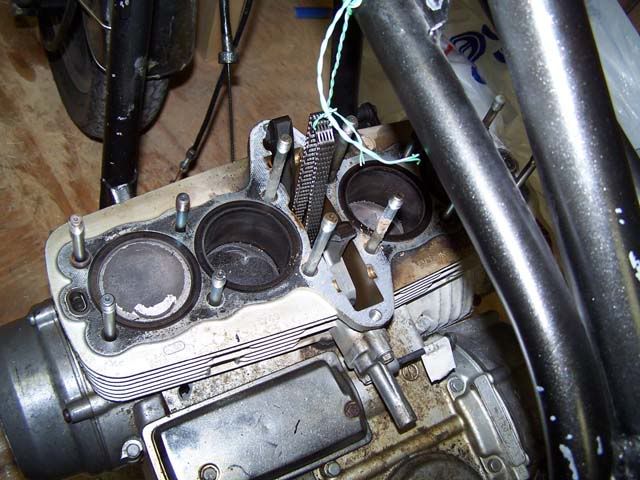
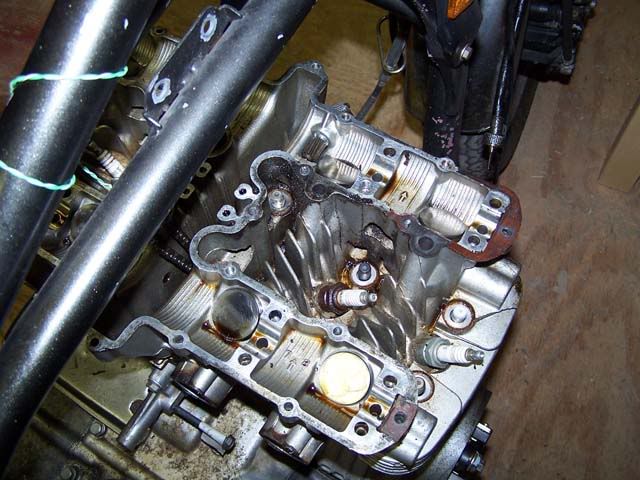
Here is the a pic with the head off. I'm no mechanic, but already I can tell the pistons aren't where they should be.


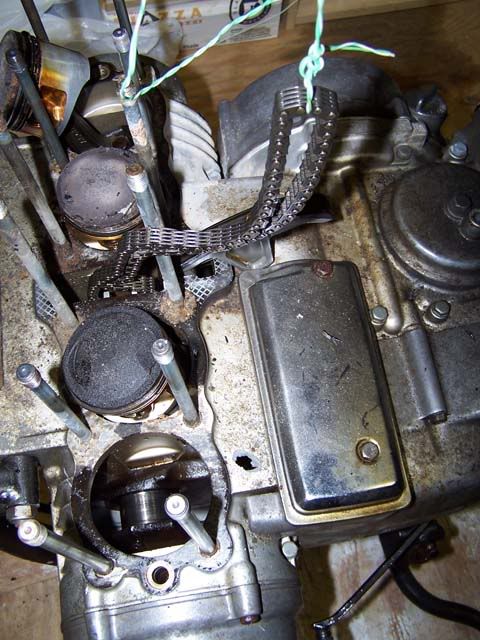
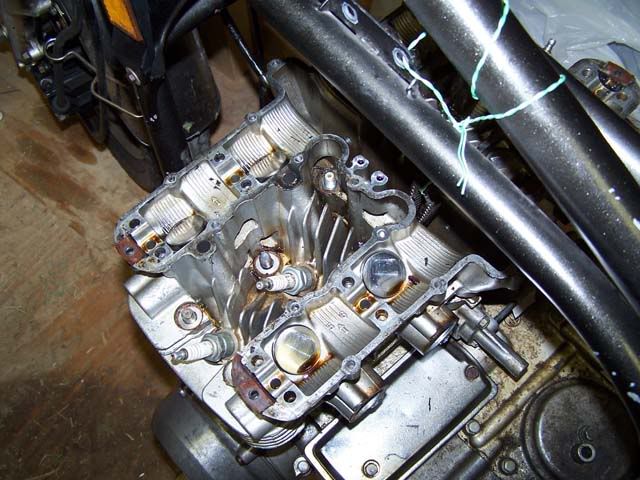
Here is a better view with the block off.


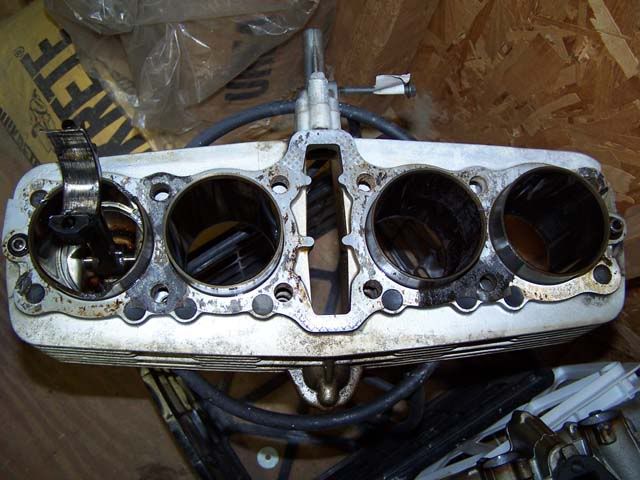
Now for some exciting photos! Here is the underside of the block, which shows how the sleeve for piston #1 is all chewed up.


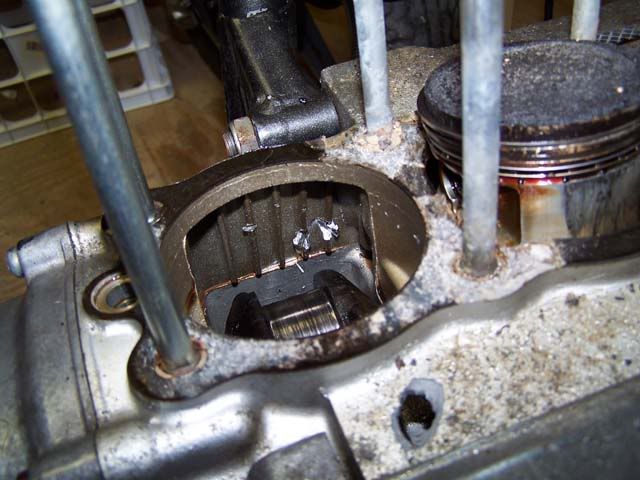
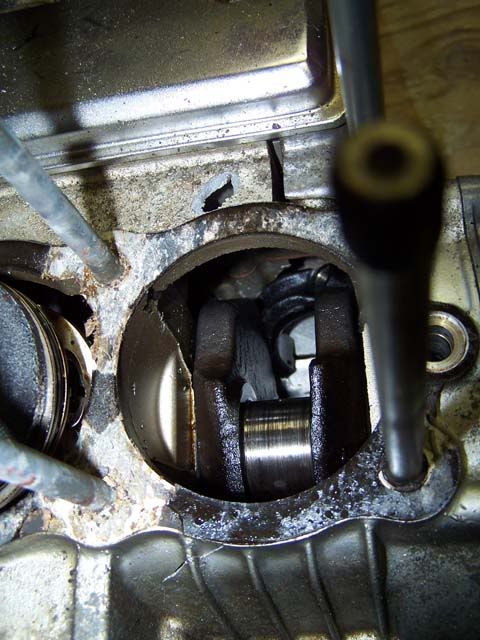
Here is some more carnage in the crankcase.


And...here is what I think caused the failure.


Yep, it looks like the connecting rod for piston #1 broke. It then tossed around the crankcase chewing up the inside, tearing up the cylinder sleeve, and finally causing some shrapnel to exit the case. The broken piece of rod got wedged in the case, which is preventing the crank from turning. I also noticed that the abrupt stoppage must have caused the crankcase to buldge or flex out in certain spots ever so slightly.

I'm no expert, but I think this engine is shot and good for some minor parts. Oh well, it looks as though I'm in the market for an engine.

Please Log in or Create an account to join the conversation.

KZ750 LTD Hole in Engine 30 Mar 2006 21:41 #35640

  • Sandy
  • Sandy's Avatar
  • Offline
  • User
  • Fly High,Tony
  • Posts: 2452
  • Thank you received: 13
Bummer...I can see a crack in the front of the case too.:pinch:
Well...at least You now have the experience on tearing down a motor,right...good job,Bud.
Now...We just gotta find You a NEW one...if I could help You out...I would,but I don't have ANY 750 parts.
Anyone?...:whistle: Let's see if We can help Him get a new heart into that body...
1977 KZ1000 A-1

Please Log in or Create an account to join the conversation.

KZ750 LTD Hole in Engine 31 Mar 2006 05:50 #35681

  • wiredgeorge
  • wiredgeorge's Avatar
  • Offline
  • User
  • Posts: 5310
  • Thank you received: 44
OK... at this point, you are probably down on this project but if it were mine, I would pop a new crankshaft and a new block/pistons. Weld holes/cracks. The welding will have to be done by a shop that can do aluminum. To split the cases, you will need to pull the cases out of the bike frame. There are about 17 bolts on the bottom and 5 on the top. Remove these and use the 8mm holes they give you for inserting bolts. these bolts, when threaded into the holes, will split the cases. I think you should have two on the front of the engine and one in the rear; maybe two. The cases should be split with the engine upside down. You just lift off the lower case and the crank will have four bolts holding the crank keeper. You will also have to remove the oil pump (3 bolts I think) because the oil pump is gear driven off the crank. Once you have the engine out, removing the bolts and splitting the cases is only about an hour's work. Find a new crank, block and pistons on eBay or from another kzrider member. Make sure the pistons are marked for the cylinder they came out of and when you get them, MEASURE using bore gauge and caliper the bore and piston diameter to ensure the clearance is within spec. Honestly, at this point, if you had the parts on hand (and a new cam shaft), you are not that far from getting this thing fixed! It all just bolts back together the way it came apart. It would be a great time to look at the gears/shift forks in your transmission.
wiredgeorge Motorcycle Carburetors
Mico TX
www.wgcarbs.com
Too many bikes to list!

Please Log in or Create an account to join the conversation.

  • Page:
  • 1
  • 2
Powered by Kunena Forum