
Rebuild of KZ1000J engine
- kzstreetfighter71
-
- Offline
- User
- Atlantic West Coast
- Posts: 823
- Thanks: 208
Re: Rebuild of KZ1000J engine
25 Jul 2022 13:48I removed the valve seals today. Had no luck with the special plier set I bought. An ordinary needle nose plier did the trick however, confirming what zed1015 saidSo dont by any special tool for removing and installing the seals...
After that I used the car power washer to clean up the head some more, especially around the valve guides. Worked pretty well and the runners cleaned up nicely.
Read the clymer manual about splitting the crankcase now, so that is the next task
Just make sure you double and then triple check all bolts and fasteners are removed before using the 3 bolt holes to split the cases, even one left in can be bad news
06 Gsf 1200 bandit, 08 Triumph tiger 1010
05 Yam xv1700 , 02 Hon shadow 1100
1975 Z1 (currently working on)
1977 Z1000 ( running and in storage)
1978 Z1000 (currently working on)
1978 Z1r "skinny tank" (currently working on)
1978 Z1r "fat tank (gathering parts)
1979 z1000st (currently working on)
05 Yam xv1700 , 02 Hon shadow 1100
1975 Z1 (currently working on)
1977 Z1000 ( running and in storage)
1978 Z1000 (currently working on)
1978 Z1r "skinny tank" (currently working on)
1978 Z1r "fat tank (gathering parts)
1979 z1000st (currently working on)
Please Log in or Create an account to join the conversation.
- Wookie58
-

- Offline
- Moderator
- Posts: 4896
- Thanks: 2968
Re: Rebuild of KZ1000J engine
25 Jul 2022 14:29The tool Jonas bought (ref my post) has drifts with centre pins in the kitIt can be tricky to install new seals. I use a pencil like device that I put in the center of the guide and then drop a seal over the device. Once it's on the guide it can be pressed on with your thumb.

1982 KZ1000 Ltd
www.kzrider.com/forum/11-projects/617631...-82-begins?start=192
kzrider.com/filebase-alias?view=download...d-fault-diagnosis&ca
www.kzrider.com/forum/11-projects/617631...-82-begins?start=192
kzrider.com/filebase-alias?view=download...d-fault-diagnosis&ca
Please Log in or Create an account to join the conversation.
- Mikaw
-
- Offline
- Sustaining Member
- Posts: 4837
- Thanks: 1851
Re: Rebuild of KZ1000J engine
25 Jul 2022 17:20
There are 2 bolts under the starter that are commonly forgot and the case can be damaged.
1976 KZ 900 A4
kzrider.com/forum/11-projects/613548-1976-kz-900-a4
1976 KZ 900 B1 LTD
1978 KZ 1000 B2 LTD
1980 KZ 750 E1
Kowledge Speaks, But Wisdom Listens.
Jimi Hendrix.
1976 KZ 900 B1 LTD
1978 KZ 1000 B2 LTD
1980 KZ 750 E1
Kowledge Speaks, But Wisdom Listens.
Jimi Hendrix.
The following user(s) said Thank You: daveo, howardhb, Jonas_Z1000j
Please Log in or Create an account to join the conversation.
- Jonas_Z1000j
-
 Topic Author
- Offline
- User
- Posts: 94
- Thanks: 31
Re: Rebuild of KZ1000J engine
26 Jul 2022 12:42 - 26 Jul 2022 12:47
Thanks for the heads up on the case split, I will make sure to triple check!
@Wookie58 Im sure the center pins will come in handy for that
I removed the engine from the frame today and started with a makeshift engine cradle.
Edit: anyone have a picture of how you support the engine upside down to remove the oil pan and case? The connecting rods bugs me a bit...
Will go to Norway to visit a friend now for a couple of days, have to use the car though as the family is tagging along (Its some really nice roads and scenary between Sweden and Norway over the mountains for motorcycle riding). Will start the camchain work after that!
Z1000 J2 -82 not so running restoration object anymore
Z900RS -21 Green/Yellow
Z900RS -21 Green/Yellow
Last edit: 26 Jul 2022 12:47 by Jonas_Z1000j.
Please Log in or Create an account to join the conversation.
- 577nitro
-

- Offline
- User
- Posts: 287
- Thanks: 56
Re: Rebuild of KZ1000J engine
26 Jul 2022 18:04Thanks for the input!
I have lapped 4 valves now, it was more work with this than I anticipated
A bit late, I performed the wiggle test on all the valves. Every valve wiggle is my conclusion. The exhaust valves a bit less, intake more. I tried both at barely open and somewhere close to full opening. With oil on the shafts and barely open, there is no wiggle.
I have read threads here about replacing these and I understand that the normal procedure is to replace guide, grind seat and new valve?
Does anyone know how much of the wear is typically the guide and how much is on the valve shaft? I tried measuring the shafts with a digital caliper (not accurate enough) and the valve shafts do seem to have measurable wear.
It would be easy to simply buy new valves and lap them, if the result would be good enough. Any thoughts on this?
Also the wiggle test, with or without oil?
thanks!
/Jonas
I trick I found for lapping the valves is to use a cordless drill. With the valves in, put some lapping compound on the valve seats, push the valve tight home on the seat. Put tape on the valve stem (masking two coats). Open the chuck on a cordless drill, chuck the valve stem in, tighten to just snug enough to hold (do not over tighten!). Using low speed spin the valve, and pull up against the seat. It doesn't take very long to get a nice polish. Not all valves can be done this way due to position and length. Reverse direction also, this mimics the back and forth motion of lapping by hand. I'll say it again, go light, go slow, be care full.
577nitro-
Please Log in or Create an account to join the conversation.
- Jonas_Z1000j
-
Topic Author
- Offline
- User
- Posts: 94
- Thanks: 31
Re: Rebuild of KZ1000J engine
02 Aug 2022 11:41 - 02 Aug 2022 11:42
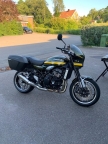
Thanks for the tip, I have seen a couple of youtube vids on lapping with the cordless drill. Im a bit anxious though that I will damage the stem or grind off too much seat. Very well, before I started with the KZ again I installed 2 cases on my Z900RS, will do some touring next weekend! Looks better then expected?

Removed engine from frame and then some covers, pan, oil pump and all the case bolts. All good so far!
5 bolts removed with engine sitting on the pan (2 was by the starter)
16 bolts removed with engine upside down + the 8 bigger bolts (4+4) for the crank. This should be all according to the Clymer manual.
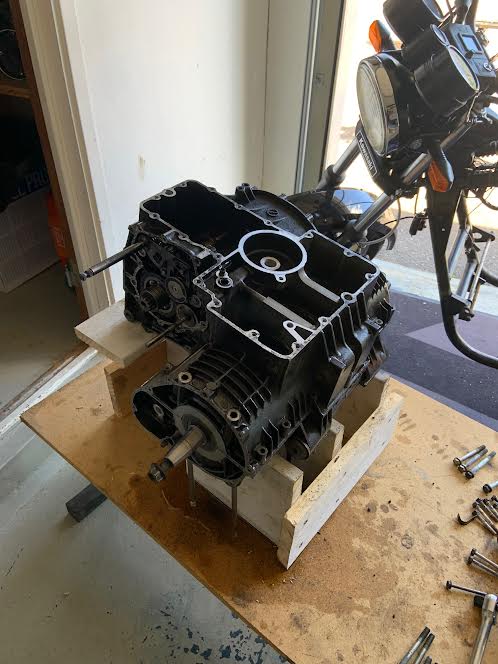
It should be ready then to pry apart? you dont have to disengage anything in the gearbox before taking it apart?
Any other words of wisdom before?

thanks a lot!
Removed engine from frame and then some covers, pan, oil pump and all the case bolts. All good so far!
5 bolts removed with engine sitting on the pan (2 was by the starter)
16 bolts removed with engine upside down + the 8 bigger bolts (4+4) for the crank. This should be all according to the Clymer manual.
It should be ready then to pry apart? you dont have to disengage anything in the gearbox before taking it apart?
Any other words of wisdom before?
thanks a lot!
Z1000 J2 -82 not so running restoration object anymore
Z900RS -21 Green/Yellow
Z900RS -21 Green/Yellow
Last edit: 02 Aug 2022 11:42 by Jonas_Z1000j.
Please Log in or Create an account to join the conversation.
- Wookie58
-
- Offline
- Moderator
- Posts: 4896
- Thanks: 2968
Re: Rebuild of KZ1000J engine
02 Aug 2022 11:53Lot's of tapping with a plastic or raw-hide mallet and no "prying" with levers if you can avoid itThanks for the tip, I have seen a couple of youtube vids on lapping with the cordless drill. Im a bit anxious though that I will damage the stem or grind off too much seat. Very well, before I started with the KZ again I installed 2 cases on my Z900RS, will do some touring next weekend! Looks better then expected?
Removed engine from frame and then some covers, pan, oil pump and all the case bolts. All good so far!
5 bolts removed with engine sitting on the pan (2 was by the starter)
16 bolts removed with engine upside down + the 8 bigger bolts (4+4) for the crank. This should be all according to the Clymer manual.
It should be ready then to pry apart? you dont have to disengage anything in the gearbox before taking it apart?
Any other words of wisdom before?
thanks a lot!

1982 KZ1000 Ltd
www.kzrider.com/forum/11-projects/617631...-82-begins?start=192
kzrider.com/filebase-alias?view=download...d-fault-diagnosis&ca
www.kzrider.com/forum/11-projects/617631...-82-begins?start=192
kzrider.com/filebase-alias?view=download...d-fault-diagnosis&ca
Please Log in or Create an account to join the conversation.
- zed1015
-

- Offline
- User
- Posts: 3130
- Thanks: 1736
Re: Rebuild of KZ1000J engine
02 Aug 2022 12:24 - 02 Aug 2022 12:25Yep! no need for any prying or mallets.Lot's of tapping with a plastic or raw-hide mallet and no "prying" with levers if you can avoid it
There's 3 m8 threaded holes that take jacking bolts to gently push the cases apart.
AIR CORRECTOR JETS FOR VM CARBS AND ETHANOL RESISTANT VITON CHOKE PLUNGER SEAL REPLACMENT FOR ALL CLASSIC AND MODERN MOTORCYCLE CARBURETTORS
www.kzrider.com/23-for-sale/611992-air-c...lide-mikunis?start=0
www.kzrider.com/23-for-sale/611992-air-c...lide-mikunis?start=0
Last edit: 02 Aug 2022 12:25 by zed1015.
The following user(s) said Thank You: Mikaw, Jonas_Z1000j, Wookie58
Please Log in or Create an account to join the conversation.
- Jonas_Z1000j
-
Topic Author
- Offline
- User
- Posts: 94
- Thanks: 31
Re: Rebuild of KZ1000J engine
02 Aug 2022 12:53
Aha! the Clymer does not mention this, it says prying on both sides of the crank. I will see if I can locate these threaded m8 holes tomorrow. thanks a lot!
Z1000 J2 -82 not so running restoration object anymore
Z900RS -21 Green/Yellow
Z900RS -21 Green/Yellow
Please Log in or Create an account to join the conversation.
- Scirocco
-

- Offline
- Premium Member
- Never change a running system
- Posts: 4414
- Thanks: 2264
Re: Rebuild of KZ1000J engine
02 Aug 2022 15:57
The cases and faring looking great on your z900!!!
My 1975 Z 1 B 900 Project
www.kzrider.com/forum/11-projects/605133...ears-deep-sleep-mode
www.kzrider.com/forum/11-projects/605133...ears-deep-sleep-mode
Please Log in or Create an account to join the conversation.
- Dr. Gamma
-

- Offline
- Sustaining Member
- Posts: 1230
- Thanks: 689
Re: Rebuild of KZ1000J engine
02 Aug 2022 16:38 - 02 Aug 2022 16:39
Do yourself a huge favor and get a hold of a genuine factory Kawasaki shop manual. I like how you say your Clymer manual makes no mention of using the three 8mm threaded holes used to help to split the case haves. Clymer manuals have a bad habit of leaving out certain information like that throughout the whole shop manual. The factory manuals are always a more complete manual than your Clymer manual.
!!!!Important Note!!!!!! When you use those three 8mm bolts to split the cases. If you leave just ONE case bolt in place and you keep cranking down on those three 8mm bolts. And your cases are still not coming apart and you crank down on those bolts a little bit more. The next sound you will hear is a snapping sound as a put a nice crack in your lower case!!!! I have watched a few dealership "mechanics" make that mistake!!! Its a very distinctive sound you don't want to ever hear!!! Just triple check to make sure ALL the case bolts have been removed!!!!

!!!!Important Note!!!!!! When you use those three 8mm bolts to split the cases. If you leave just ONE case bolt in place and you keep cranking down on those three 8mm bolts. And your cases are still not coming apart and you crank down on those bolts a little bit more. The next sound you will hear is a snapping sound as a put a nice crack in your lower case!!!! I have watched a few dealership "mechanics" make that mistake!!! Its a very distinctive sound you don't want to ever hear!!! Just triple check to make sure ALL the case bolts have been removed!!!!
1972 H2 750 Cafe Racer built in 1974.
1976 KH400 Production Road Racer.
1979 Kz1000 MK. II Old AMA/WERA Superbike.
1986 RG500G 2 stroke terror.
1986 GSXR750RG The one with the clutch that rattles!
Up in the hills near Prescott, Az.
1976 KH400 Production Road Racer.
1979 Kz1000 MK. II Old AMA/WERA Superbike.
1986 RG500G 2 stroke terror.
1986 GSXR750RG The one with the clutch that rattles!
Up in the hills near Prescott, Az.
Last edit: 02 Aug 2022 16:39 by Dr. Gamma.
Please Log in or Create an account to join the conversation.
- Scirocco
-
- Offline
- Premium Member
- Never change a running system
- Posts: 4414
- Thanks: 2264
Re: Rebuild of KZ1000J engine
02 Aug 2022 17:04
You are correct, lazy US machanics always use impact guns, who cares what´s next......
My 1975 Z 1 B 900 Project
www.kzrider.com/forum/11-projects/605133...ears-deep-sleep-mode
www.kzrider.com/forum/11-projects/605133...ears-deep-sleep-mode
Please Log in or Create an account to join the conversation.