
77 KZ650B Restoration/Build
- 650ed
-

- Offline
- User
-

Registered
- Posts: 15334
- Thanks: 2831
Re: 77 KZ650B Restoration/Build
25 Oct 2019 17:33lakshan wrote: Hey, might be a silly question but would you guys rather get the bike started on potentially 2 year old oil to get it warm and easy to change? Or would you change it cold and maybe do another oil change in a closer interval to really get all the old stuff out?
Most of the muck will probably have settled to the bottom of the pan, so I would change it cold rather than pump that stuff back up into the engine. Ed
1977 KZ650-C1 Original Owner - Stock (with additional invisible FIAMM horn)
The following user(s) said Thank You: lakshan
Please Log in or Create an account to join the conversation.
- lakshan
-
 Topic Author
- Offline
- User
-
Registered
- Posts: 82
- Thanks: 7
Re: 77 KZ650B Restoration/Build
26 Oct 2019 15:51
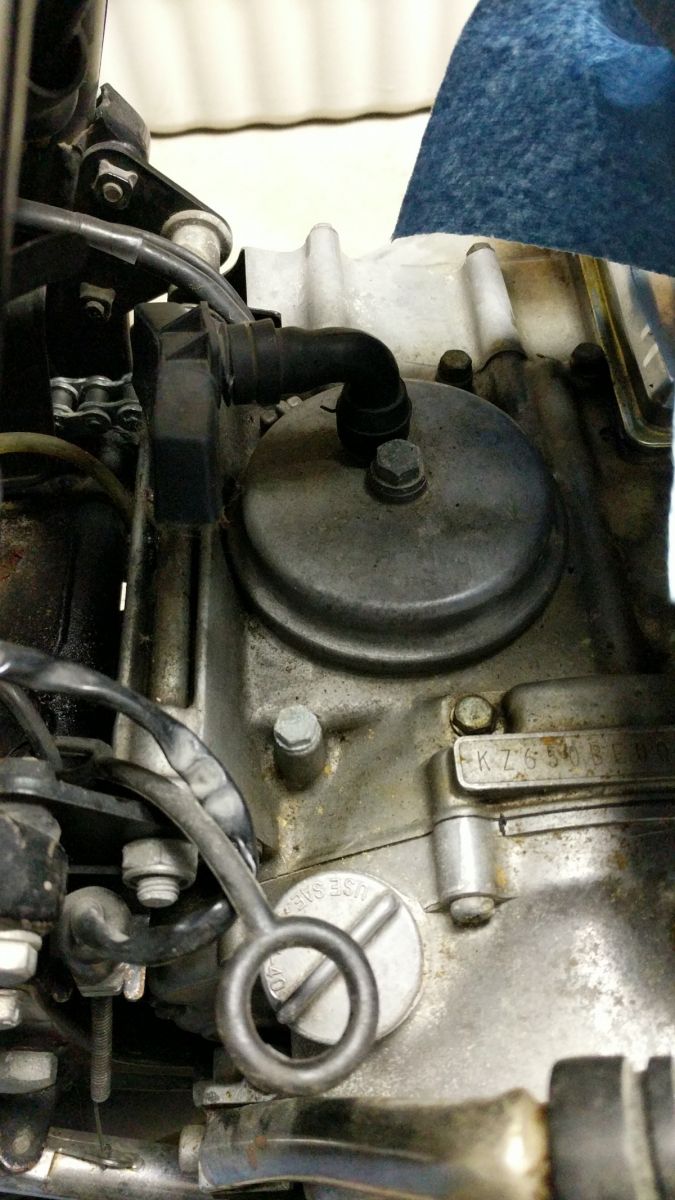
Thanks guys, will follow that advice. Also, can someone identify this for me? Don't even know how to look it up but I've tried and went through the Haynes manual but no luck...
'77 KZ650B1 in progress...
Please Log in or Create an account to join the conversation.
- 650ed
-
- Offline
- User
-
Registered
- Posts: 15334
- Thanks: 2831
Re: 77 KZ650B Restoration/Build
26 Oct 2019 16:23 - 26 Oct 2019 16:28
If your question is about that little "L" shaped rubber tube it is Kawasaki part number 92059-137. It is the "Breather Tube." It should connect the stock airbox to the breather cover. Your photo shows it attached to the breather cover, but of course there's no airbox in your photo. Its purpose is to allow the gases from the engine, which likely contain particles of oil, to be drawn through the airbox then through the carbs so they are burned in the engine.
If your question is about the little rubber loop shown near the oil filler cap, that loop is for the carb fuel overflow hoses. Those hoses are routed from the bottom of the carbs through that loop and they then exit below and behind the engine toward the ground. That way if any excess fuel flows through them it will land on the ground not on the engine. Ed
If your question is about the little rubber loop shown near the oil filler cap, that loop is for the carb fuel overflow hoses. Those hoses are routed from the bottom of the carbs through that loop and they then exit below and behind the engine toward the ground. That way if any excess fuel flows through them it will land on the ground not on the engine. Ed
1977 KZ650-C1 Original Owner - Stock (with additional invisible FIAMM horn)
Last edit: 26 Oct 2019 16:28 by 650ed.
The following user(s) said Thank You: Nessism, lakshan
Please Log in or Create an account to join the conversation.
- lakshan
-
Topic Author
- Offline
- User
-
Registered
- Posts: 82
- Thanks: 7
Re: 77 KZ650B Restoration/Build
26 Oct 2019 22:24
Thanks Ed! I meant the L shaped item but good note on the other piece too. So I've seen examples where people route the breather cover through a hose toward the back of the bike. Others use a POD. Is there a preferred way? The hose seems to make sense to me.
'77 KZ650B1 in progress...
Please Log in or Create an account to join the conversation.
- 650ed
-
- Offline
- User
-
Registered
- Posts: 15334
- Thanks: 2831
Re: 77 KZ650B Restoration/Build
27 Oct 2019 09:26
The preferred way is to attach the breather hose to the airbox, this is why the professional engineers at Kawasaki designed it that way. That way the vacuum inside the airbox when the engine is running draws fumes through the hose and then into the engine. Running a hose any other way will result in oil laden fumes venting onto the rear wheel or other parts of the bike unless some type of catch can has been attached. Ed
1977 KZ650-C1 Original Owner - Stock (with additional invisible FIAMM horn)
Please Log in or Create an account to join the conversation.
- lakshan
-
Topic Author
- Offline
- User
-
Registered
- Posts: 82
- Thanks: 7
Re: 77 KZ650B Restoration/Build
29 Oct 2019 10:12 - 29 Oct 2019 10:12650ed wrote: The preferred way is to attach the breather hose to the airbox, this is why the professional engineers at Kawasaki designed it that way. That way the vacuum inside the airbox when the engine is running draws fumes through the hose and then into the engine. Running a hose any other way will result in oil laden fumes venting onto the rear wheel or other parts of the bike unless some type of catch can has been attached. Ed
Thanks Ed. Yes I understand that the stock airbox would have been ideal but unfortunately I don't have it
") I see that a lot of people here have pod filters set up, wondering how they solved their breather issue?
I see that a lot of people here have pod filters set up, wondering how they solved their breather issue?I have completed my valve clearance checks, my haynes manual shows that I should measure when the top of the lobe is up and slightly tilted toward the bucket (when lined up with the cam gear indicators). I used this method and found all the lobes within clearances so that was awesome!
I searched for a while and I found so many versions of measuring. One where the lobe is directly perpendicular to the bucket. Another where the lobe is perpendicular to the valve cover, another where it's parallel to the valve cover. I went with my Haynes manual but I recorded all the other measurements just in case. Replaced the gasket as well.
After cleaning the tank and putting gas in, I might have damaged my petcock or something because it's slowly leaking in the off position. A drop every couple seconds roughly. After a day of the tank sitting there there's a nice big gas puddle, my garage smells great :pinch: Trying to source a placement petcock (part number 51023-1023) as most people seem to think a rebuild is no use most of the time. Other than the slow leak from the fuel line, there's no other leaking as far as I can tell. Is it fine as a quick and easy fix to add a fuel shut off ? Any issue with this just being a permanent solution if I can't get a replacement petcock?
I'm sure I'll find one eventually but just curious if it's a decent enough workaround.
'77 KZ650B1 in progress...
Last edit: 29 Oct 2019 10:12 by lakshan.
Please Log in or Create an account to join the conversation.
- TexasKZ
-

- Offline
- Platinum Member
-

Registered
- Posts: 8229
- Thanks: 2700
Re: 77 KZ650B Restoration/Build
29 Oct 2019 10:29
Rebuilding the petcock is a perfectly viable solution as long as there is no internal damage. In fact, with the ethanol-laden fuel most of us have to put up with, rebuilding is basically a part of routine maintenance.
If the sealing surfaces are not pitted, a rebuild should fix the problem. I always polish the face of the lever and also the seat that the little o-ring, which is almost always the problem, seals against. A little time with some good aluminum polish will do wonders for the valve.
If the sealing surfaces are not pitted, a rebuild should fix the problem. I always polish the face of the lever and also the seat that the little o-ring, which is almost always the problem, seals against. A little time with some good aluminum polish will do wonders for the valve.
1982 KZ1000 LTD parts donor
1981 KZ1000 LTD awaiting resurrection
2000 ZRX1100 not ridden enough
www.kzrider.com/11-projects/620336-anoth...uild-thread?start=24
1981 KZ1000 LTD awaiting resurrection
2000 ZRX1100 not ridden enough
www.kzrider.com/11-projects/620336-anoth...uild-thread?start=24
Please Log in or Create an account to join the conversation.
- lakshan
-
Topic Author
- Offline
- User
-
Registered
- Posts: 82
- Thanks: 7
Re: 77 KZ650B Restoration/Build
30 Oct 2019 08:11
Got it started!! Woo hoooooo
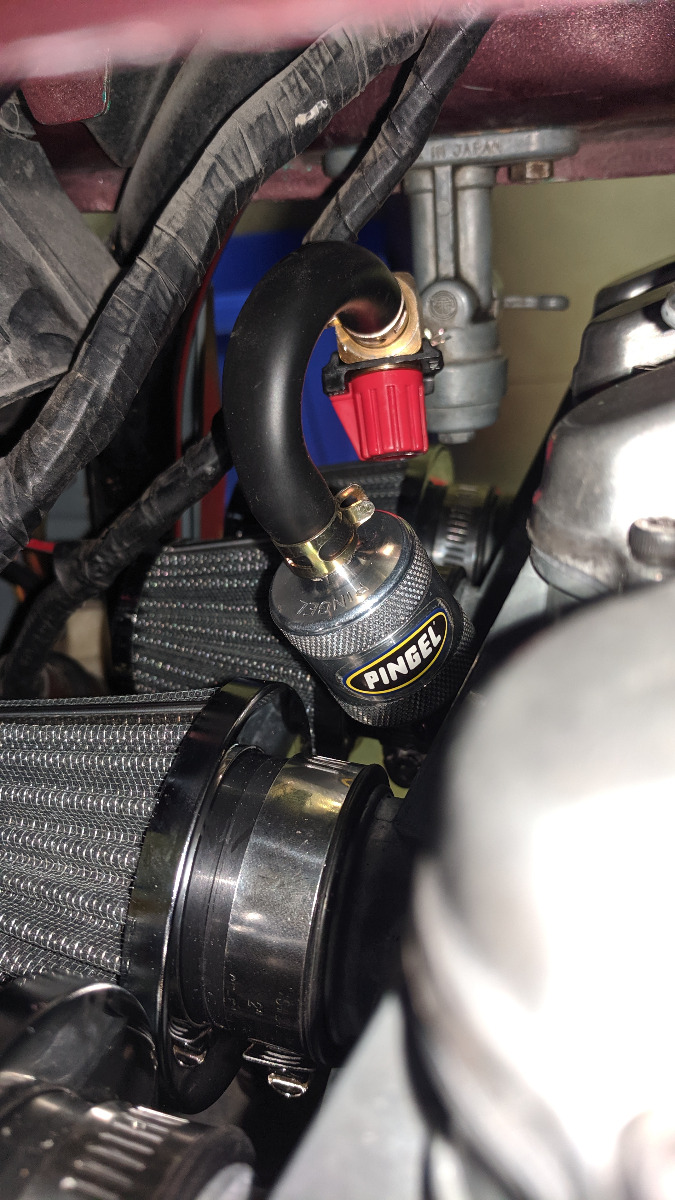
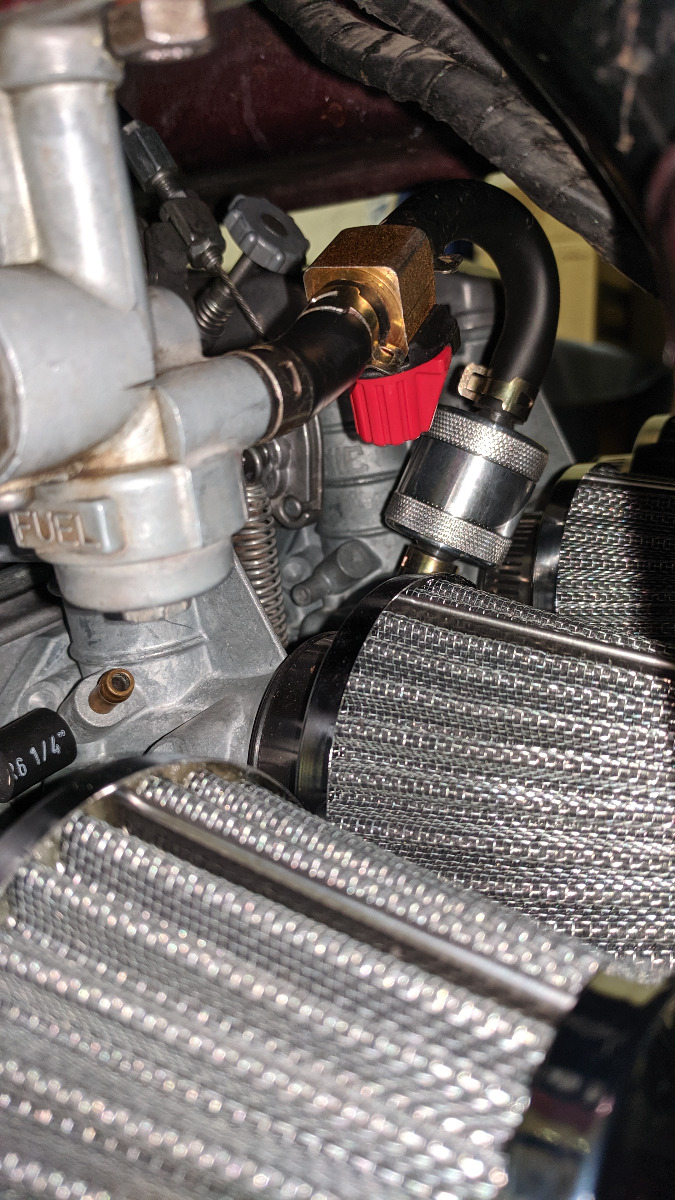
A rebuild kit for my petcock would take a week to ship and was about $50 incl tax and shipping. Local store had a MotionPro fuel cut off that was pretty good quality for $25 so I decided to grab that even if it's just temporary (figured it's good to have around anyway). I'm inquiring about a replacement petcock from a friend as well so hopefully that comes through. For now I routed the cut off.
New spark plugs in. I went with the BR7ES because the shop didn't have the non resistor plugs. I will source non-resistor plugs for the next season and swap them. For now these will do. Previous owner had resistor caps on the plugs so I took em off. He was previously running B7ES plugs.
New oil, used the Shell T6 oil and new Kawi filter/o-rings.
New Yuasa Battery.
When it first started up RPMs were up near 4k but they settled around 1.2k. Sounded like it was starving a bit so I adjusted the idle a bit higher to around 1.4k. I let it run for a few minutes, then turned it off, then tried starting again. It wouldn't start right away; after a few crank attempts and opening the throttle a little it starts up.
1) I guess the above is due to fuel starvation? I'm guessing it's my fuel line because it slightly curves up before going down to the carbs. Will need to fix that.
2) The problem might also be ignition I'm assuming? The next step I'm planning on taking is doing the ignition points adjustment/maintenance.
3) As soon as I pop it into first gear, the bike rolls forward and stalls as I'm not giving it any gas (clutch lever pulled in all the way). So I will do a clutch adjustment as well.
Any thoughts/tips on the above?
'77 KZ650B1 in progress...
Please Log in or Create an account to join the conversation.
- gordone
-

- Offline
- Sustaining Member
-
Registered
- Posts: 1533
- Thanks: 93
Re: 77 KZ650B Restoration/Build
16 Nov 2019 23:32
In europe we have 5%? ethanol In the fuel these days, so I have installed fuel lines who is made for the «new» type of fuel.
1981 KZ650-D4, with 1981 z750L engine (Wiensco 810 big bore).
Project:
www.kzrider.com/forum/11-projects/607213...sr-1981-z750l-engine
Project:
www.kzrider.com/forum/11-projects/607213...sr-1981-z750l-engine
Please Log in or Create an account to join the conversation.
- 650ed
-
- Offline
- User
-
Registered
- Posts: 15334
- Thanks: 2831
Re: 77 KZ650B Restoration/Build
17 Nov 2019 06:21 - 17 Nov 2019 06:22
I have found that ND W22ES-U spark plugs work the best in my 1977 KZ650. In the past I used the NGK B7ES plugs, but they sometimes gave me problems with fouling. The ND (Denso) plugs have never fouled and seem to last forever. Ed
1977 KZ650-C1 Original Owner - Stock (with additional invisible FIAMM horn)
Last edit: 17 Nov 2019 06:22 by 650ed.
Please Log in or Create an account to join the conversation.
- Bierbelly
-

- Offline
- User
-
Registered
- Me and Cdr. Cody
- Posts: 11
- Thanks: 2
Re: 77 KZ650B Restoration/Build
21 Jan 2020 18:42
I am beginning the same project on a B2 (from what I can tell). The bike is in much rougher shape than yours, having been left to sit outside in the elements for over two years (jerk). I got it for free, so no complaints, but...
I first got a new battery for the beast, to see if it was alive. Found that some electrical lives, but not on the right controller for the engine and lights. A nightmare to open up that clamshell. Found a used one on ebay, but it lacked at least one of the switches. Going to make two outta one. Everything inside is/was terribly rusted. I found that soaking everything in white vinegar dissolved a great deal of the rust in the most important places. Now, at least my start button makes contact.
I'll post pix later. Looking for help/advice here. I figure that the first thing to do is determine whether the engine starts. Why bother with spending a bunch if it doesn't?
1977 KZ650 basket case
1994 HD Heritage (gone to heaven)
1980 Yamaha XS 750 (also gone)
1994 HD Heritage (gone to heaven)
1980 Yamaha XS 750 (also gone)
Please Log in or Create an account to join the conversation.
- xstreamcanadian
-
- Offline
- User
-
Registered
- Posts: 280
- Thanks: 12
Re: 77 KZ650B Restoration/Build
04 Sep 2020 18:09
small E guitar string for cleaning jets man, works fantastic. good use for old string
The following user(s) said Thank You: KZJOE900
Please Log in or Create an account to join the conversation.
Moderators: Street Fighter LTD