
Custom Fabbed Seat KZ650 - *Update PICS* APR 23
- ronboskz650sr
-

- Offline
- User
-

Registered
- Posts: 323
- Thanks: 0
Re: Custom Fabbed Seat on KZ650
28 Apr 2006 17:08
I'm working this weekend, and have to go out tonight in a few minutes. In a nutshell, though..I made a form fitted seatpan of fiberglass by laying garbage bags and duct tape over the frame and tool kit/battery. I applied the fiberglass matting and resin directly to the bike and the seat pan is an exact fit to the frame underneath. after that, you just do whatever your heart desires to make the cushion and tailpiece work. In my case, the tailpiece is formed from an 8 inch stainless soup strainer ($3 at walmart), some cardboard from a pizza box and ducttape. The fiberglass makes the form over all that. Then you can use that as a form or "plug" to make a mold for the whole piece. If you do a search here or on totalmotorcycle.com, you'll find a few step-by-step threads with pics. One guy over there made his with carbon fiber, but the process is the same. I stopped short of making the mold and am actually riding on the "plug", finished and painted. It looks and works great, but I may finish it up some other time when my life settles down a little...it would weigh slightly less without the cardboard and strainer in there. For now, it will have to do. You can also carve a plug from balsa or styrofoam (do a search to find ourt what types can be carved...not the small sphere types), then make your mold from that. As fro mounting...it can be as simple or complex as you want it. I actually rode around for a couple of weeks with no hardware at all, and it never so much as shifted on the frame. I even leaned off in some curves to see if it would shift..no dice. I think the form fit route is my favorite...a couple of flat hooks on one side or in the back to hook under the frame rail and tilt the seat down ton the other side and it's on.
God bless!
-Ron
Post edited by: ronboskz650sr, at: 2006/04/28 20:20
God bless!
-Ron
Post edited by: ronboskz650sr, at: 2006/04/28 20:20
Please Log in or Create an account to join the conversation.
- bkitchen
-

- Offline
- User
-
Registered
- Posts: 231
- Thanks: 0
Re: Custom Fabbed Seat KZ650 - *Update PICS* APR 23
28 Apr 2006 17:44
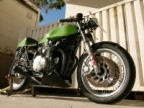
Mailbox with trailer lights??? Here is a side view of the seat I made.

Please Log in or Create an account to join the conversation.
- ronboskz650sr
-
- Offline
- User
-
Registered
- Posts: 323
- Thanks: 0
Re: Custom Fabbed Seat KZ650 - *Update PICS* APR 23
30 Apr 2006 03:42
Bikes go through stages, especially hand modified ones. Then the owner decides which one to leave it at...or it will go through more stages. My bike bears no resemblence to the one I brought home a couple of years ago. or the one it was three months before its current stage. Mailbox? Nah. Custom tailpiece with handmade seat. I see it for what it is and all the work you put into it...and I like it!
God bless!
-Ron
God bless!
-Ron
Please Log in or Create an account to join the conversation.
- KZReeder
-

- Offline
- User
-
Registered
- Posts: 149
- Thanks: 1
Re: Custom Fabbed Seat KZ650 - *Update PICS* APR 23
30 Apr 2006 05:23
bkitchen wrote:
First off:
What I said and the way I said it was wrong. I apologize for making a statement that might have started an unnecessary flame war.
Secondly:
I like your bike and the cafe look that you are going after... I like how you've cleaned up the side panel area and made it see-through... I like the combination of parts and the colors that you've used. However, visually, the hard lines of the tail piece that you built really fight with the soft contours of the rest of bike. Without any disrespect and simply from a (sitting on the back porch and sipping a beer) perspective... I think a tail piece that flows with the rest of the bike would really bring out the vintage go fast look that you're after.
I've added a pic that speaks to what I'm talking about... the tail piece is merely made from another KZ650 tank and the fairing/clip-ons have been lowered a bit to line up with the tank a little more.
Sorry for the long post but I didn't want to seem like I was totally slamming your bike and I do believe that I came across that way in my previous post... again, I apologize... Hope to see you on the road some day.
Cheers,
Claude

Post edited by: KZReeder, at: 2006/04/30 11:10
Mailbox with trailer lights???
First off:
What I said and the way I said it was wrong. I apologize for making a statement that might have started an unnecessary flame war.
Secondly:
I like your bike and the cafe look that you are going after... I like how you've cleaned up the side panel area and made it see-through... I like the combination of parts and the colors that you've used. However, visually, the hard lines of the tail piece that you built really fight with the soft contours of the rest of bike. Without any disrespect and simply from a (sitting on the back porch and sipping a beer) perspective... I think a tail piece that flows with the rest of the bike would really bring out the vintage go fast look that you're after.
I've added a pic that speaks to what I'm talking about... the tail piece is merely made from another KZ650 tank and the fairing/clip-ons have been lowered a bit to line up with the tank a little more.
Sorry for the long post but I didn't want to seem like I was totally slamming your bike and I do believe that I came across that way in my previous post... again, I apologize... Hope to see you on the road some day.
Cheers,
Claude
Post edited by: KZReeder, at: 2006/04/30 11:10
Please Log in or Create an account to join the conversation.
- bkitchen
-
- Offline
- User
-
Registered
- Posts: 231
- Thanks: 0
Re: Custom Fabbed Seat KZ650 - *Update PICS* APR 23
01 May 2006 20:45
No problem KZreeder I was just playing anyway. Beauty is in the eye of the beholder. Plus that back end has a purpose. First My battery is stashed up in there. And secondly the back half of the seat comes off so my wife can ride with me too (converta-seat??)") That way when I ride alone I get the solo seat look but can take it off too. I did like your photochopped rendering though, looks good.
That way when I ride alone I get the solo seat look but can take it off too. I did like your photochopped rendering though, looks good. ") I have been working on a new handmade fiberglass fairing that sits a little lower, so great idea:laugh: pics and step by step write up coming soon.
I have been working on a new handmade fiberglass fairing that sits a little lower, so great idea:laugh: pics and step by step write up coming soon.
Post edited by: bkitchen, at: 2006/05/01 23:48
That way when I ride alone I get the solo seat look but can take it off too. I did like your photochopped rendering though, looks good. I have been working on a new handmade fiberglass fairing that sits a little lower, so great idea:laugh: pics and step by step write up coming soon.Post edited by: bkitchen, at: 2006/05/01 23:48
Please Log in or Create an account to join the conversation.
- KZReeder
-
- Offline
- User
-
Registered
- Posts: 149
- Thanks: 1
Re: Custom Fabbed Seat KZ650 - *Update PICS* APR 23
01 May 2006 21:06
Cool. Hey, what battery did you use up in the tail piece... I'm considering doing the same thing with my bike... I like the see through look. I've seen a couple of small batteries and I've been told that there is someone that makes a small sealed battery. I'm just not sure what to look for that has enough oomph to turn over the KZ1000.
Thanks!
Thanks!
Please Log in or Create an account to join the conversation.
- dutchz
-
- Offline
- User
-
Registered
- Posts: 784
- Thanks: 4
Re: Custom Fabbed Seat KZ650 - *Update PICS* APR 23
08 May 2006 22:03
Hey guys, I finally got around to making a better seat for my bike this weekend, so here's the pictures as promised. Mattblack, hope you don't mind, just trying to contribute something to an interesting thread.
I tried to take a bunch of photos so you can see a couple of different stages.
This seat replaces my cut-up up yoga mat (well my wife's) and will have to last until the next stage (cafe tank... or not). The new seat, like the yoga mat before it is mounted with velcro. If I decide on a cafe tank it will be longer than the stock tank, at that point this seat will be shortened, reshaped and reupholstered (professionaly?) and I will epoxy some bolt mounts to the pan. For now it's fine.
Cost:
aluminum sheet 1/8"x12x24 >$2.20
camping mat(blue) >$5.99
thick upholstry vinyl .75 yrd. >$4.50
velcro >$4.00
coarse sanding sponge block >$4.00
adhesive 3M >$8.99
not sitting on a yogamat when hitting pothole:pinch: >priceless
Post edited by: dutchz, at: 2006/05/09 01:47
1974 Kawasaki Z1
Stock front hub and rear axle.
Stock front hub and rear axle.
Please Log in or Create an account to join the conversation.
- dutchz
-
- Offline
- User
-
Registered
- Posts: 784
- Thanks: 4
Re: Custom Fabbed Seat KZ650 - *Update PICS* APR 23
08 May 2006 22:09
First off, this is my seat base. It is screwed down with 2 screws into the threaded battery box tabs in the middle, and 2 allen heads through the loop of the frame in the back towards the lights. The extra 2 screws in the middle screw into the connector cluster underneath the seatpan. The velcro was once holding the famed, but now defunct yoga mat.

1974 Kawasaki Z1
Stock front hub and rear axle.
Stock front hub and rear axle.
Please Log in or Create an account to join the conversation.
- dutchz
-
- Offline
- User
-
Registered
- Posts: 784
- Thanks: 4
Re: Custom Fabbed Seat KZ650 - *Update PICS* APR 23
08 May 2006 22:15
The new seat pan. The curve in the back conforms to the seatbase. The curve in the front clears the battery connectors. Both curves were achieved through the highly scientific method of bending sheet metal over the left and right knee (back and front curve respectively). I put the bends in the whole sheet (12x24") for more leverage, before tracing around the frame with a sharpie and cutting the pan.

1974 Kawasaki Z1
Stock front hub and rear axle.
Stock front hub and rear axle.
Please Log in or Create an account to join the conversation.
- dutchz
-
- Offline
- User
-
Registered
- Posts: 784
- Thanks: 4
Re: Custom Fabbed Seat KZ650 - *Update PICS* APR 23
08 May 2006 22:17
Some fine tuning with a large file and it's ready for mock-up.
Post edited by: dutchz, at: 2006/05/09 01:17
Post edited by: dutchz, at: 2006/05/09 01:17
1974 Kawasaki Z1
Stock front hub and rear axle.
Stock front hub and rear axle.
Please Log in or Create an account to join the conversation.
- dutchz
-
- Offline
- User
-
Registered
- Posts: 784
- Thanks: 4
Re: Custom Fabbed Seat KZ650 - *Update PICS* APR 23
08 May 2006 22:20
I said mockup :whistle:.

1974 Kawasaki Z1
Stock front hub and rear axle.
Stock front hub and rear axle.
Please Log in or Create an account to join the conversation.
- dutchz
-
- Offline
- User
-
Registered
- Posts: 784
- Thanks: 4
Re: Custom Fabbed Seat KZ650 - *Update PICS* APR 23
08 May 2006 22:25
Next stage: glueing on the foam. I sprayed both the seatpan and a generous piece of foam (at least 1" overlap around edge) with the 3M 90 spray glue. Let it sit for a couple of minutes, then stick the pieces together and press firmly.
Trim foam around the seatbase at a straight angle with a razor, and repeat step until desired thickness is achieved (3 layers).

Post edited by: dutchz, at: 2006/05/09 01:26
Trim foam around the seatbase at a straight angle with a razor, and repeat step until desired thickness is achieved (3 layers).
Post edited by: dutchz, at: 2006/05/09 01:26
1974 Kawasaki Z1
Stock front hub and rear axle.
Stock front hub and rear axle.
Please Log in or Create an account to join the conversation.
Moderators: Street Fighter LTD