
i have no clue...
- 7aliveatlast7
-
 Topic Author
- Offline
- User
-

Registered
- Posts: 19
- Thanks: 0
i have no clue...
21 Jan 2013 00:24
so i've been on here for a while, mostly just lurking around, not many posts. i'm not getting much feedback on another forum i'm on, so i'm hoping someone here might be able to help me out, as i'm about at the end of my rope.
so i have an '81 kz440, and i thought it had a bad starter solenoid. i thought this because out of nowhere, my starter button stopped turning the starter motor over. however, i could get it to turn over by gapping the posts on the solenoid. so i figured bad solenoid. got a brand new one, put it in, and same problem. i have no idea what to do.
i know a multimeter could help, but i don't know what setting to put it on or where to touch it to or anything. i'm sorry, i need to be treated like a 5 year old when it comes to electrical. i'm so frustrated and discouraged by this, as i have been working on it for a year now, and was about to ride it for the first time since tearing into it. i don't even know where to start, but would like to at least go down swinging before i cave in and take it to a shop.
thanks in advance for anyone trying to help.
Please Log in or Create an account to join the conversation.
- Motor Head
-

- Offline
- User
-
Registered
- FIX UP YOUR BIKE RIGHT AND CHEAP
- Posts: 5137
- Thanks: 393
Re: i have no clue...
21 Jan 2013 00:31
You are not getting Voltage down to the Starter Solenoid, or the ground connection is faulty. The two small wires going to your Solenoid, one is Power from the Start button, and the other is to ground. Are you holding the clutch in when attempting to start, as there is a clutch switch in the power circuit. You must hold the lever in. But a simple home made test light from a spare 12v bulb will help you if you don't have a meter. Do You know how to set that up? Also posting Where you Are may help. there could be a member in your area willing to give a hand.
1982 KZ1000LTD K2 Vance & Hines 4-1 ACCEL COILS Added Vetter fairing & Bags. FOX Racing rear Shocks, Braced Swing-arm, Fork Brace, Progressive Fork Springs RT Gold Emulators, APE Valve Springs, 1166 Big Bore kit, RS34's, GPZ cams.
1980 KZ550LTD C1 Stock SOLD Miss it
1979 MAZDA RX7 in the works, 13B...
1980 KZ550LTD C1 Stock SOLD Miss it
1979 MAZDA RX7 in the works, 13B...
Please Log in or Create an account to join the conversation.
- MFolks
-

- Offline
- User
-
Registered
- Posts: 6650
- Thanks: 541
Re: i have no clue...
21 Jan 2013 00:33
First, disconnect the Negative(-) battery terminal to prevent any sparking, then open up the right handlebar switch pod,loking for broken or coroded wires going to the start button. These older bikes are starting to suffer failed or failng solder joints, causing problems like this.
If you find bad solder joints, you'll need a small, 25 watt soldering iron,soldering flux,and rosin core solder to repair the joint. If you need further instructions, I've got a repair procedure to follow to do the "Fix".
If you find bad solder joints, you'll need a small, 25 watt soldering iron,soldering flux,and rosin core solder to repair the joint. If you need further instructions, I've got a repair procedure to follow to do the "Fix".
1982 GPZ1100 B2
General Dynamics/Convair 1983-1993
GLCM BGM-109 Tomahawk, AGM-129A Advanced Cruise Missile (ACM)
General Dynamics/Convair 1983-1993
GLCM BGM-109 Tomahawk, AGM-129A Advanced Cruise Missile (ACM)
Please Log in or Create an account to join the conversation.
- MFolks
-
- Offline
- User
-
Registered
- Posts: 6650
- Thanks: 541
Re: i have no clue...
21 Jan 2013 00:35
I'll post the repair procedure here:
Read this for a primer on hand soldering: technologyinterface.nmsu.edu/fall97/electronics/solder.html
Repairing Motorcycle Soldered Connections on the older bikes.
When repairing soldered wires on motorcycle switches or light bulbs sockets, have the following on hand:
1. A 25 Watt soldering iron or one that the wattage can be adjusted.
2. Rosin core solder of 60/40 type. SN60 or SN63 is preferred.
3. Rosin flux or soldering paste (Never use solder or soldering paste designed for plumbing work, as it contains an acid that will corrode the electrical joint, ruining it).
4. 91% rubbing Alcohol, or 70%. The lower percentage will clean up flux residue, but not as good as the higher percentage stuff. Acetone does a good job of removing excess solder flux too.
5. A cut down ½” paint brush, or acid brush for scrubbing the repaired solder joint.
6. Clean rags or paper towels
7. A damp sponge to keep the soldering iron tip clean.
8. Some “Solder Wick” a braided bare copper wire designed to collect heated excess solder, aiding in joint preperation, available at electronic supply stores.
9. Some wooden toothpicks.
10. Small Hemostats or clip on heatsinks.
A. Before soldering, “Tin” the soldering iron tip by plugging it in or turning the iron on, allowing it to get to operating temperature(2-3 minutes).
B. Unroll about 3” of solder from the roll of rosin core solder & then using a clean rag or paper towel moistened with Alcohol, wipe the unrolled solder, removing the finger print oils that will create a poor solder joint.
C. Apply a small amount of solder to the now heated soldering iron tip, wiping the excess off with the wet sponge, keeping a thin layer on the soldering iron.
D. The soldering iron is now ready for use, but before applying the heated tip to a wire, wipe the tip on the damp sponge, this removes any oxidized solder and makes for a much better connection.
E. If the joint to be repaired is grey in color or appears “Crumbled”, apply some rosin soldering paste or flux to the joint with a small toothpick or screwdriver, and then apply the soldering iron tip for a few seconds.
G. The fluxed joint should clean up, allowing for a better connection. If no luck, use the solder wick to remove all traces of the old solder by apply in it between the soldering iron tip and the bad joint.
H. Hemostats and clip on heatsinks will be used to prevent the wire insulation from burning, overheating & pulling away from the connection.
I. Apply a small amount of flux to the joint to be repaired & then a very short duration of heated soldering iron tip & solder(like a few seconds or so).
J. Clean off the repaired joint with the brush & rubbing Alcohol or Acetone, the newly repaired joint should appear clean and bright, almost as if it were polished, with no voids or holes.
K. When repairing the bad or "Cold Solder Joints" (as the Electronics industry calls them), it takes really no special skills, just patience, and a place to work(along with the mentioned tools. You've got to be sober, and not stoned, as the soldering tool can be at 700 F, possibly giving the impaired bike owner severe burns.
L. If you have fine muscle control problems, have a friend do the soldering for you. Moving a wire before the electrical joint has properly set up, can create "Cold Joints" too. If possible, practice on the bench top with some scrap wires before attempting repairs on the bike.
M. This information comes from years of missile test cable and equipment assembly, when I worked at General Dynamics/Convair Division in San Diego California, on the BGM-109 Tomahawk and later on the AGM-129 Advanced Cruise Missile. This was from 1983-1993. The company had a week long soldering school, where you learned to solder meeting “Mil-Spec” standards.
1982 GPZ1100 B2
General Dynamics/Convair 1983-1993
GLCM BGM-109 Tomahawk, AGM-129A Advanced Cruise Missile (ACM)
General Dynamics/Convair 1983-1993
GLCM BGM-109 Tomahawk, AGM-129A Advanced Cruise Missile (ACM)
Please Log in or Create an account to join the conversation.
- MFolks
-
- Offline
- User
-
Registered
- Posts: 6650
- Thanks: 541
Re: i have no clue...
21 Jan 2013 00:38
A good, basic instruction on using a Digital Multimeter:
The Best Mutimeter Tutorial
The Best Mutimeter Tutorial
1982 GPZ1100 B2
General Dynamics/Convair 1983-1993
GLCM BGM-109 Tomahawk, AGM-129A Advanced Cruise Missile (ACM)
General Dynamics/Convair 1983-1993
GLCM BGM-109 Tomahawk, AGM-129A Advanced Cruise Missile (ACM)
Please Log in or Create an account to join the conversation.
- 7aliveatlast7
-
Topic Author
- Offline
- User
-
Registered
- Posts: 19
- Thanks: 0
Re: i have no clue...
21 Jan 2013 00:55Motor Head wrote: You are not getting Voltage down to the Starter Solenoid, or the ground connection is faulty. The two small wires going to your Solenoid, one is Power from the Start button, and the other is to ground. Are you holding the clutch in when attempting to start, as there is a clutch switch in the power circuit. You must hold the lever in. But a simple home made test light from a spare 12v bulb will help you if you don't have a meter. Do You know how to set that up? Also posting Where you Are may help. there could be a member in your area willing to give a hand.
wow, 4 replies within 15 minutes! i'm a believer in the site already, haha, that's more than i had in 48 hours on the other forum i've been posting on!
i am in quakertown, PA, about 40 miles north of philadelphia. i have not been holding the clutch in, but i've never had to do that before either, unless i was starting it in gear. also, i do not know the 12v bulb trick, but i do have access to a multimeter.
MFolks wrote: First, disconnect the Negative(-) battery terminal to prevent any sparking, then open up the right handlebar switch pod,loking for broken or coroded wires going to the start button. These older bikes are starting to suffer failed or failng solder joints, causing problems like this.
If you find bad solder joints, you'll need a small, 25 watt soldering iron,soldering flux,and rosin core solder to repair the joint. If you need further instructions, I've got a repair procedure to follow to do the "Fix".
thanks for the soldering tips, i actually just pulled apart my right hand control yesterday to check for wire problems, but everything looked good.
i guess i should add, when the problem first started, i was trying to start the bike, and it was turning over just fine using the starter button, but was getting weak. i figured i'd help it out by hooking it to a car battery, but i didn't start the car, just turned it to the "on" position. now i don't know if hooking it to the car had anything to do with my problem or if it is just a coincidence, but once it was hooked up, i hit the starter button, and it turned over once and then just stopped. the button wouldn't do a thing, only thing i could do was gap the solenoid. i hope that can help diagnose the problem.
Please Log in or Create an account to join the conversation.
- Motor Head
-
- Offline
- User
-
Registered
- FIX UP YOUR BIKE RIGHT AND CHEAP
- Posts: 5137
- Thanks: 393
Re: i have no clue...
21 Jan 2013 01:05
Use the Meter you have and put it on DCV. Red lead for testing, and the black lead to the battery Negative terminal. Move the Red lead to Battery + to confirm voltage above 12v. Then with Key on Check the fuses, go on each side. 12v in and 12v out of each fuse. You may have a fuse that looks fine but is bad, or not making con tact at the Clips that holds them.
1982 KZ1000LTD K2 Vance & Hines 4-1 ACCEL COILS Added Vetter fairing & Bags. FOX Racing rear Shocks, Braced Swing-arm, Fork Brace, Progressive Fork Springs RT Gold Emulators, APE Valve Springs, 1166 Big Bore kit, RS34's, GPZ cams.
1980 KZ550LTD C1 Stock SOLD Miss it
1979 MAZDA RX7 in the works, 13B...
1980 KZ550LTD C1 Stock SOLD Miss it
1979 MAZDA RX7 in the works, 13B...
Please Log in or Create an account to join the conversation.
- 7aliveatlast7
-
Topic Author
- Offline
- User
-
Registered
- Posts: 19
- Thanks: 0
Re: i have no clue...
21 Jan 2013 10:43
awesome, thank you for the help, i will try that! just saw the one i have access to (my dad's) is for a 10v system, so i'll have to track one down that can be used for a 12v, but that's good info to start with once i get my hands on one. thanks again, i'll update with whatever i find!
Please Log in or Create an account to join the conversation.
- Motor Head
-
- Offline
- User
-
Registered
- FIX UP YOUR BIKE RIGHT AND CHEAP
- Posts: 5137
- Thanks: 393
Re: i have no clue...
21 Jan 2013 11:00 - 21 Jan 2013 11:25
Post up the Brand and Model of the Meter your Dad has, and we can look it up to see what it has. Possibly tell you how to use it etc.
Otherwise if you want a basically free test light, you can use a piece of wire and the Tail light circuit, or a Turn Signal. Under the seat you will see where the tail/ brake plugs into 3 bullet connectors, the Blue wire will work, just unplug it, then connect to the rear/ tail light end. Then this wire can be used to touch to voltage points at the battery, then fuse panel, and eventually the starter solenoid circuit from the Start Button etc. Cheap and effective, it won't tell you voltage, but will tell you if power is supplied in the circuit.
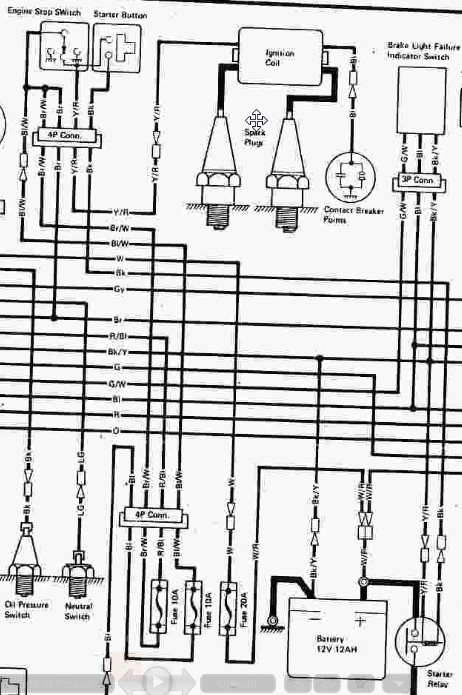
Somewhere on this Twin Forum there should be a wiring diagram for your bike,
www.armbell.com/kz400/index.php?mforum=kz400
Or the one here on kZR in "File Base" it will be very similar,
www.kzrider.com/filebase/doc_download/104-kz400h1wiring-diagram
Here is a section of the wiring for the Start Circuit.
Otherwise if you want a basically free test light, you can use a piece of wire and the Tail light circuit, or a Turn Signal. Under the seat you will see where the tail/ brake plugs into 3 bullet connectors, the Blue wire will work, just unplug it, then connect to the rear/ tail light end. Then this wire can be used to touch to voltage points at the battery, then fuse panel, and eventually the starter solenoid circuit from the Start Button etc. Cheap and effective, it won't tell you voltage, but will tell you if power is supplied in the circuit.
Somewhere on this Twin Forum there should be a wiring diagram for your bike,
www.armbell.com/kz400/index.php?mforum=kz400
Or the one here on kZR in "File Base" it will be very similar,
www.kzrider.com/filebase/doc_download/104-kz400h1wiring-diagram
Here is a section of the wiring for the Start Circuit.
1982 KZ1000LTD K2 Vance & Hines 4-1 ACCEL COILS Added Vetter fairing & Bags. FOX Racing rear Shocks, Braced Swing-arm, Fork Brace, Progressive Fork Springs RT Gold Emulators, APE Valve Springs, 1166 Big Bore kit, RS34's, GPZ cams.
1980 KZ550LTD C1 Stock SOLD Miss it
1979 MAZDA RX7 in the works, 13B...
1980 KZ550LTD C1 Stock SOLD Miss it
1979 MAZDA RX7 in the works, 13B...
Attachments:
Last edit: 21 Jan 2013 11:25 by Motor Head.
Please Log in or Create an account to join the conversation.
- 7aliveatlast7
-
Topic Author
- Offline
- User
-
Registered
- Posts: 19
- Thanks: 0
Re: i have no clue...
21 Jan 2013 14:35
thanks for that diagram. i actually just picked up a clymer manual about a week ago, so that should be of some help as well. i'm asking a buddy of mine who is an electrician if he could lend me an extra multimeter, so i'm waiting to hear back from him. not sure of the brand/model of my dad's as i don't have it on hand, but my friend's is very similar to the one in the video that MFolks posted, so i should be able to figure that out.
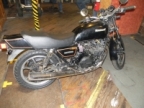
just to give you an idea of what i'm working with, here's a picture of my bike as i bought it

then what i turned it into and rode it as for a year

and what it looks like now after having worked on it all of last year

i bought it with the wiring being an absolute bird's nest, so i'm in the midst of trying to tidy it all up quite a bit. i was just finishing up when all this happened.
just to give you an idea of what i'm working with, here's a picture of my bike as i bought it
then what i turned it into and rode it as for a year
and what it looks like now after having worked on it all of last year
i bought it with the wiring being an absolute bird's nest, so i'm in the midst of trying to tidy it all up quite a bit. i was just finishing up when all this happened.
Please Log in or Create an account to join the conversation.
- 7aliveatlast7
-
Topic Author
- Offline
- User
-
Registered
- Posts: 19
- Thanks: 0
Re: i have no clue...
21 Jan 2013 14:40
just watched that video, and my dad's is exactly what the video suggested steering clear of...the old school analog crap with manual ranging, haha.
Please Log in or Create an account to join the conversation.
- Steve1986
-
- Offline
- User
-
Registered
- Posts: 26
- Thanks: 0
Re: i have no clue...
24 Jan 2013 23:44
My bike did the same thing starter button did nothing. my problem was the started safety switch. i ended up bypassing it don't know if your bike has this or not. something to check i guess.
1982 kz1000J
Miles-6700
Miles-6700
Please Log in or Create an account to join the conversation.
Moderators: Street Fighter LTD