
Thanks
- koloj
-
 Topic Author
- Offline
- User
-

Registered
- Posts: 223
- Thanks: 5
Thanks
12 Aug 2014 05:46
Just wanted to thank everyone with all their help on here she went together smooth only thing I did different is used clamps to compress all four pistons at the same time then installed the cylinders....worked good and fast...head gasket looks sound all around...next is paint then getting her back in the chassis....only question I have is the lower cylinder gasket there is those black holes or plastic circle things stick out half way on lower cylinder surface front side engine those don't thend to leak do they what kinda scares me...but other then that is their some kinda guide that shows u what all the screw sizes are for all the engine covers and valve cover they sent me the kit but just a bag of screws thanks again..
Please Log in or Create an account to join the conversation.
- koloj
-
Topic Author
- Offline
- User
-
Registered
- Posts: 223
- Thanks: 5
- 650ed
-

- Offline
- User
-
Registered
- Posts: 15333
- Thanks: 2833
Re: Thanks
12 Aug 2014 06:55
The parts diagrams on Kawasaki.com show the screw sizes and where the screws go. Here's how to use that site:
Go to Kawasaki.com. On left side put cursor over "Owner Information" then on drop down menu click on "Parts Diagrams." The click "Continue" next to "Motorcycles" and click on model/year/etc. on drop down. Once you get the list of parts for your bike you can click on the category of parts - such as "Air Cleaner" and you will see a diagram of all the parts for that category. Then when you click on an actual part number on the list under the diagram it will say if the Item Status is "Active." If it is "Active" Kawasaki still sells the part through dealers. Also, at that little page you can click on the yellow highlighted question mark for a cross reference of which bikes share that part or click on the red highlighted S to see earlier part numbers for the same part.
If you want to change bike models you can enter the new model at the top. Also, you can put in just the first part of the model (i.e. KZ650) and it will list all the years and sub models. You also can put in a part number up top and switch the word "MODEL" to "PART NUMBER" using the little drop down in that box. If you do that it will show all the models that part is used on.
Ed
1977 KZ650-C1 Original Owner - Stock (with additional invisible FIAMM horn)
The following user(s) said Thank You: Jbosh
Please Log in or Create an account to join the conversation.
- koloj
-
Topic Author
- Offline
- User
-
Registered
- Posts: 223
- Thanks: 5
Please Log in or Create an account to join the conversation.
- DesertKZ
-
- Offline
- User
-
Registered
- Posts: 227
- Thanks: 20
Re: Thanks
12 Aug 2014 08:04
Nothing like the feeling of putting a motor together, firing it up and blasting it down the road. Good job!
1979 KZ1000 Shaft
1979 CX500C
1975 GT750 Smoker
1979 CX500C
1975 GT750 Smoker
Please Log in or Create an account to join the conversation.
- 4TheKZ1000
-
- User
-
Public
- Thanks: 0
Re: Thanks
12 Aug 2014 08:28 - 12 Aug 2014 08:30
Just remember to lube threads on engine studs, stud bolts and washers lightly before torqueing them, you will get a superior torque and is very important.
After running the bike for a couple weeks and going through several heat/cool cycles, re-torque the head. The gaskets will bead-down......don't forget outer two.
I would recheck the head bolts one or two more times as time goes by. I found two bolts that moved the third time around.
After running the bike for a couple weeks and going through several heat/cool cycles, re-torque the head. The gaskets will bead-down......don't forget outer two.
I would recheck the head bolts one or two more times as time goes by. I found two bolts that moved the third time around.
Last edit: 12 Aug 2014 08:30 by 4TheKZ1000.
Please Log in or Create an account to join the conversation.
- koloj
-
Topic Author
- Offline
- User
-
Registered
- Posts: 223
- Thanks: 5
- koloj
-
Topic Author
- Offline
- User
-
Registered
- Posts: 223
- Thanks: 5
- koloj
-
Topic Author
- Offline
- User
-
Registered
- Posts: 223
- Thanks: 5
Re: Re:Thanks
16 Aug 2014 20:12
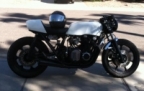
Motor in doing electrical waiting for three shims hopefully by wensday all my sweating and hard work releases the kz beat in this garage....and she feels young and new again
Please Log in or Create an account to join the conversation.
- kaw-a-holic
-
- Offline
- User
-
Registered
- Posts: 1808
- Thanks: 249
Re: Re:Thanks
16 Aug 2014 20:37
Looks good, what paint did you use? Primer? Prep steps?
Jon
1977 KZ1000a1
Mesa, AZ
Phoenix Fighter Project
1977 KZ1000a1
Mesa, AZ
Phoenix Fighter Project
Please Log in or Create an account to join the conversation.
- koloj
-
Topic Author
- Offline
- User
-
Registered
- Posts: 223
- Thanks: 5
Re: Re:Thanks
16 Aug 2014 20:59
I use rustolem x2 gloss on the frame but wet sanded it for days just cause I use it on chairs last year and the stuff is tuff even with the 0 below days we had with them outside...engine high heat duplicolor vht black gloss engine let me say was lot of work grease old paint on it tools me weeks to get clean soda blasting it old gaskets were so caked on it all the bolts stripped like I want to know who thought of using Phillips so I got a whole hex kit for it then valves got seated and machined to perfection cylinders honned and new set of piston rings gaskets now doing the electric hide it best as possible in a PVC pipe I'm painting look like a oil tank...but all in all make sure the surface is super clean I can't stress it cans of carb cleaner and duplicolor prep spray oh and least four grades of steel wool works wonders on those thight spots....I say the hardest part was getting the engine back in the chassis without messing up the paint job reccommed 1 ton hoist from harbor frieght then bolt up the two mounts and rear one bolt make sure you wrap the block with a towel save the paint before hositin... But was fun building and learning about this bike much as I learned about it I'll always know whats wrong with it and what parts it needs
Please Log in or Create an account to join the conversation.
- koloj
-
Topic Author
- Offline
- User
-
Registered
- Posts: 223
- Thanks: 5
Re: Re:Re: Thanks
16 Aug 2014 21:05
Oh thinking polishing was hardest part sanding and buffing over and over but man so worth the mirror finish
Attachments:
Please Log in or Create an account to join the conversation.
Moderators: Street Fighter LTD