
82 GPz750 Running - Need Advice/Next Steps
- nicksorg
-
 Topic Author
- Offline
- User
-

Registered
- Posts: 123
- Thanks: 1
82 GPz750 Running - Need Advice/Next Steps
05 Jul 2010 15:15
My 82 GPz750 that sat for 9 years with the PO, finally started yesterday after fixing the wiring and cleaning the carbs. When I first started it with full choke, it revved very high. Today it doesn't want to stay running off the choke and I can't seem to get it to idle using the main idle screw. Also when it first started, it blew a bunch of nest material, acorns etc. out of the exhaust. I noticed today that it blew some more stuff out.
So my plan now I think is to pull the carbs and clean them again. I'm also thinking about pulling the exhaust pipes and making sure they're clean. Any thoughts?
Thanks
Nick
So my plan now I think is to pull the carbs and clean them again. I'm also thinking about pulling the exhaust pipes and making sure they're clean. Any thoughts?
Thanks
Nick
1982 Kawasaki KZ1000-K2
Please Log in or Create an account to join the conversation.
- PLUMMEN
-
- Offline
- User
-
Registered
- Posts: 7986
- Thanks: 104
Re: 82 GPz750 Running - Need Advice/Next Steps
05 Jul 2010 15:22
sounds like a good plan of attack,id also go through the brakes and probably a set of tires before putting it on the road ")
Still recovering,some days are better than others.
Please Log in or Create an account to join the conversation.
- nicksorg
-
Topic Author
- Offline
- User
-
Registered
- Posts: 123
- Thanks: 1
Re: 82 GPz750 Running - Need Advice/Next Steps
05 Jul 2010 15:57
Thanks, definitely needs tires and I'm looking at brakes. I just tried starting it again and it definitely revs high when started cold with the choke on. Once it the engine heats up, it doesn't like running without it.
I bought 4 rebuild kits for the carbs, but only used the gaskets and pilot jet plugs when I put them back together. I'll see what they look like when I pull them.
I bought 4 rebuild kits for the carbs, but only used the gaskets and pilot jet plugs when I put them back together. I'll see what they look like when I pull them.
1982 Kawasaki KZ1000-K2
Please Log in or Create an account to join the conversation.
- MFolks
-

- Offline
- User
-
Registered
- Posts: 6650
- Thanks: 541
Re: 82 GPz750 Running - Need Advice/Next Steps
05 Jul 2010 16:52
Carb Cleaning 102
Written by MShively
Most carburetor problems seem to come after the motorcycle was stored or not started for a while. If it won't start or only runs with the choke lever pulled out, you have one or more jets obstructed by gummed or varnished fuel. Notice the enrichening lever...most of the motorcycle carbs have enrichening passages inside the carburetor that WHEN THE THROTTLE IS CLOSED, provide the rich air/fuel mixture to start the engine. If you open the throttle any at all it cuts this enrichening out of the system. So if you are having trouble starting and everything looks ok, see if closing the throttle helps. This does not apply to carbs with a butterfly choke.
To access the jets you will have to take the carbs off the engine. A service manual will be very helpful here for specifications, images of the carburetor, and procedures. Take a float bowl off and remove the jets. Sometimes removing the jets can be difficult because the fuel has gummed or varnished over the parts. If so, clear as much of the gum out as possible. Use carb cleaner and compressed air to aid removal. Before soaking carbs in a dip tank or powerful cleaner, look for rubber seals, O'rings, and other parts that may be damaged by the cleaners. Remove any rubber parts prior to cleaning. Look closely, sometimes these parts are hard to see. If they are there and you can't get them, you will have to clean the carb body carefully by hand and not soak it.
Before you remove the fuel/air screw, gently turn it in until it seats. Count and record the number of "turns in." After cleaning and when you replace it, set it at this setting. Most carbs have a rubber o-ring and steel washer under the fuel/air screw spring. Look for them and remove them with a piece of wire or suitable fabricated tool BEFORE you spray carb cleaner in there. The fuel/air screw may be covered by a tamper cap or plug. You will have to remove this plug to access it. Upon reassembly and after cleaning, a base setting for the fuel/air screws of 1.25 turns out is good to start if you don't have the factory specs or forgot to record the turns out earlier. When the engine is warm, turn the screw in until the engine stumbles, then out until it stumbles, and leave it at half way in between. Adjust the idle with the throttle stop screw as needed.
You will need to remove the main jet and the needle jet. The main jet is usually larger and screwed onto the lower end of the needle jet, locking it into the emulsion tower and carb body. Remove the main jet and tap out the needle jet. Do this very carefully. It is soft brass and may break or damage very easily. Sometimes the needle jet will have an O-ring. Remove the O-ring and soak both main jet and needle jet in carb cleaner. Upon reassembly, there may be a locator pin in the emulsion tower/carb body that fits in a grove on the needle jet. Make sure they align properly.
You will need to remove the pilot jet. Pilot jets may be located similar as the main jet, covered by a rubber plug, deep inside an emulsion tower, or other. Be careful not to strip or break the small pilot jet when you try to remove it. It may be necessary to grind the end of a small screwdriver to fit the jet just right. Even after soaking, the jet may still be plugged. Use a small "E" guitar string and push it through the jet. (A wire strand out of a wire brush may work. The wire brush should measure about .013" in diameter.) The smallest jet drill you can get is #80, which has a diameter of .0135". You can use the wire and not enlarge the hole, at least not by much. Yes, some manuals say not to insert any wire jet cleaning tools into the jets. However, Honda and other manufacturers produce them as special tools for the dealer technicians.
Use compressed air with spray cleaner and the wire to clean jets. Spray carb cleaner into the carb passages, and then follow with compressed air. Watch for cleaner to exit from other passage ways and openings, and ensure that those small idle passages are clear. The smallest tubes, passageways, and openings are critical to the operation of the carburetor. EVERY PINHOLE IS IMPORTANT. Make certain that your see and hear air and cleaner pass freely through every opening. Wear goggles and don't get so close that you get carb spray in your eyes.
Sometimes the pins or rods that hold the floats can be gummed. Spray a bit of carb cleaner and let it set awhile. Repeat and try to gently move the float. Eventually, the pin will loosen enough so that you can drive out the pin with a very small punch. If necessary, tap on the punch very gently with the handle of a small screwdriver or similar tool. Penetrating oil also works good to free up gummed float pins and stuck throttle slides. If the slides have a rubber diaphragm on them, spray carb cleaner on a rag and wipe the slide clean. Do not get carb cleaner on the rubber diaphragms. It will ruin them. While you have the Diaphragm out, inspect it for holes. If you have an engine that has good compression and starts well, but just has no power and revs up ever so slowly, check that rubber diaphragm. It may have a hole or tear. The throttle slide will not rise if it is damaged.
When you put the float valve or needle valve back in place, put a drop of light oil on it so it will move freely in its seat and not stick before the gas first starts to fill the bowl.
Don't clean the outside of constant velocity (CV) carbs with spray carb cleaner unless you are sure they are not the rubber diaphragm type. Carb cleaner will ruin the rubber. There is a piston type of CV carburetor, but it's still not a good idea to use the spray because of rubber float bowl gaskets (O'rings).
If you turn on the fuel petcock and gas pours out the overflow tubes, tap lightly on the carb body with a suitable tool. That will vibrate the float valves loose. Same thing if there is dirt holding the valves open. If it doesn't work you need a new float valve & seat. The tips of the float valves can be steel or rubber. Tips with a groove worn in them should be replaced. The float pin springs often become gummed by fuel and cause the pins to stick. Test with your finger. They should be free moving - no resistance. Replace all if you feel any sticking. If they first stuck, but you worked them free, try and use them. They may fail when gasoline gets into the spring again.
Floats control the fuel level in the float bowls. Adjustable tangs on the floats rest on the float valve pins. When level is low, the float lowers and the valve follows. More fuel enters the bowl. Similarly, shutting fuel flow off when it replenishes supply. If the tang is metal, you can adjust the float level by bending the tang up or down. If it is plastic, it is non-adjustable. Float levels are different for each bike and are found in the bikes shop manual. If you don't have the float setting and can't find it anywhere, set it so the fuel level is a bit below the top of the float bowl. Make sure no gas comes out of the float overflow tubes or hoses. The float overflow tube is at the bottom or side of each float bowl. There are many styles of floats: copper, brass, bronze, plastic, urethane, tin, cork, and maybe other materials. Brass and plastic are the most common.
If the rubber ducts that connect the carb and air cleaner housing are hard and dry-rotted, you should replace them. Replace rubber intake manifolds if necessary, too.
On the side of some carbs is another diaphragm that temporarily closes the pilot or slow speed jet air passage when the throttle is closed. This richens the fuel mixture to reduce backfiring when coming to a stop. Check the diaphragm for holes and tears.
At the bottom of some carbs is an accelerator pump to pump extra fuel when the throttle is opened. The pump is attached or connected to one float bowl. Check the pump's diaphragm for holes or tears. A rubber coating called "Plasti-Dip" has been used to fix diaphragms. I have never used it but I hear it works. Get it from NAPA part #765-2527.
Adjustments that you can make from outside the carburetor:
1) Synchronizer screws balance the carburetors for smooth performance and idling. 2) Idle screw (throttle stop screw) adjusts the speed of the idle. 3) The idle fuel/air screw adjusts the idle mixture. This is only at idle and does not effect anything above idle. Another method to adjust it: turn the fuel/air screw in and out until you get the highest idle speed. Then lower the idle speed with the idle screw and do it again until you get the best idle. The air screw can be located in a variety of places on the carb. If you have a 1980 or newer machine, it may have a cover over it to keep you from messing with it. You will have to drill it and then pry it out using the hole you made. It may be illegal for you to do this, depending on where you live.
If you can't get it to idle, or rather the idle stays real high then drops off and dies, check for an air leak. Spray starting fluid, WD40, brake cleaner, carb cleaner, etc... on the manifold, carbs, air box, vacuum hoses, and petcock to see if the revs change. If they do, you have a leak. If your valve clearances are too tight, it will also effect the idle.
You can make your air/fuel mixture a bit richer or leaner by moving the carburetor needle clip up or down. Move the clip down a notch to raise the needle, to richen the mixture. Move the clip up to lower the needle, to lean out the mixture. The needle is located in the throttle slide.
1982 GPZ1100 B2
General Dynamics/Convair 1983-1993
GLCM BGM-109 Tomahawk, AGM-129A Advanced Cruise Missile (ACM)
General Dynamics/Convair 1983-1993
GLCM BGM-109 Tomahawk, AGM-129A Advanced Cruise Missile (ACM)
Please Log in or Create an account to join the conversation.
- ready2ryde1985
-
- Offline
- User
-
Registered
- got to love these kzs
- Posts: 467
- Thanks: 4
Re: 82 GPz750 Running - Need Advice/Next Steps
05 Jul 2010 20:18
New intake boots.
Sounds like you are having the same problem I was try the intake boots 9 year old rubber .. thats just where i would start.") good luck these bikes are a blast when you get it right
good luck these bikes are a blast when you get it right
Sounds like you are having the same problem I was try the intake boots 9 year old rubber .. thats just where i would start.
good luck these bikes are a blast when you get it right
84 kz 700 a1
82 kz550 ltd
82 kz550 ltd
Please Log in or Create an account to join the conversation.
- dragsta
-

- Offline
- User
-
Registered
- Posts: 27
- Thanks: 0
Re: 82 GPz750 Running - Need Advice/Next Steps
05 Jul 2010 20:38
nicksorg wrote:
evict the rats! if the PO had to fix the wires, rats chewed them. the little monsters chewed the wires on my truck my, car, and my lawn tractor. i finally had to go out with my .22 and blast the em. i hated to do it but they left me no choice.... you may have to shoot water through those pipes to clean them out.
Also when it first started, it blew a bunch of nest material, acorns etc. out of the exhaust. I noticed today that it blew some more stuff out.
So my plan now I think is to pull the carbs and clean them again. I'm also thinking about pulling the exhaust pipes and making sure they're clean. Any thoughts?
Thanks
Nick
evict the rats! if the PO had to fix the wires, rats chewed them. the little monsters chewed the wires on my truck my, car, and my lawn tractor. i finally had to go out with my .22 and blast the em. i hated to do it but they left me no choice.... you may have to shoot water through those pipes to clean them out.
Please Log in or Create an account to join the conversation.
- nicksorg
-
Topic Author
- Offline
- User
-
Registered
- Posts: 123
- Thanks: 1
Re: 82 GPz750 Running - Need Advice/Next Steps
06 Jul 2010 05:24 - 06 Jul 2010 07:32
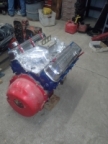
I pulled the pipes and carbs this morning. There was one broken stud on the number 1 head and a bunch of nuts, etc. in the pipes. I'm not sure if these have packing also, but there looks like some steel wool at the end of the pipe.

I drained the carbs and some orange gas came out, mostly from the inside carbs 2 and 3. Since I recently cleaned the tank, that wasn't unexpected. The float valve was stuck in carb 4 which makes sense, because when it was running pipes 1, 2, and 3 were white and 4 was hot, but not like the others. I was happy to see that all the pilot jet plugs held.
I have all the parts to do a rebuild on the carbs from Z1, but I'm a little nervous. I can't tell the jet sizes that are in there now and the new pilot jet doesn't have holes on it like the current ones.
Nick
1982 Kawasaki KZ1000-K2
Last edit: 06 Jul 2010 07:32 by nicksorg.
Please Log in or Create an account to join the conversation.
- nicksorg
-
Topic Author
- Offline
- User
-
Registered
- Posts: 123
- Thanks: 1
Re: 82 GPz750 Running - Need Advice/Next Steps
06 Jul 2010 05:30
Here's a pic showing that 3 of the carbs were working. Note the orange from the rust.

1982 Kawasaki KZ1000-K2
Please Log in or Create an account to join the conversation.
- mtkawboy
-
- Offline
- User
-
Registered
- Posts: 823
- Thanks: 16
Re: 82 GPz750 Running - Need Advice/Next Steps
06 Jul 2010 16:02
Unless you clean the 9 years of varnish & rust out of the tank prior to starting after the carb rebuild you will be doing it again shortly. I have one of those bikes I bought new in 82. Search for fuel tank cleaning on here, youre going to need it or youre wasting your time. Your vacuum petcock will probably be bad too. They dont give away the carb airbox boots or the petcock rebuild kits either, roughly $110+ for all of it. Take the bolts out of the battery box too, it gives you a little extra room that really helps. They are still a bear to get back on even with new airbox boots. Be careful you dont lose the aluminum plugs & rubber gasket when youre blowing the carbs out. They are under the gasket in pic #2 at the top of the float bowl. Ask me how I know you can !
78-KZ1000/1105, 80 KZ1000, 82 Kawasaki GPZ750, 95 Harley Fatboy, 80 Suzuki GS1100ET, 81 GS1100E parts bike, 83 GS1100SD Katana/1394,78 Yamaha XT500, 81 Yamaha XS650, 78 Yamaha XS650E, 48 Whizzer model J motorbike, 71 Honda CT70H, 71 Honda CT70, 81 IT 250 Yamaha,82 Honda XL100S owned
Please Log in or Create an account to join the conversation.
- nicksorg
-
Topic Author
- Offline
- User
-
Registered
- Posts: 123
- Thanks: 1
Re: 82 GPz750 Running - Need Advice/Next Steps
12 Jul 2010 01:37
After some research on the site, I decided to clean the tank again. Here's what I did:
- Drained the gas.
- Removed the tank hardware.
- Cleaned with power purple and rinsed.
- Put a rubber stopper in the fill hole.
- Filled the tank with Muriatic acid and a little water.
- I moved mix back and forth and let it sit for awhile on different sides of the tank. This step removed alot of the rust.
- Added baking soda to the tank to neutralize the acid and drained it.
- Rinsed with water several times.
- Repeated the steps above with phosphoric acid.
At this point the inside of the tank looked great. However there were still some spots of rust on the fill neck and along the bottom seems as seen from the top fill hole. I decided to repeat the entire process above. When I got to the rinse before the phosphoric solution, I decided to try using my power washer to remove some of the hard to reach rust spots I just mentioned. My tank is in good structural condition so I thought it wouldn't hurt. Using my flat/wide attachement, I hit the tank with the power washer from the top fill hole, and it worked perfectly. Once I finished, I used compressed air to dry out the inside and immediately filled the tank with fresh gas. I ran a little gas out of the petcock and its flowing nice and clear.
Nick
1982 Kawasaki KZ1000-K2
Please Log in or Create an account to join the conversation.
- leakyseal
-
- Offline
- User
-
Registered
- KZ pilot for life.
- Posts: 47
- Thanks: 0
Re: 82 GPz750 Running - Need Advice/Next Steps
12 Jul 2010 10:04
I LOVE the 82'750.:woohoo:
What a sweet ride,i've allways wanted one.The GPZ's were a good mix of classic,and sport.They're also quick for old bikes.Just thought i'd say that,looks like these guys got ya covered.")

What a sweet ride,i've allways wanted one.The GPZ's were a good mix of classic,and sport.They're also quick for old bikes.Just thought i'd say that,looks like these guys got ya covered.

Please Log in or Create an account to join the conversation.
- mjg15
-
- Offline
- User
-
Registered
- Posts: 698
- Thanks: 18
Re: 82 GPz750 Running - Need Advice/Next Steps
12 Jul 2010 18:00
Good luck with yours. Mine sat for several years. I adjusted the valves, ultrasonic'ed the carbs and went over the whole bike. The first time I rode it the headgasket started leaking.....uuuggghhh.
'80 Z750fx
'81 KZ550A
'81 GPz550's, Too many!
'82 KZ1000R
'82 GPz750
'90 ZR550
Project photo album: s163.photobucket.com/albums/t289/mg15_ph...GPz-ZR550%20project/
s163.photobucket.com/albums/t289/mg15_ph...current=DSC01286.jpg
'81 KZ550A
'81 GPz550's, Too many!
'82 KZ1000R
'82 GPz750
'90 ZR550
Project photo album: s163.photobucket.com/albums/t289/mg15_ph...GPz-ZR550%20project/
s163.photobucket.com/albums/t289/mg15_ph...current=DSC01286.jpg
Please Log in or Create an account to join the conversation.
Moderators: Street Fighter LTD