
Kz 1000 Head porting
- gearhead119
-
 Topic Author
- Offline
- User
-

Registered
- Posts: 37
- Thanks: 0
Re: Kz 1000 Head porting
01 Sep 2009 20:34
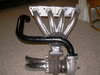
Here are some pics of the exhaust ports. most of the rough cuts are done here but I can't seem to find a flapper/stone/carbide/drum/ etc... that gives me the finish that I am looking for so I need to finish the blending yet.. Still a bit more on the intakes ye too. more to come....


2000 Zrx1100 Turbo-220bhp/145lbs torque
1978 KZ 1000 project-in progress
1978 KZ 1000 project-in progress
Please Log in or Create an account to join the conversation.
- larrycavan
-

- User
-
Public
- Thanks: 0
Re: Kz 1000 Head porting
02 Sep 2009 05:06
Anything you need, you can get here
www.mondello.com/
Please Log in or Create an account to join the conversation.
- larrycavan
-
- User
-
Public
- Thanks: 0
Re: Kz 1000 Head porting
02 Sep 2009 05:18
gearhead119 wrote:
In the case of the exhaust port, force the air through it in normal direction.
Point the probe into the flow and move it around the port. You'll see the closer you get to the floor, the flow falls off.
A string on a wand will do the same thing but it won't give you the same reference the water guage would. With the guage, you can see how much the column changes.
Yes a digital manometer is fine.
Here's a velocity test being performed on an intake port on my bench with a Jbend Pitot. Output is in actual feet per second @28" test pressure.
For exhaust, same concept but the pitot is straight. And I use an actual pitot instead of a probe but the probe will still give you reference to work from. You're just looking for where the port flows vs where it goes dead.
www.flowbenchtech.com/porting/CRH/velocitytest.htm
I am guessing from my search results that the manometer you speak of is just a vaccuum sync guage. If so I have a nice digital one that I use at work. is it possible to use this to test port flow. I have thought about it before but didn't know if it was possible or accurate it could be. How does the shop vac vaccuum campare to the engine vaccumm read my a guage? would a plenum need to be made to equallize pressure between the four ports?
you are applying a constant vaccumm to the port and using the brakeline with the guage and hose attatched to search around the port area for high and low areas. Do you need to use a type of mercury stick/guage that has an air bleed screw in the line? I got some of those also.
In the case of the exhaust port, force the air through it in normal direction.
Point the probe into the flow and move it around the port. You'll see the closer you get to the floor, the flow falls off.
A string on a wand will do the same thing but it won't give you the same reference the water guage would. With the guage, you can see how much the column changes.
Yes a digital manometer is fine.
Here's a velocity test being performed on an intake port on my bench with a Jbend Pitot. Output is in actual feet per second @28" test pressure.
For exhaust, same concept but the pitot is straight. And I use an actual pitot instead of a probe but the probe will still give you reference to work from. You're just looking for where the port flows vs where it goes dead.
www.flowbenchtech.com/porting/CRH/velocitytest.htm
Please Log in or Create an account to join the conversation.
- gearhead119
-
Topic Author
- Offline
- User
-
Registered
- Posts: 37
- Thanks: 0
Re: Kz 1000 Head porting
04 Sep 2009 19:03
larrycavan wrote:
I brought home the valve seat cutters (neway). The seats are going to be this weekends project. I have done about 10 or so heads in the past so I kinda know what I am doing... This will be my first 4 cylinder where EVERYTHING needs to match. This is also the first shim type motor that I have done. What is the purpose for the 37.5 mm block? Is 37.5mm the stock hights or the height I should be shooting for. Would I try to correct the height by sinking the valve further into the head or be taking some off the valve tips when I am finished with all the seats? I have a valve grinding machine at work that does a really good job. How thick is the stealite on the valve tips?
Here's a street cut port to look at. These typically make over 100HP at the rear wheel with 29 smoothbores, drop in cams and 1075 street compression pistons. Good torque throug the middle as well.
When you do the valve job, push the seat all the way out to the edge of the valve and then use the outside cutter one more time to narrow the 45 up so there's a thin, shiny line just outside the 45.
If you're cutting the seats by hand with Neway cutters, watch you don't get going crooked with the cutter. The T handle will quickly rock and the cutter will follow a crooked seat in a heart beat.
Best to just go in there first with a 60 and put a light cut in there to see how crooked things are.
Then, take the 30, go easy, keep the cutter straight and wipe the 45 right out. Go back with the 60, set your inside angle to the width you want, then cut the 45 lightly.
Put magic marker on the seat and set the valve in there. DO NOT SPIN IT. Pull it out and see where the seat locates and more importantly, how evenly the marker is dispersed onto the valve. It's a quick/easy way to check your concentricity.
Then adjust the location with the 45 and set outside location with the 30 and width with the 60.
If the head has never been touched, you're going to find the exhaust valves are seated way low on the face. They can be sunk a bunch to push the seat further out on the valve face.
The handiest thing you'll want is a 37.5mm round block to drop down in the bucket bore to check your stem height. You can make one or APE has them for an inexpensive price. I use mine all the time.
I brought home the valve seat cutters (neway). The seats are going to be this weekends project. I have done about 10 or so heads in the past so I kinda know what I am doing... This will be my first 4 cylinder where EVERYTHING needs to match. This is also the first shim type motor that I have done. What is the purpose for the 37.5 mm block? Is 37.5mm the stock hights or the height I should be shooting for. Would I try to correct the height by sinking the valve further into the head or be taking some off the valve tips when I am finished with all the seats? I have a valve grinding machine at work that does a really good job. How thick is the stealite on the valve tips?
2000 Zrx1100 Turbo-220bhp/145lbs torque
1978 KZ 1000 project-in progress
1978 KZ 1000 project-in progress
Please Log in or Create an account to join the conversation.
- larrycavan
-
- User
-
Public
- Thanks: 0
Re: Kz 1000 Head porting
05 Sep 2009 05:20
gearhead119 wrote:
The installed stem height is what the 37.5mm block is used for. Look in your OEM service manual. The chart that shows stem height to shim range. 37.5 is standard.
When you tip the valves [grind the stems] you want them very flat. A valve grinding machine is suggested for that.
Set the head up so that your pilot is pointing straight up. Do not just lay the head flat on the workbench and cut seats with the pilot on an angle.
You can use different length 6mm bolts on each side of the head in the valve cover bolt holes to do that.
I use a power head with Neway Cutters but also have a zip gun with stones.

larrycavan wrote:Here's a street cut port to look at. These typically make over 100HP at the rear wheel with 29 smoothbores, drop in cams and 1075 street compression pistons. Good torque throug the middle as well.
When you do the valve job, push the seat all the way out to the edge of the valve and then use the outside cutter one more time to narrow the 45 up so there's a thin, shiny line just outside the 45.
If you're cutting the seats by hand with Neway cutters, watch you don't get going crooked with the cutter. The T handle will quickly rock and the cutter will follow a crooked seat in a heart beat.
Best to just go in there first with a 60 and put a light cut in there to see how crooked things are.
Then, take the 30, go easy, keep the cutter straight and wipe the 45 right out. Go back with the 60, set your inside angle to the width you want, then cut the 45 lightly.
Put magic marker on the seat and set the valve in there. DO NOT SPIN IT. Pull it out and see where the seat locates and more importantly, how evenly the marker is dispersed onto the valve. It's a quick/easy way to check your concentricity.
Then adjust the location with the 45 and set outside location with the 30 and width with the 60.
If the head has never been touched, you're going to find the exhaust valves are seated way low on the face. They can be sunk a bunch to push the seat further out on the valve face.
The handiest thing you'll want is a 37.5mm round block to drop down in the bucket bore to check your stem height. You can make one or APE has them for an inexpensive price. I use mine all the time.
I brought home the valve seat cutters (neway). The seats are going to be this weekends project. I have done about 10 or so heads in the past so I kinda know what I am doing... This will be my first 4 cylinder where EVERYTHING needs to match. This is also the first shim type motor that I have done. What is the purpose for the 37.5 mm block? Is 37.5mm the stock hights or the height I should be shooting for. Would I try to correct the height by sinking the valve further into the head or be taking some off the valve tips when I am finished with all the seats? I have a valve grinding machine at work that does a really good job. How thick is the stealite on the valve tips?
The installed stem height is what the 37.5mm block is used for. Look in your OEM service manual. The chart that shows stem height to shim range. 37.5 is standard.
When you tip the valves [grind the stems] you want them very flat. A valve grinding machine is suggested for that.
Set the head up so that your pilot is pointing straight up. Do not just lay the head flat on the workbench and cut seats with the pilot on an angle.
You can use different length 6mm bolts on each side of the head in the valve cover bolt holes to do that.
I use a power head with Neway Cutters but also have a zip gun with stones.
Please Log in or Create an account to join the conversation.
- gearhead119
-
Topic Author
- Offline
- User
-
Registered
- Posts: 37
- Thanks: 0
Re: Kz 1000 Head porting
05 Sep 2009 22:29
I just got done with the valve job. It went realativly smooth.... I snapped a few pics along the way.


2000 Zrx1100 Turbo-220bhp/145lbs torque
1978 KZ 1000 project-in progress
1978 KZ 1000 project-in progress
Please Log in or Create an account to join the conversation.
- PLUMMEN
-
- Offline
- User
-
Registered
- Posts: 7983
- Thanks: 104
Re: Kz 1000 Head porting
06 Sep 2009 08:01
nice work ")
Still recovering,some days are better than others.
Please Log in or Create an account to join the conversation.
- larrycavan
-
- User
-
Public
- Thanks: 0
Re: Kz 1000 Head porting
06 Sep 2009 16:30 - 06 Sep 2009 16:31
Looks pretty good ")
Stagger the blades on the 60* cutter and it won't leave those little ridges.
Also you can use blades from the 45 or 30 in the 60 to put a fine finish on that angle...
Set the valves on the seat and tap around the outer circumference with your finger. If there's any angle irregularities, you'll hear the valve rock / click.
Checking with a light is good practice.
Are you using a solid 7mm pilot or the expandable one?
Last edit: 06 Sep 2009 16:31 by larrycavan.
Please Log in or Create an account to join the conversation.
- gearhead119
-
Topic Author
- Offline
- User
-
Registered
- Posts: 37
- Thanks: 0
Re: Kz 1000 Head porting
06 Sep 2009 19:46 - 06 Sep 2009 19:49
I am using a solid pilot. I started using the neway T-handles but that only lasted about a half hour. then I got out my drill and an adapter to fit the blade heads....I know I know I know... not the best way to do it but I would have 20 hours doin it by hand... it is probably way straighter than I could have got it by hand though. The exhaust was really easy... the stock seats only had 1 angle .. thats it!.. the whole "sink the valve into the head " thing.. I was worried about getting them all the same.. but they look great!! ")
That bit that Larry wrote a few posts into this thread was worth a million bucks!! It worked flawlessly... We must speak the same language!!
Tues. I will make me one of the bucket measuring tools... a few hours at the valve grinder and the valves should be ready to go back together... hopefully...
oh and I am getting the head gasket surface milled to clean up any warping or flaws
2000 Zrx1100 Turbo-220bhp/145lbs torque
1978 KZ 1000 project-in progress
1978 KZ 1000 project-in progress
Last edit: 06 Sep 2009 19:49 by gearhead119.
Please Log in or Create an account to join the conversation.
- larrycavan
-
- User
-
Public
- Thanks: 0
Re: Kz 1000 Head porting
07 Sep 2009 04:54
solomrus wrote:
I didn't see this post before..sorry 'bout that.
You want to keep runner size as uniform as you can. The throat size in a full out setup will be the smallest CSA.
Side draft ports with bends [typical KZ head] require bowl volume to get the head cranking up to the potential it can deliver.
larry, quick comment.
when you open up the valve seat to the X% of the valve diameter, would it be a true statement to say that your runner should NOT exceed this overall dimension?
or, will this not matter if it's blended smoothly with the larger diameter?
just wondering if this would raise the velocity some to help with TQ at lower lifts?
this will dictate the face angles on the valves, too, correct?
--r
I didn't see this post before..sorry 'bout that.
You want to keep runner size as uniform as you can. The throat size in a full out setup will be the smallest CSA.
Side draft ports with bends [typical KZ head] require bowl volume to get the head cranking up to the potential it can deliver.
Please Log in or Create an account to join the conversation.
- gearhead119
-
Topic Author
- Offline
- User
-
Registered
- Posts: 37
- Thanks: 0
Re: Kz 1000 Head porting
09 Sep 2009 19:21
Soooo. I made me a measureing tool for the valve stem height. I could only find our clymer's manual for the 900's and 1000's. It states that the stem height is supposed to be less than 38.1 mm (i think?). Do my fgures need to fall inbetween 38.1mm and 37.5mm. Are these the two "steps" on the APE measureing tool? As long as the valve tip falls between the high and the low there is enough range to adjust the valves with the availible shims. I think this theory is correct but just need someone elses insight in case I forgot something. I don't always trust the clymers stuff.
2000 Zrx1100 Turbo-220bhp/145lbs torque
1978 KZ 1000 project-in progress
1978 KZ 1000 project-in progress
Please Log in or Create an account to join the conversation.
- PLUMMEN
-
- Offline
- User
-
Registered
- Posts: 7983
- Thanks: 104
Re: Kz 1000 Head porting
09 Sep 2009 21:42
yep as long as youre between the 2 marks you should be ok,although id aim for the lower mark to give yourself a little room as valves/seats start seating together
Still recovering,some days are better than others.
Please Log in or Create an account to join the conversation.
Moderators: Street Fighter LTD