
And finally, Wookie's 82 begins !
- Wookie58
-
 Topic Author
- Away
- Moderator
-

Registered
- Posts: 6298
- Thanks: 3985
Re: And finally, Wookie's 82 begins !
26 Aug 2023 11:23
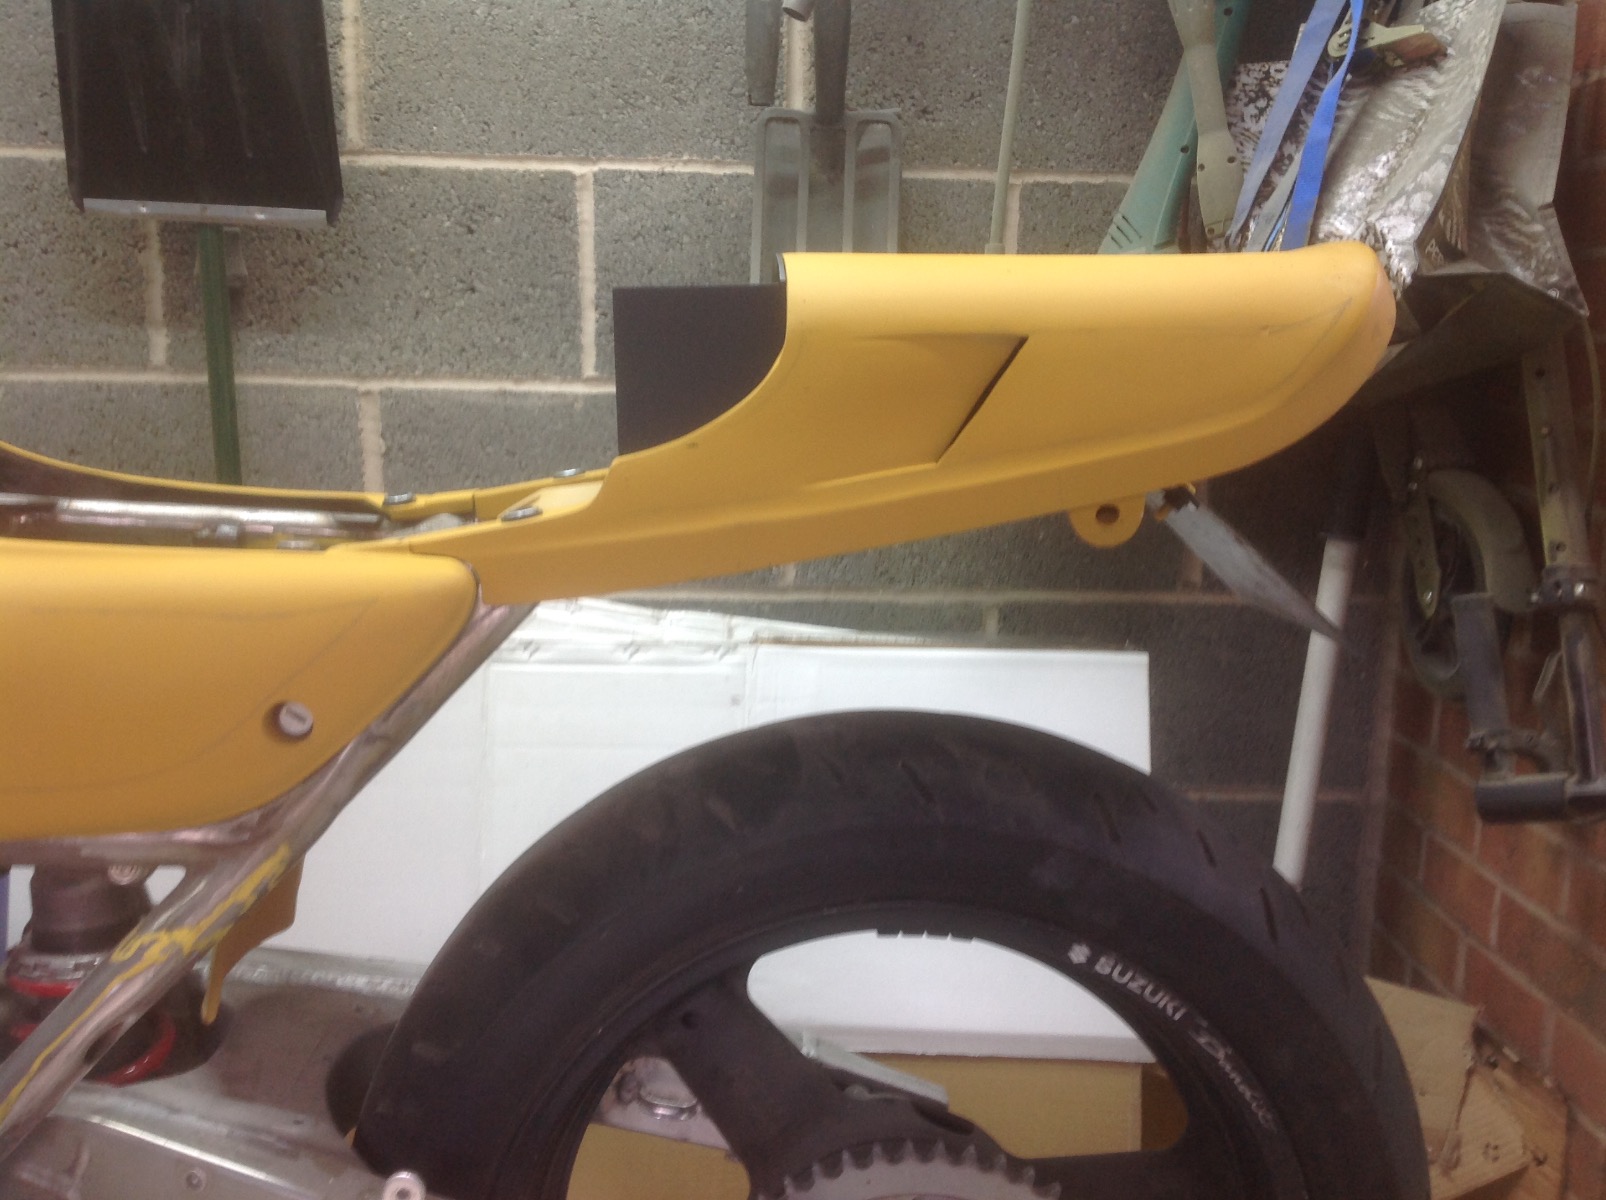
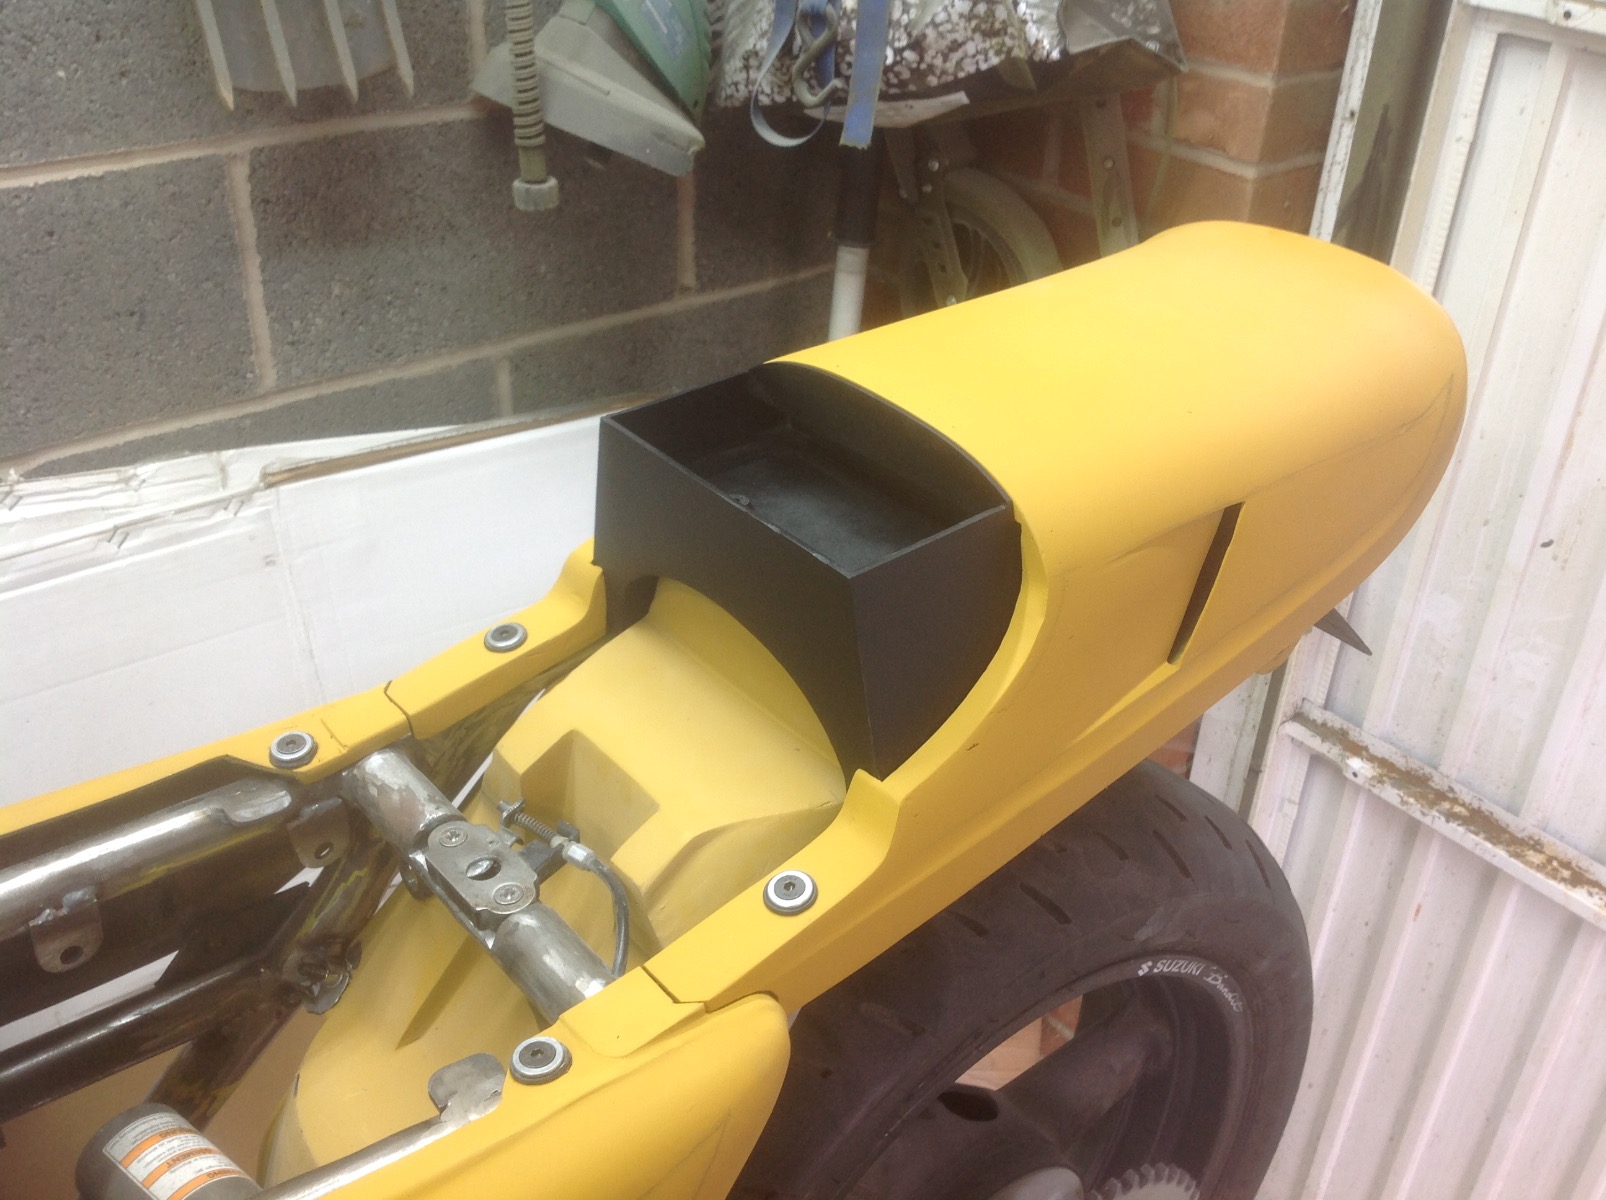
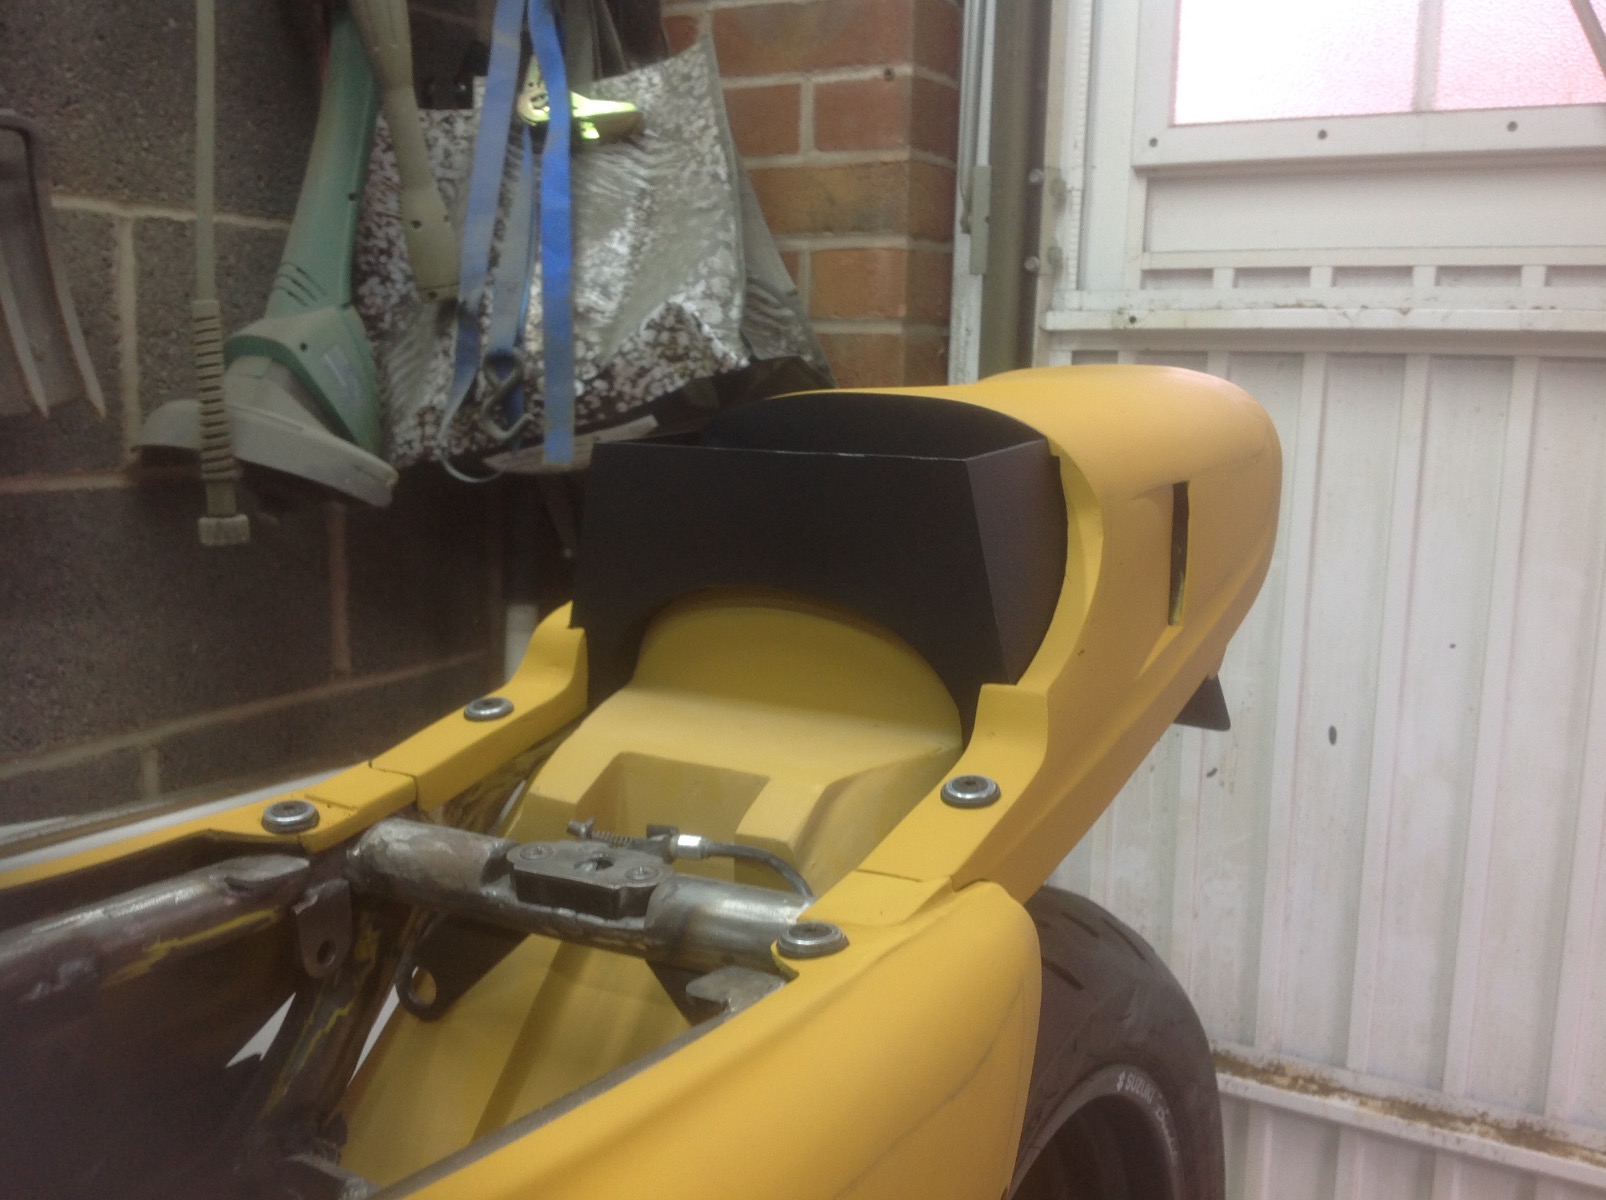
Today was a good day, finally managed to wrap up the plastic and fibreglass (will require final body working when the time comes but it's bound to get a few chips and scratches in the meantime) I am really happy now with the transitions between the different panels and the storage box turned out nice too

1982 KZ1000 Ltd
www.kzrider.com/forum/11-projects/617631...-82-begins?start=192
kzrider.com/filebase-alias?view=download...d-fault-diagnosis&ca
www.kzrider.com/forum/11-projects/617631...-82-begins?start=192
kzrider.com/filebase-alias?view=download...d-fault-diagnosis&ca
The following user(s) said Thank You: Jonas_Z1000j
Please Log in or Create an account to join the conversation.
- Wookie58
-
Topic Author
- Away
- Moderator
-
Registered
- Posts: 6298
- Thanks: 3985
Re: And finally, Wookie's 82 begins !
26 Aug 2023 11:35
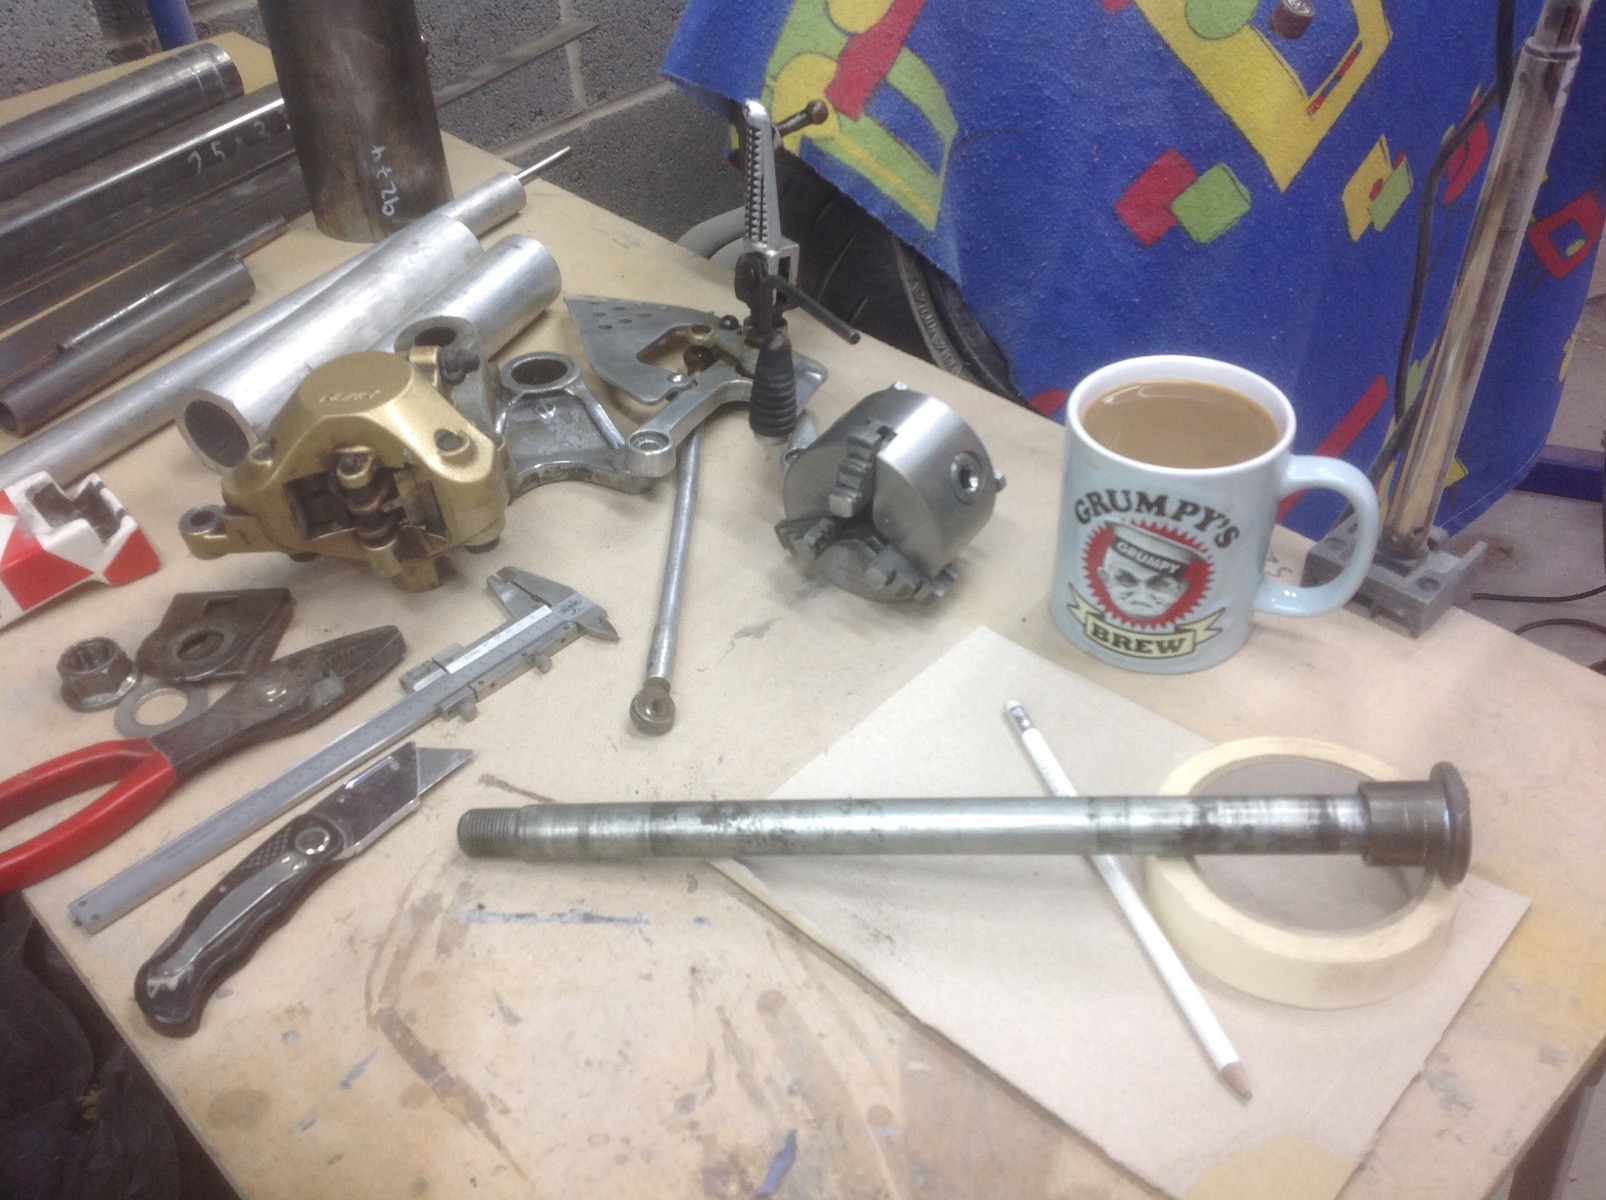
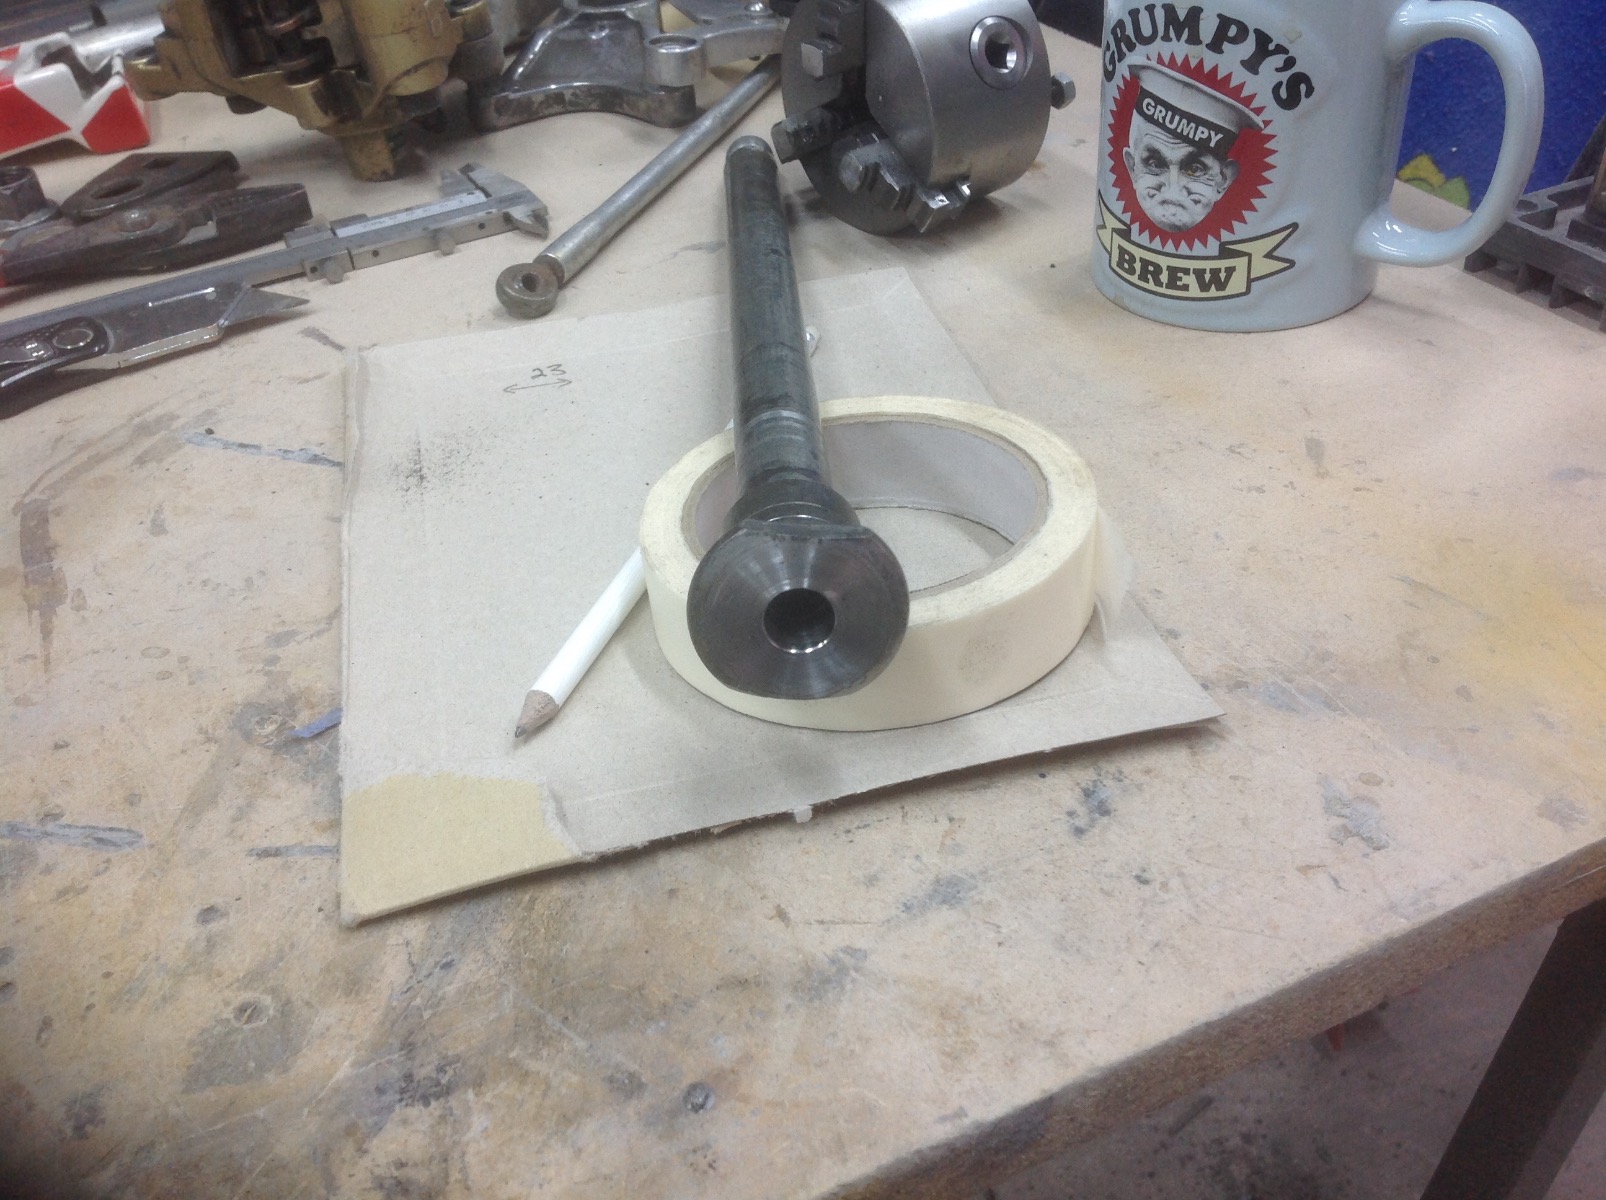
And so onto the next chapter, different tooling, different materials and more new skills to learn (I bought a small lathe a few months back
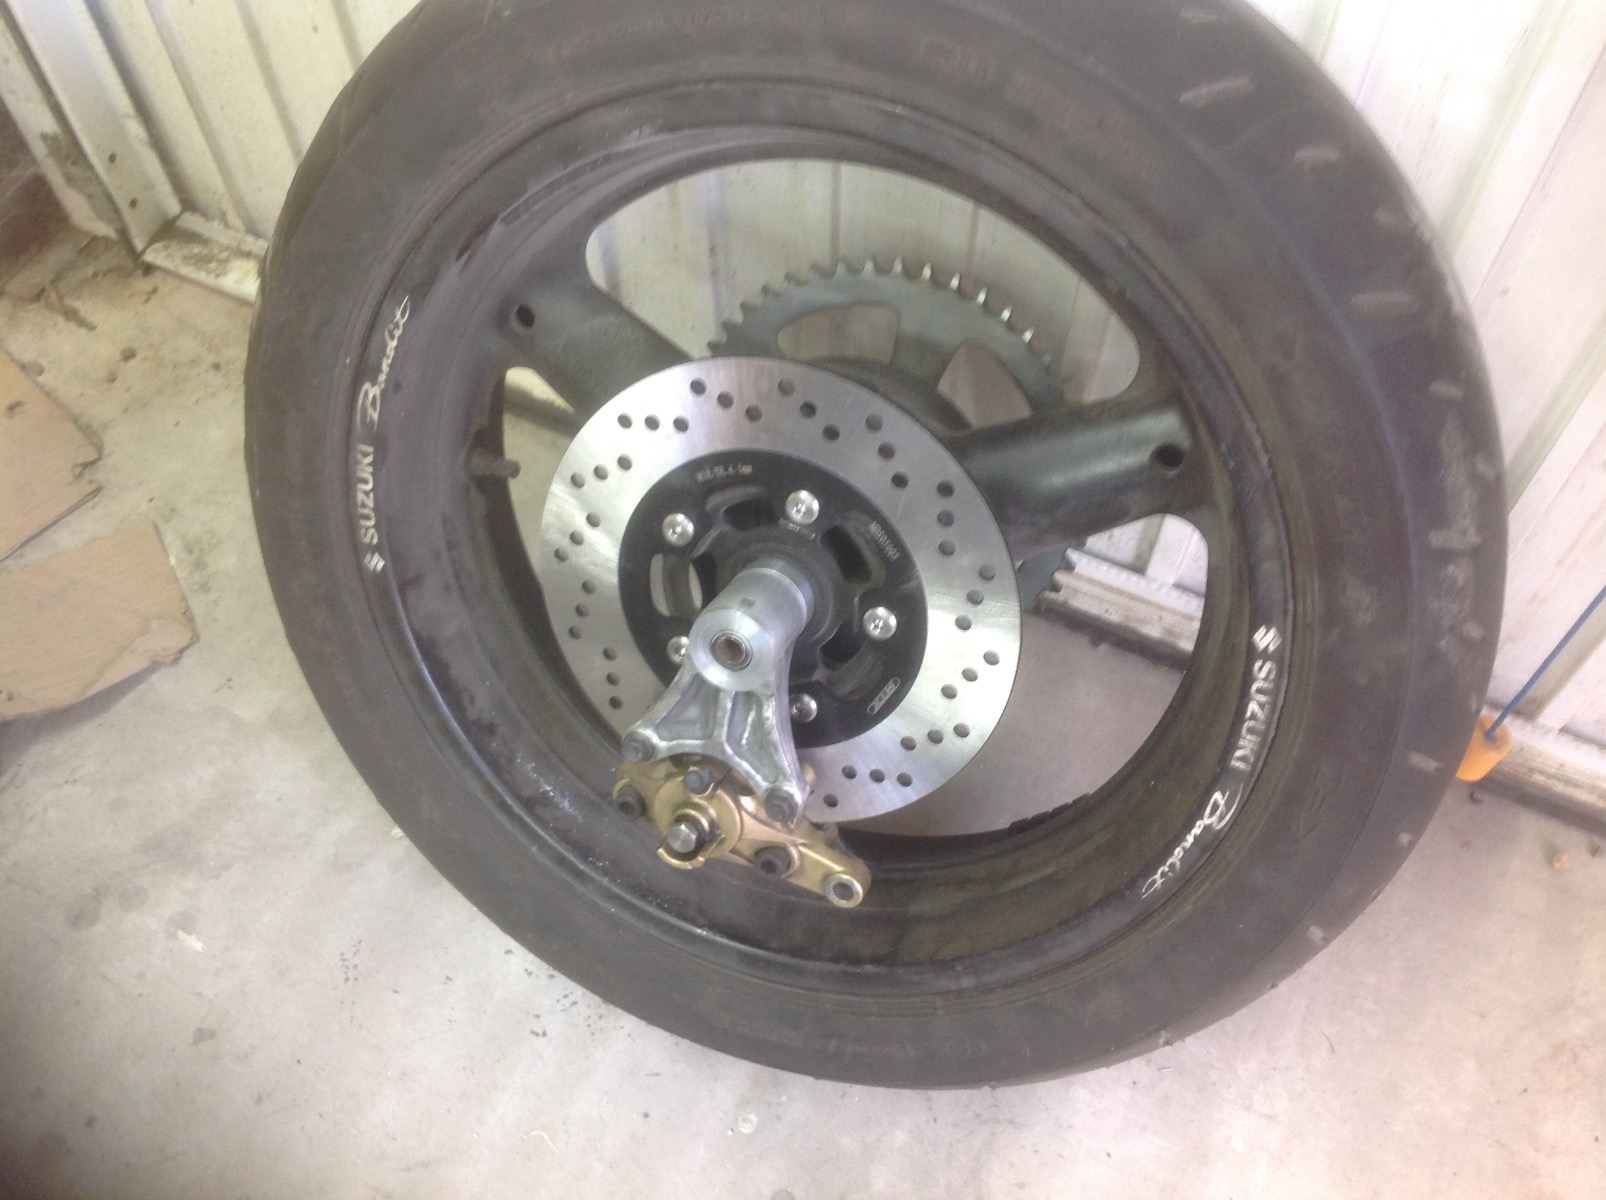
 ) I have turned wood in the past but this is all new. Was a bit "2 forward and 1 back" to start with, I wanted to get the rear axle sorted but although it will fit through the shaft of the lathe it wouldn't fit through the 3 jaw"self centring" chuck that was on the lathe. Luckily it came with a 4 jaw that the axle would fit through but it's not "self centring" (first new skill learnt) and the studs to attach it to the output wheren't there so I had to make them. Once this was all sorted I could get on with converting the axle to a GSXR/Bandit hybrid. I have used the end of the GSXR axle with the fitting for the chain adjuster block, turned the head off the bandit axle then pressed and welded the whole shebang together with a sleeve to take up the OD - ID differences
1982 KZ1000 Ltd
www.kzrider.com/forum/11-projects/617631...-82-begins?start=192
kzrider.com/filebase-alias?view=download...d-fault-diagnosis&ca
www.kzrider.com/forum/11-projects/617631...-82-begins?start=192
kzrider.com/filebase-alias?view=download...d-fault-diagnosis&ca
The following user(s) said Thank You: sf4t7, howardhb
Please Log in or Create an account to join the conversation.
- Wookie58
-
Topic Author
- Away
- Moderator
-
Registered
- Posts: 6298
- Thanks: 3985
Re: And finally, Wookie's 82 begins !
28 Aug 2023 10:05 - 28 Aug 2023 10:06
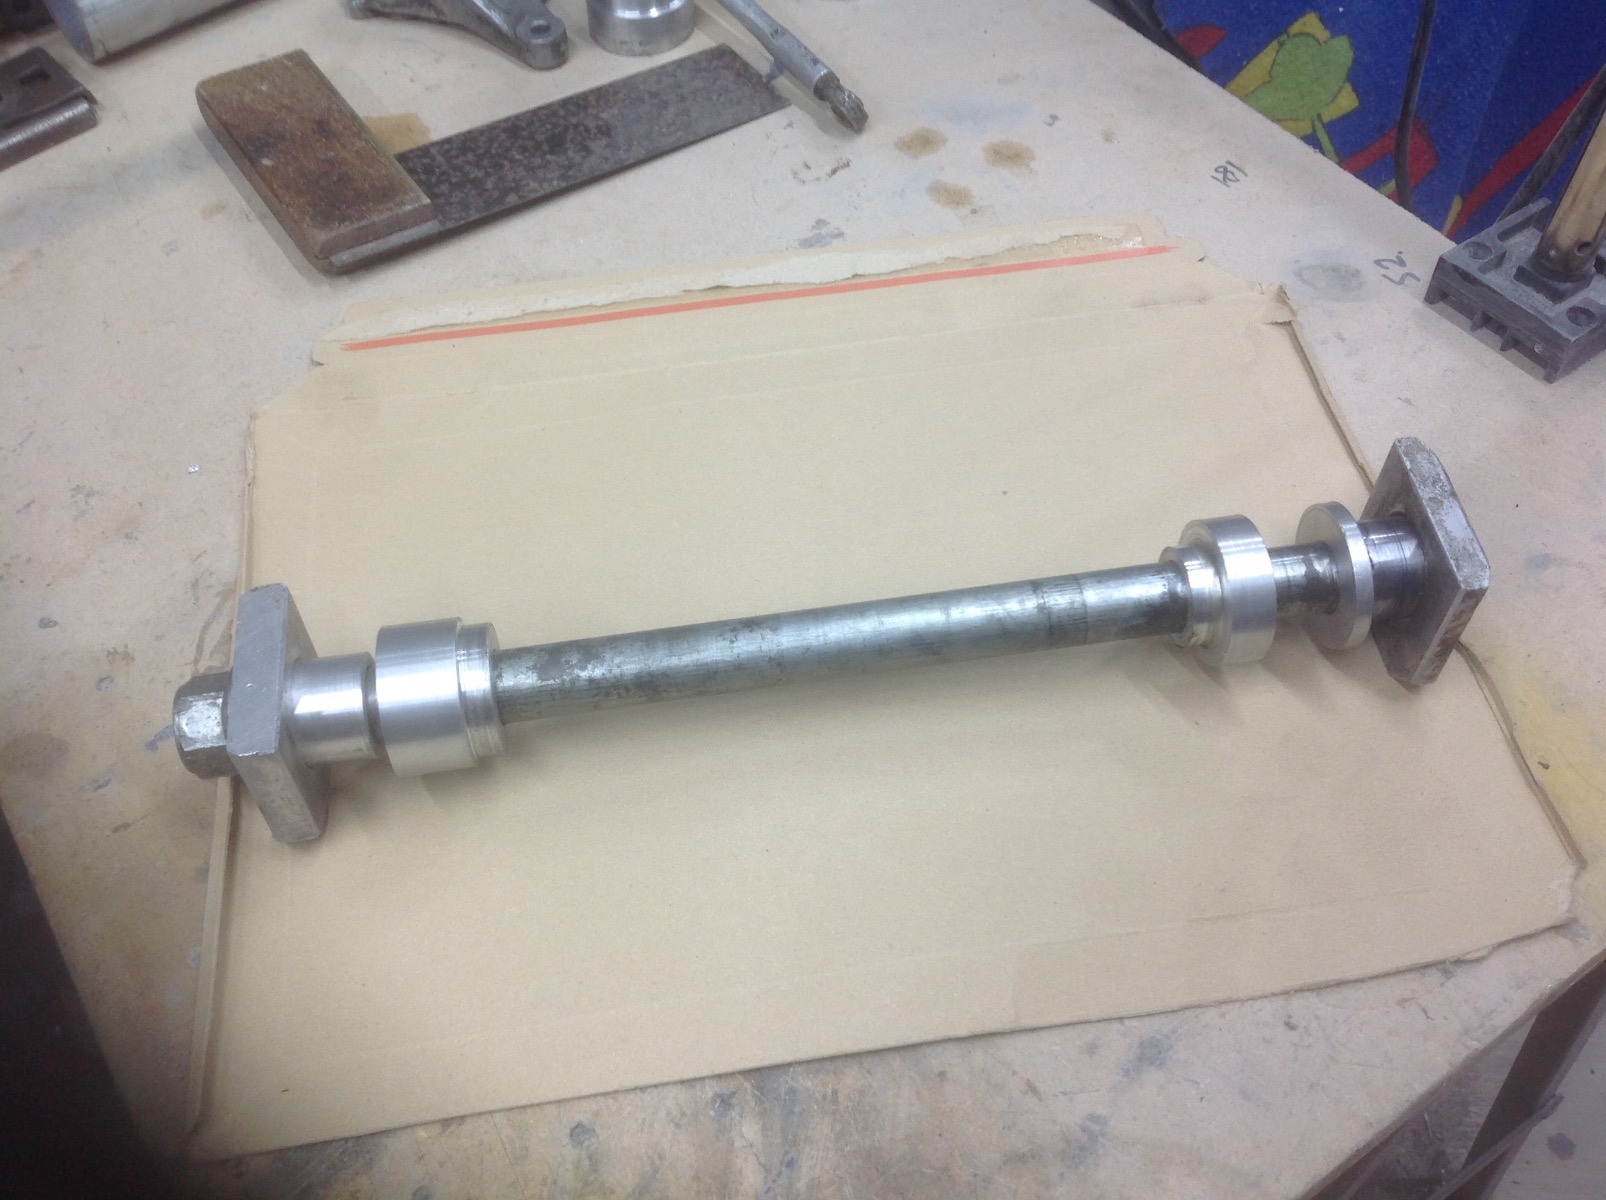
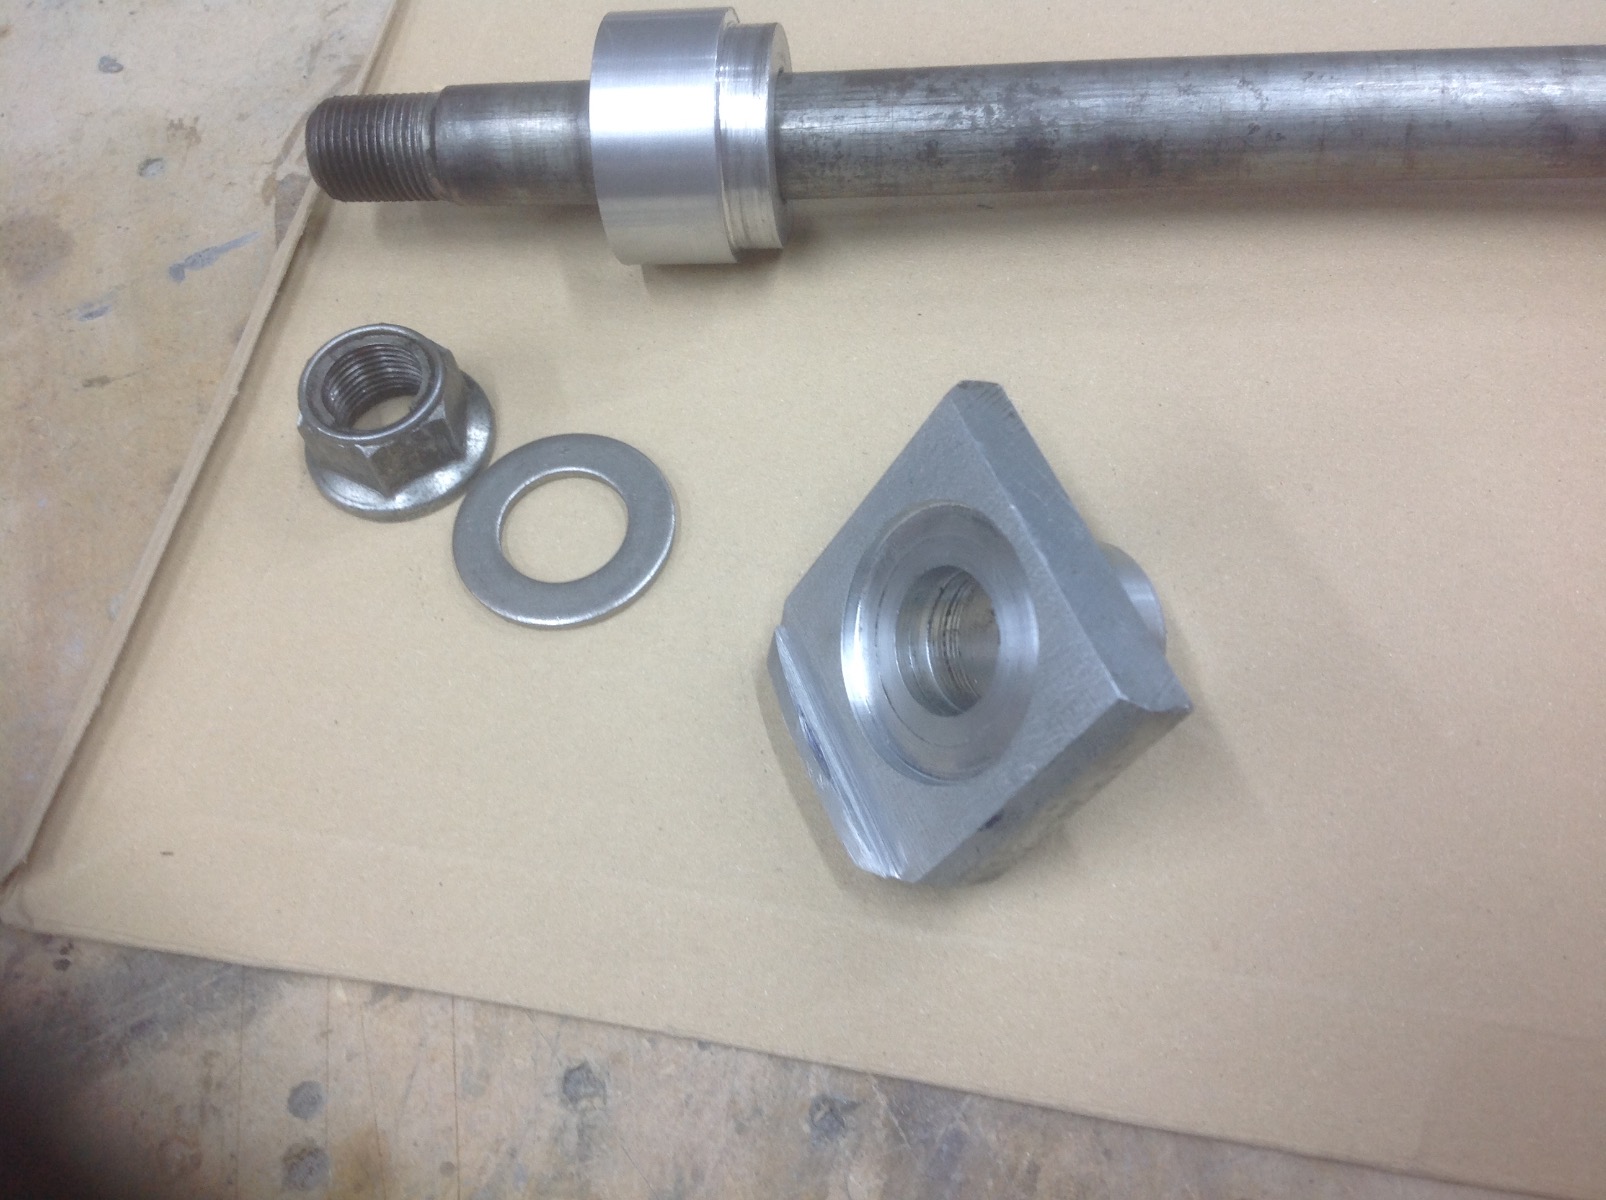
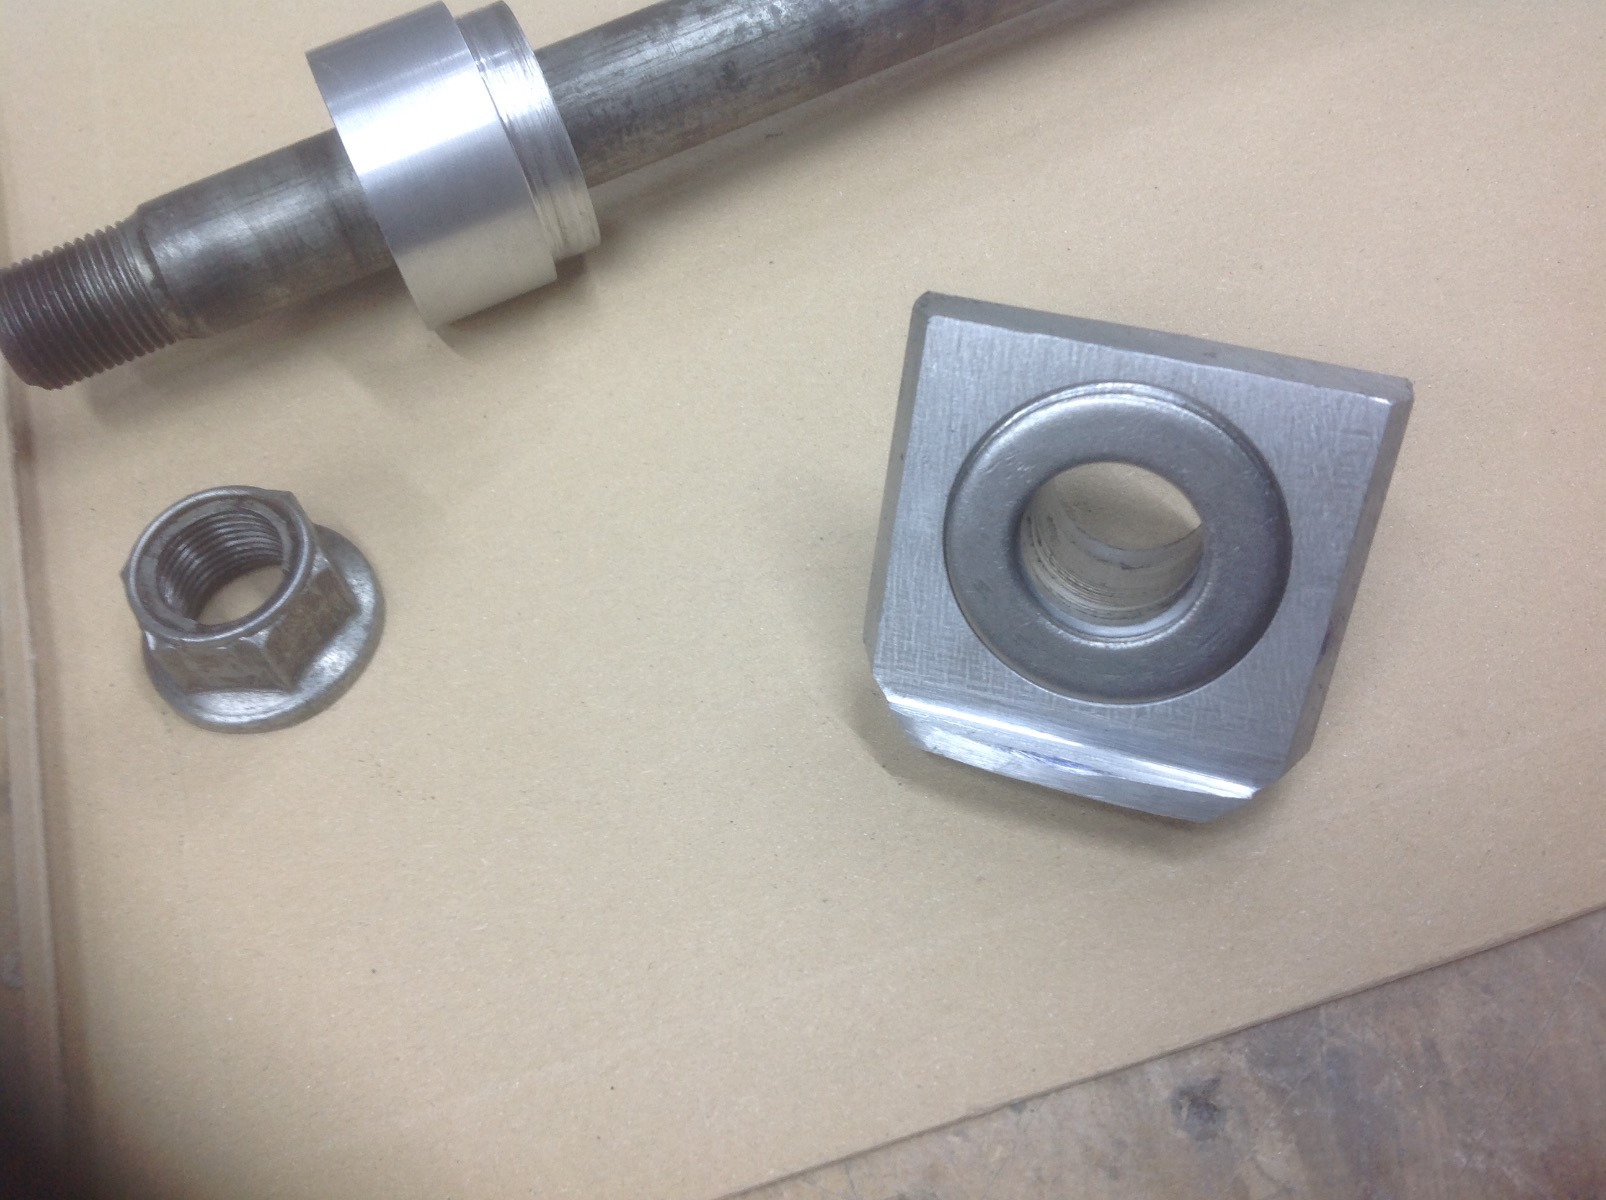
Another positive day with good progress (for me) I know a proper machinist with a "man sized" machine would have knocked these parts out before breakfast, but as a metal machining virgin I couldn't be happier (no scrap ,parts and everything fits) I have press fitted the sleeve in the left chain adjuster so there is less parts to wrestle with when fitting the wheel and also rebated it to take a stainless washer so the nut doesn't chew the alloy. So that's it, rear axle fittings complete
My new best friend, it's small but it get's the job done

[
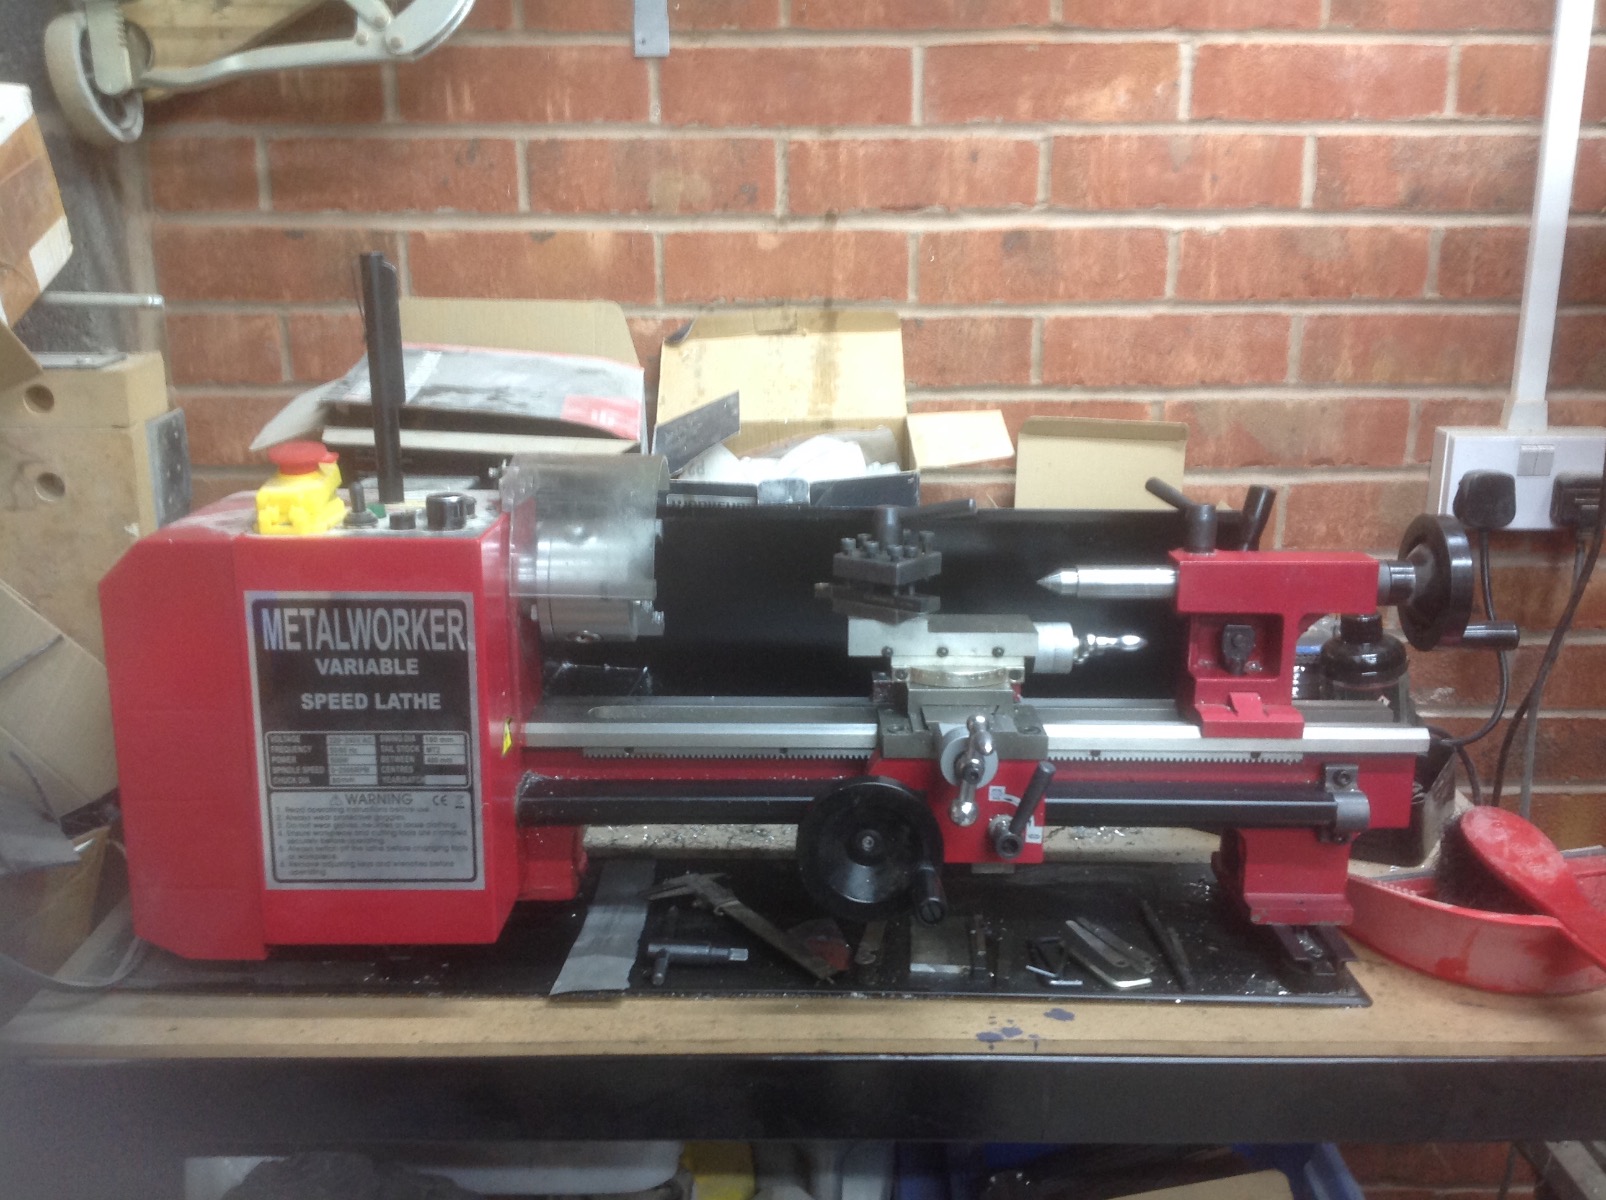
My new best friend, it's small but it get's the job done
[
1982 KZ1000 Ltd
www.kzrider.com/forum/11-projects/617631...-82-begins?start=192
kzrider.com/filebase-alias?view=download...d-fault-diagnosis&ca
www.kzrider.com/forum/11-projects/617631...-82-begins?start=192
kzrider.com/filebase-alias?view=download...d-fault-diagnosis&ca
Last edit: 28 Aug 2023 10:06 by Wookie58.
The following user(s) said Thank You: calum
Please Log in or Create an account to join the conversation.
- howardhb
-

- Offline
- Sustaining Member
-

Registered
- God, I trust
- Posts: 473
- Thanks: 510
Re: And finally, Wookie's 82 begins !
29 Aug 2023 00:59
Lookin' good Wookie!
Those parts look nice!
You'll need a bench grinder (with a green stone) to sharpen carbide cutting tools
...and a key-less chuck (for the tail-stock) is a "nice to have" too !!!
H.
Those parts look nice!
You'll need a bench grinder (with a green stone) to sharpen carbide cutting tools
...and a key-less chuck (for the tail-stock) is a "nice to have" too !!!
H.
'81 GPz 550 D1
'81 GPz 1100 B1 ELR "Tribute" www.kzrider.com/forum/11-projects/617040...-elr-tribute?start=0
'82 Yamaha YB100 Fizzie
'79 Suzuki GT200 X5 TWO STROKE TWIN - SMOKER!
'81 GPz 1100 B1 ELR "Tribute" www.kzrider.com/forum/11-projects/617040...-elr-tribute?start=0
'82 Yamaha YB100 Fizzie
'79 Suzuki GT200 X5 TWO STROKE TWIN - SMOKER!
Please Log in or Create an account to join the conversation.
- Wookie58
-
Topic Author
- Away
- Moderator
-
Registered
- Posts: 6298
- Thanks: 3985
Re: And finally, Wookie's 82 begins !
29 Aug 2023 02:18Thanks Howard, I have so much to learn from guys like you in regards to machining (fortunately my lathe is not massively powerful so if I get carried away and ignore "the sounds of protest" from the tool then it will stall the machine before anything really bad happensYou'll need a bench grinder (with a green stone) to sharpen carbide cutting tools
...and a key-less chuck (for the tail-stock) is a "nice to have" too !!!
H.

1982 KZ1000 Ltd
www.kzrider.com/forum/11-projects/617631...-82-begins?start=192
kzrider.com/filebase-alias?view=download...d-fault-diagnosis&ca
www.kzrider.com/forum/11-projects/617631...-82-begins?start=192
kzrider.com/filebase-alias?view=download...d-fault-diagnosis&ca
The following user(s) said Thank You: howardhb, Rolf1976_KZ900
Please Log in or Create an account to join the conversation.
- Rolf1976_KZ900
-

- Offline
- Sustaining Member
-
Registered
- Posts: 498
- Thanks: 261
Re: And finally, Wookie's 82 begins !
29 Aug 2023 13:10
Just found this tread Super work Wookie58 ! I love this kind of project writeups treads thanks for sharing !
The following user(s) said Thank You: Wookie58
Please Log in or Create an account to join the conversation.
- Mikaw
-
- Offline
- Sustaining Member
-
Registered
- Posts: 4825
- Thanks: 1852
Re: And finally, Wookie's 82 begins !
29 Aug 2023 15:11
Wow, homie ain’t playing around! Excellent!
1976 KZ 900 A4
kzrider.com/forum/11-projects/613548-1976-kz-900-a4
1976 KZ 900 B1 LTD
1978 KZ 1000 B2 LTD
1980 KZ 750 E1
Kowledge Speaks, But Wisdom Listens.
Jimi Hendrix.
1976 KZ 900 B1 LTD
1978 KZ 1000 B2 LTD
1980 KZ 750 E1
Kowledge Speaks, But Wisdom Listens.
Jimi Hendrix.
The following user(s) said Thank You: Wookie58
Please Log in or Create an account to join the conversation.
- Wookie58
-
Topic Author
- Away
- Moderator
-
Registered
- Posts: 6298
- Thanks: 3985
Re: And finally, Wookie's 82 begins !
02 Sep 2023 12:57 - 02 Sep 2023 12:59
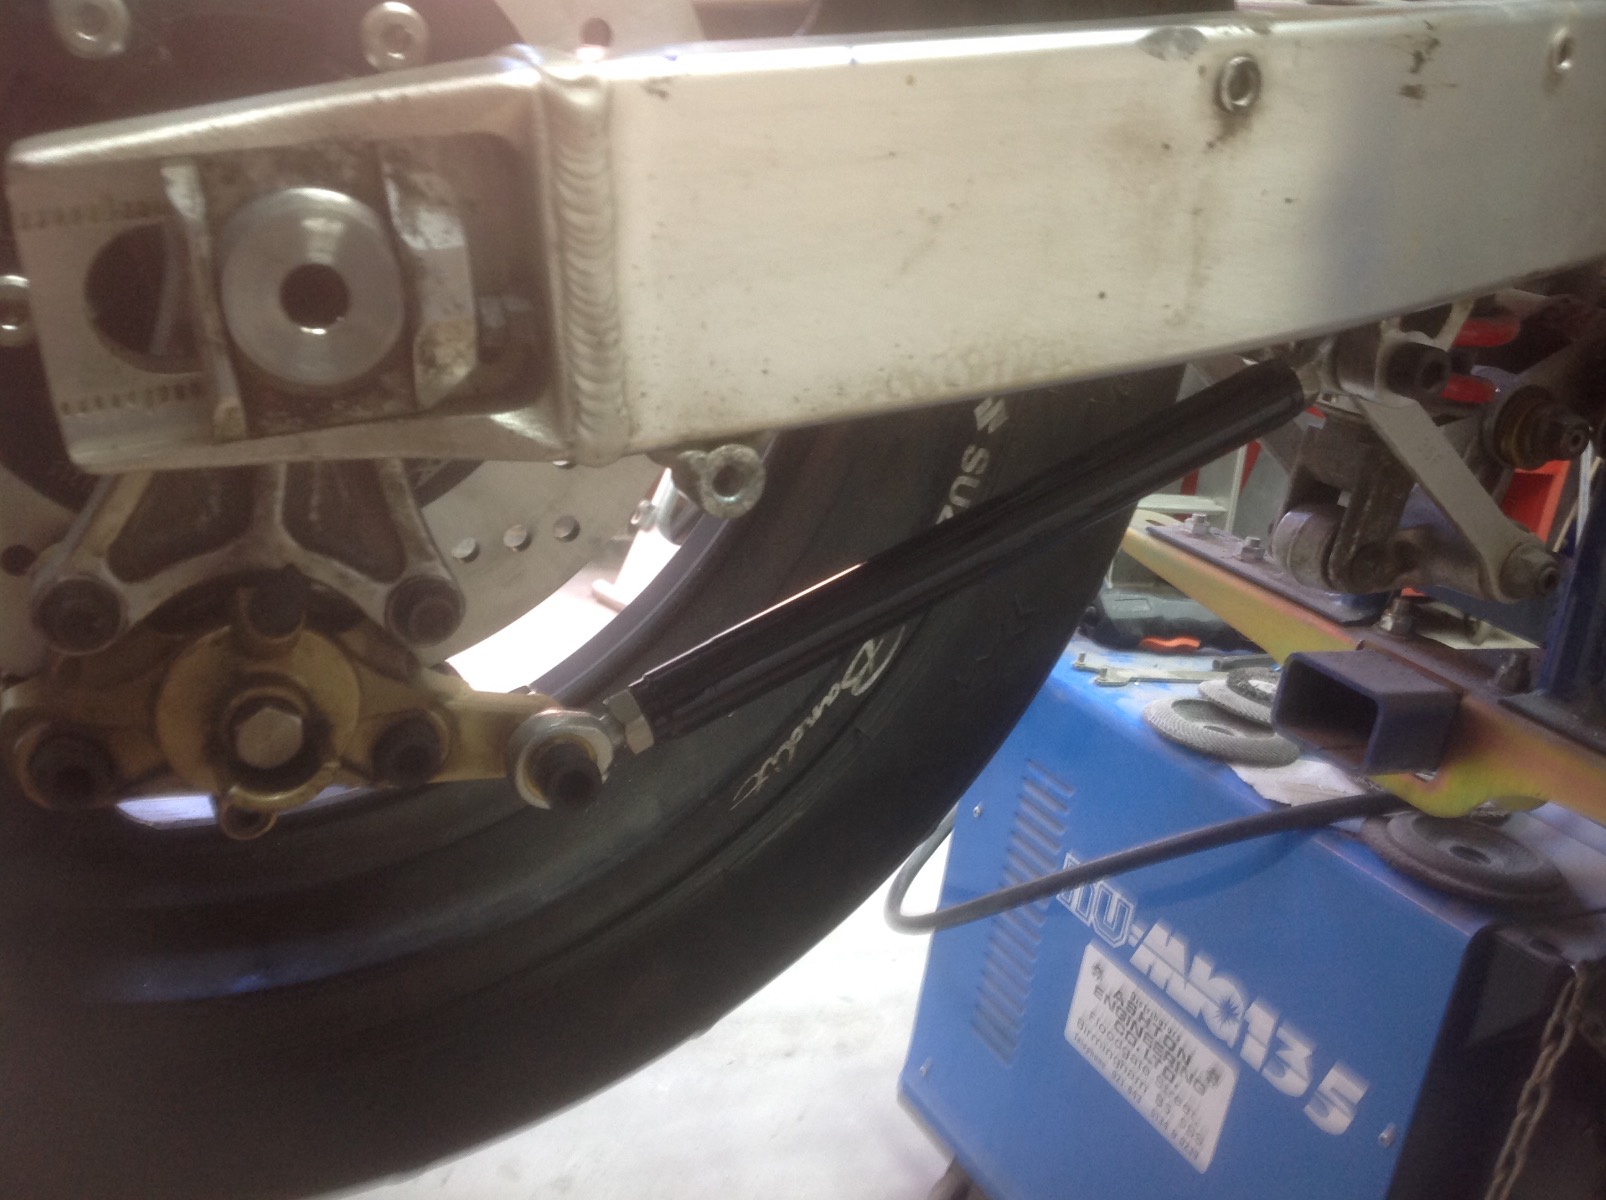
Been out there doing my thing again today, having put the back wheel in and out a few times it struck me there must be an easier way. I am sure you guys all have your own methods but when I earned my living with spanners in a dealership we had special tools and assembly jigs for all manner of jobs. What I learnt was the job was invariably easier and quicker if you used these items the manufacturer provides. Applying this logic I have put together the "Wookie wheel install kit"
The two brackets just bolt to the "stand bobbins" on the GSXR swingarm. I then cut a spare Bandit axle to the same width as the wheel assembly so that I can fully assembly the back wheel on the floor (calliper, spacers etc) with the "assembly shaft installed.
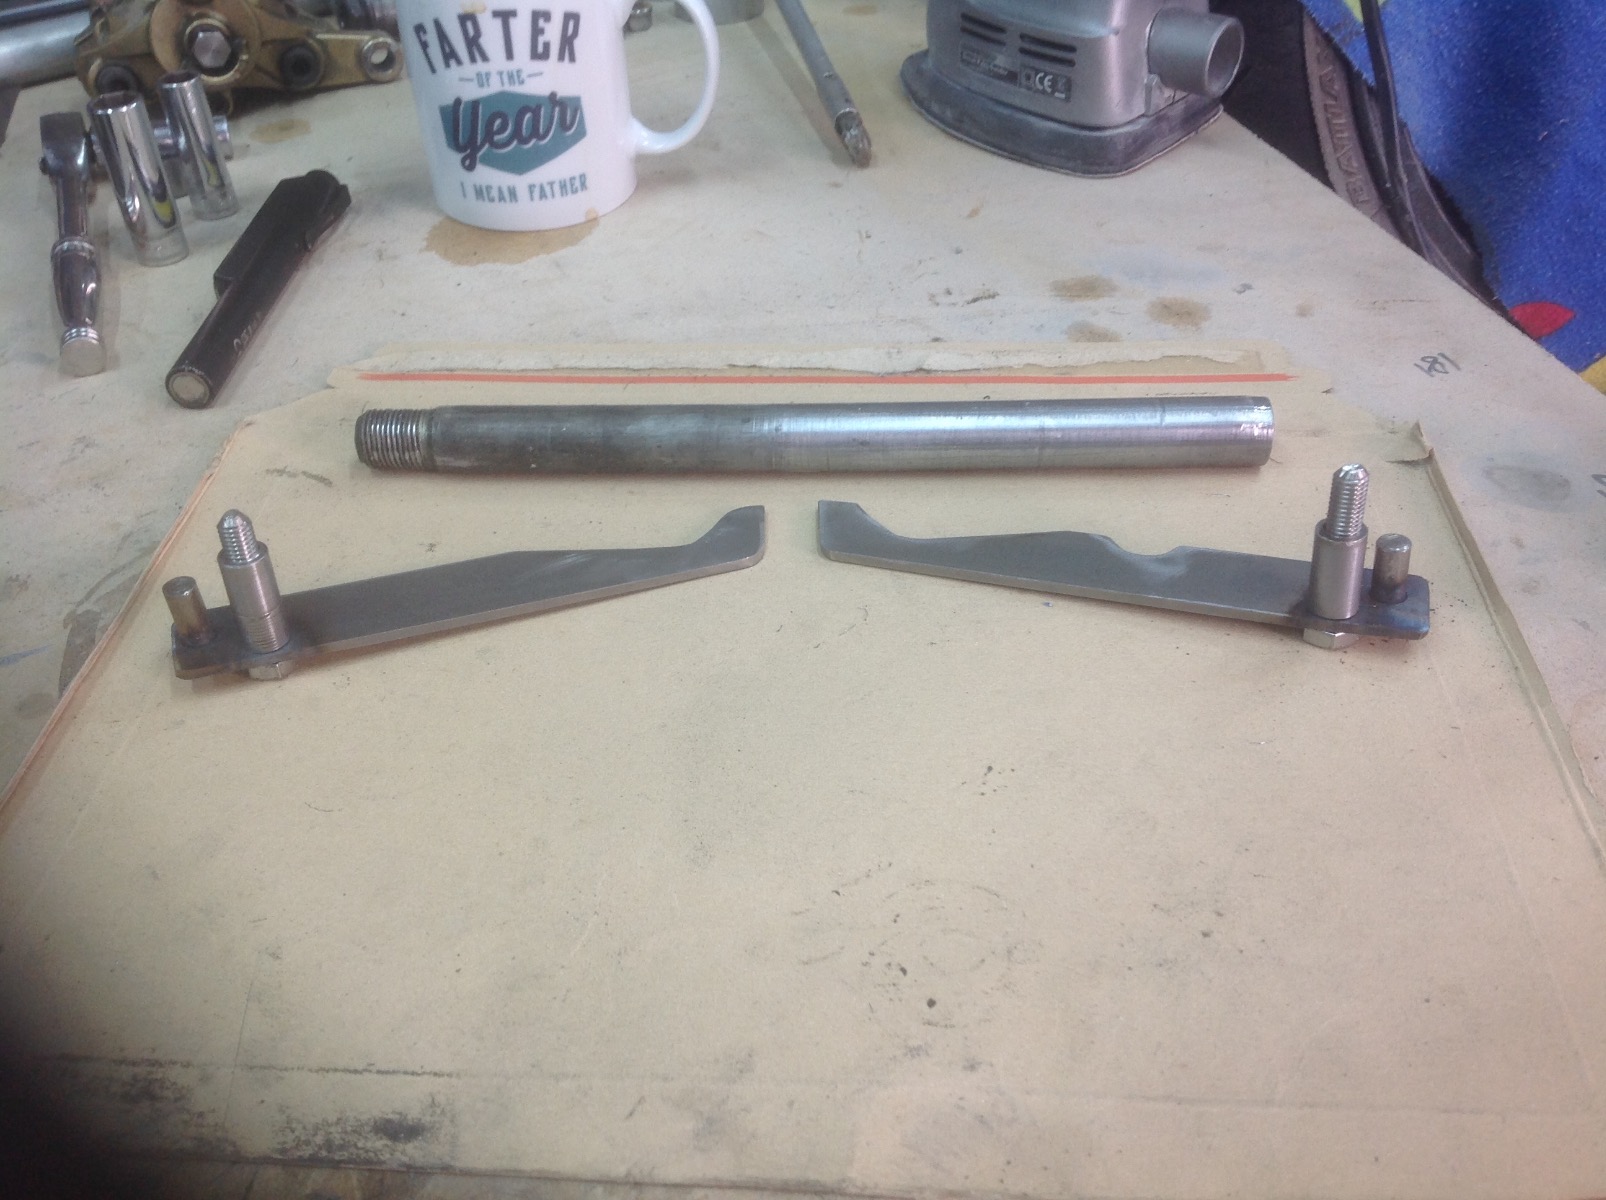
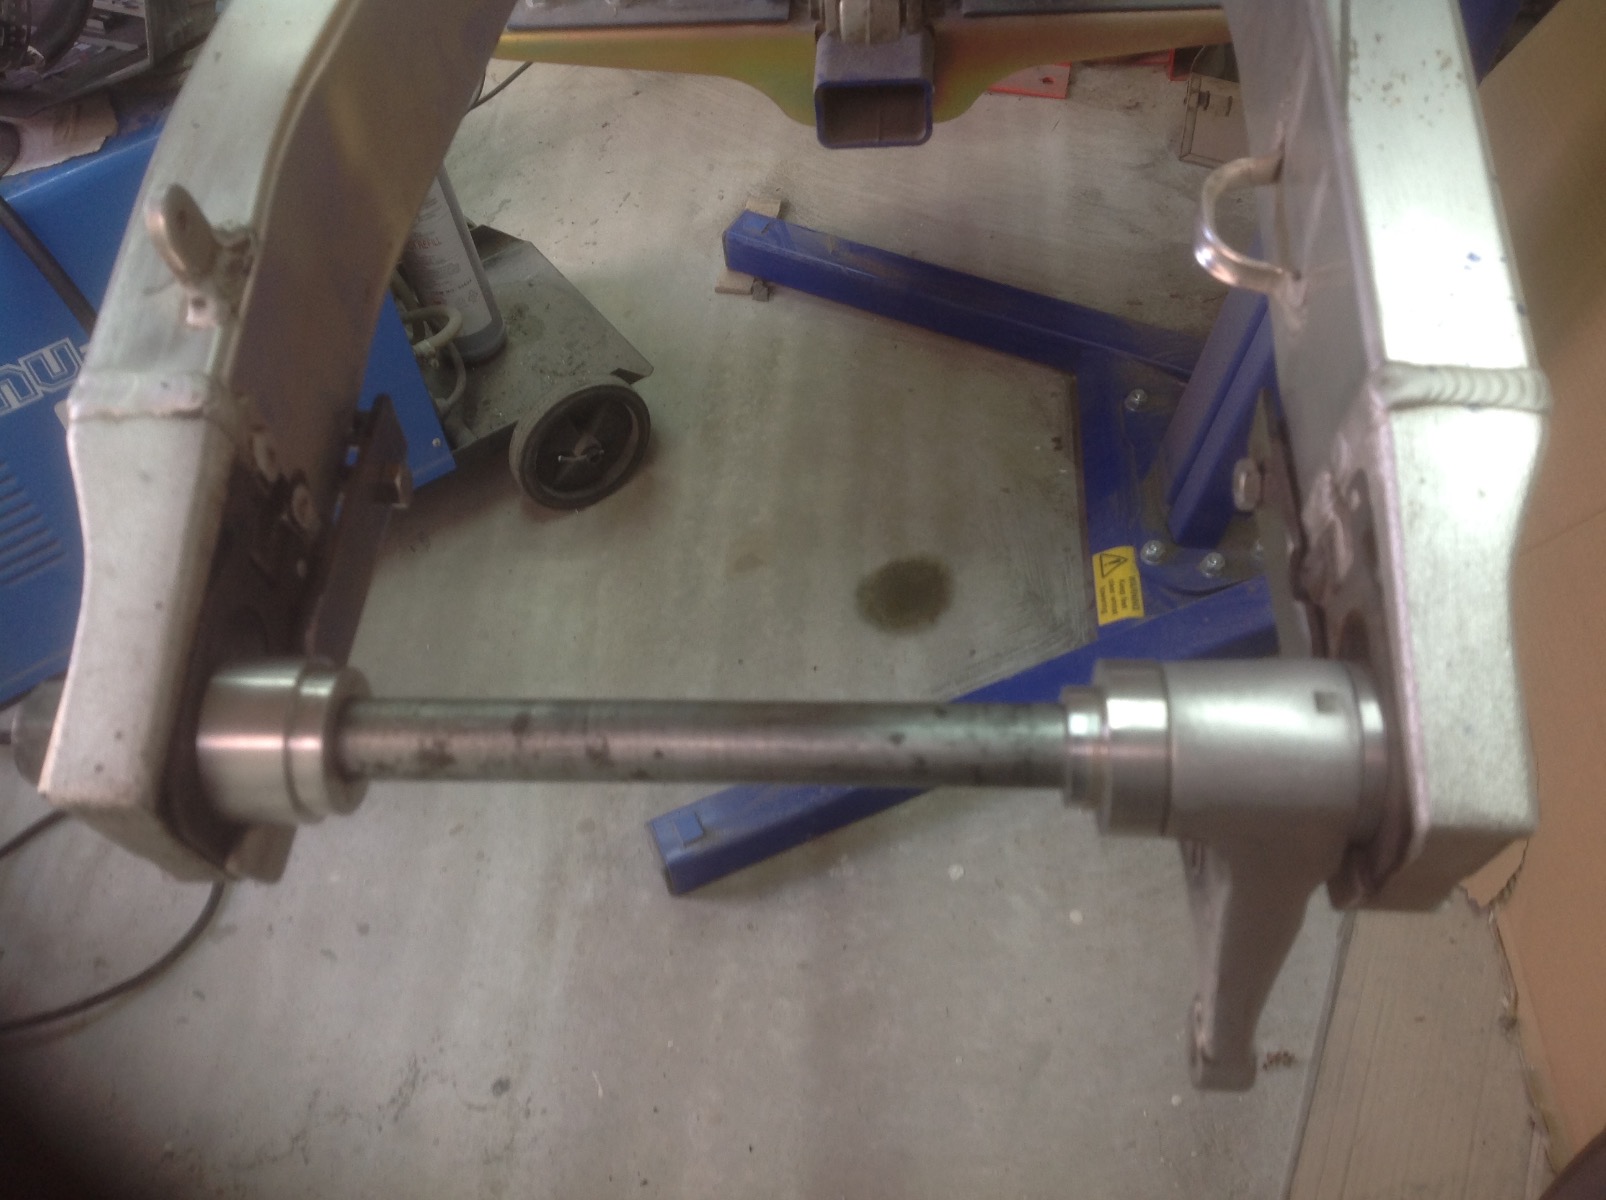
Then I can just drop the assembly onto the brackets and slide the axle in which pushes the assembly shaft out the other side, wheel in in seconds with no struggling and no damage
Then I can just drop the assembly onto the brackets and slide the axle in which pushes the assembly shaft out the other side, wheel in in seconds with no struggling and no damage
1982 KZ1000 Ltd
www.kzrider.com/forum/11-projects/617631...-82-begins?start=192
kzrider.com/filebase-alias?view=download...d-fault-diagnosis&ca
www.kzrider.com/forum/11-projects/617631...-82-begins?start=192
kzrider.com/filebase-alias?view=download...d-fault-diagnosis&ca
Last edit: 02 Sep 2023 12:59 by Wookie58.
The following user(s) said Thank You: TexasKZ, sf4t7, howardhb
Please Log in or Create an account to join the conversation.
- TexasKZ
-

- Offline
- Platinum Member
-
Registered
- Posts: 8205
- Thanks: 2681
Re: And finally, Wookie's 82 begins !
02 Sep 2023 13:40
Sweeeeeeet!
I love an elegant solution.
I love an elegant solution.
1982 KZ1000 LTD parts donor
1981 KZ1000 LTD awaiting resurrection
2000 ZRX1100 not ridden enough
www.kzrider.com/11-projects/620336-anoth...uild-thread?start=24
1981 KZ1000 LTD awaiting resurrection
2000 ZRX1100 not ridden enough
www.kzrider.com/11-projects/620336-anoth...uild-thread?start=24
The following user(s) said Thank You: Wookie58
Please Log in or Create an account to join the conversation.
- Rolf1976_KZ900
-
- Offline
- Sustaining Member
-
Registered
- Posts: 498
- Thanks: 261
Re: And finally, Wookie's 82 begins !
03 Sep 2023 02:49 - 03 Sep 2023 02:53
Smart idea ! i also use to put some wood under the wheel before taking it off when on centerstand so when putting back on it getts right height ,but with your rig it slides right in.
Last edit: 03 Sep 2023 02:53 by Rolf1976_KZ900. Reason: text
The following user(s) said Thank You: Wookie58
Please Log in or Create an account to join the conversation.
- Wookie58
-
Topic Author
- Away
- Moderator
-
Registered
- Posts: 6298
- Thanks: 3985
Re: And finally, Wookie's 82 begins !
03 Sep 2023 10:33 - 03 Sep 2023 10:36
A bit more progress today, I have done the torque arm which completes the fab work on the back end (sprocket carrier will require skimming but I will have to outsource that as my machine isn't big enough) being a "cheap Wookiee" I decided to recycle, the tube is from the KZ arm and I cut two slugs off the original axle to make the inserts to take the rose joints (was the only 20mm round bar I had) the slugs are pressed and welded in. Just £14 for the rose joints - I do love a bargain
1982 KZ1000 Ltd
www.kzrider.com/forum/11-projects/617631...-82-begins?start=192
kzrider.com/filebase-alias?view=download...d-fault-diagnosis&ca
www.kzrider.com/forum/11-projects/617631...-82-begins?start=192
kzrider.com/filebase-alias?view=download...d-fault-diagnosis&ca
Last edit: 03 Sep 2023 10:36 by Wookie58.
The following user(s) said Thank You: howardhb
Please Log in or Create an account to join the conversation.
- Wookie58
-
Topic Author
- Away
- Moderator
-
Registered
- Posts: 6298
- Thanks: 3985
Re: And finally, Wookie's 82 begins !
11 Sep 2023 12:35 - 11 Sep 2023 12:37
In the spirit of pushing forward I moved onto the foot controls over the weekend. As with everything else so far I wanted to use OEM parts (albeit from something else) in my attempt to try and build something that looks like "it could of always been that way". I picked up a set a while back from a Yamaha R6, I liked the look, the flat orientation of the master cylinder (which as a bonus is Brembo) and of course being a cheap Wookie I liked the price. I wanted them to fit nice and tight into the frame so she stays narrow around the waist (I've only got little legs)
Firstly I turned up some threaded slugs to weld into the frame and some alloy spacers to match up to the hangers. The left side went pretty well with no surprises (I still need to finish up the shift linkage with a couple of spacers and a GPZ fitting for the gearbox shaft)
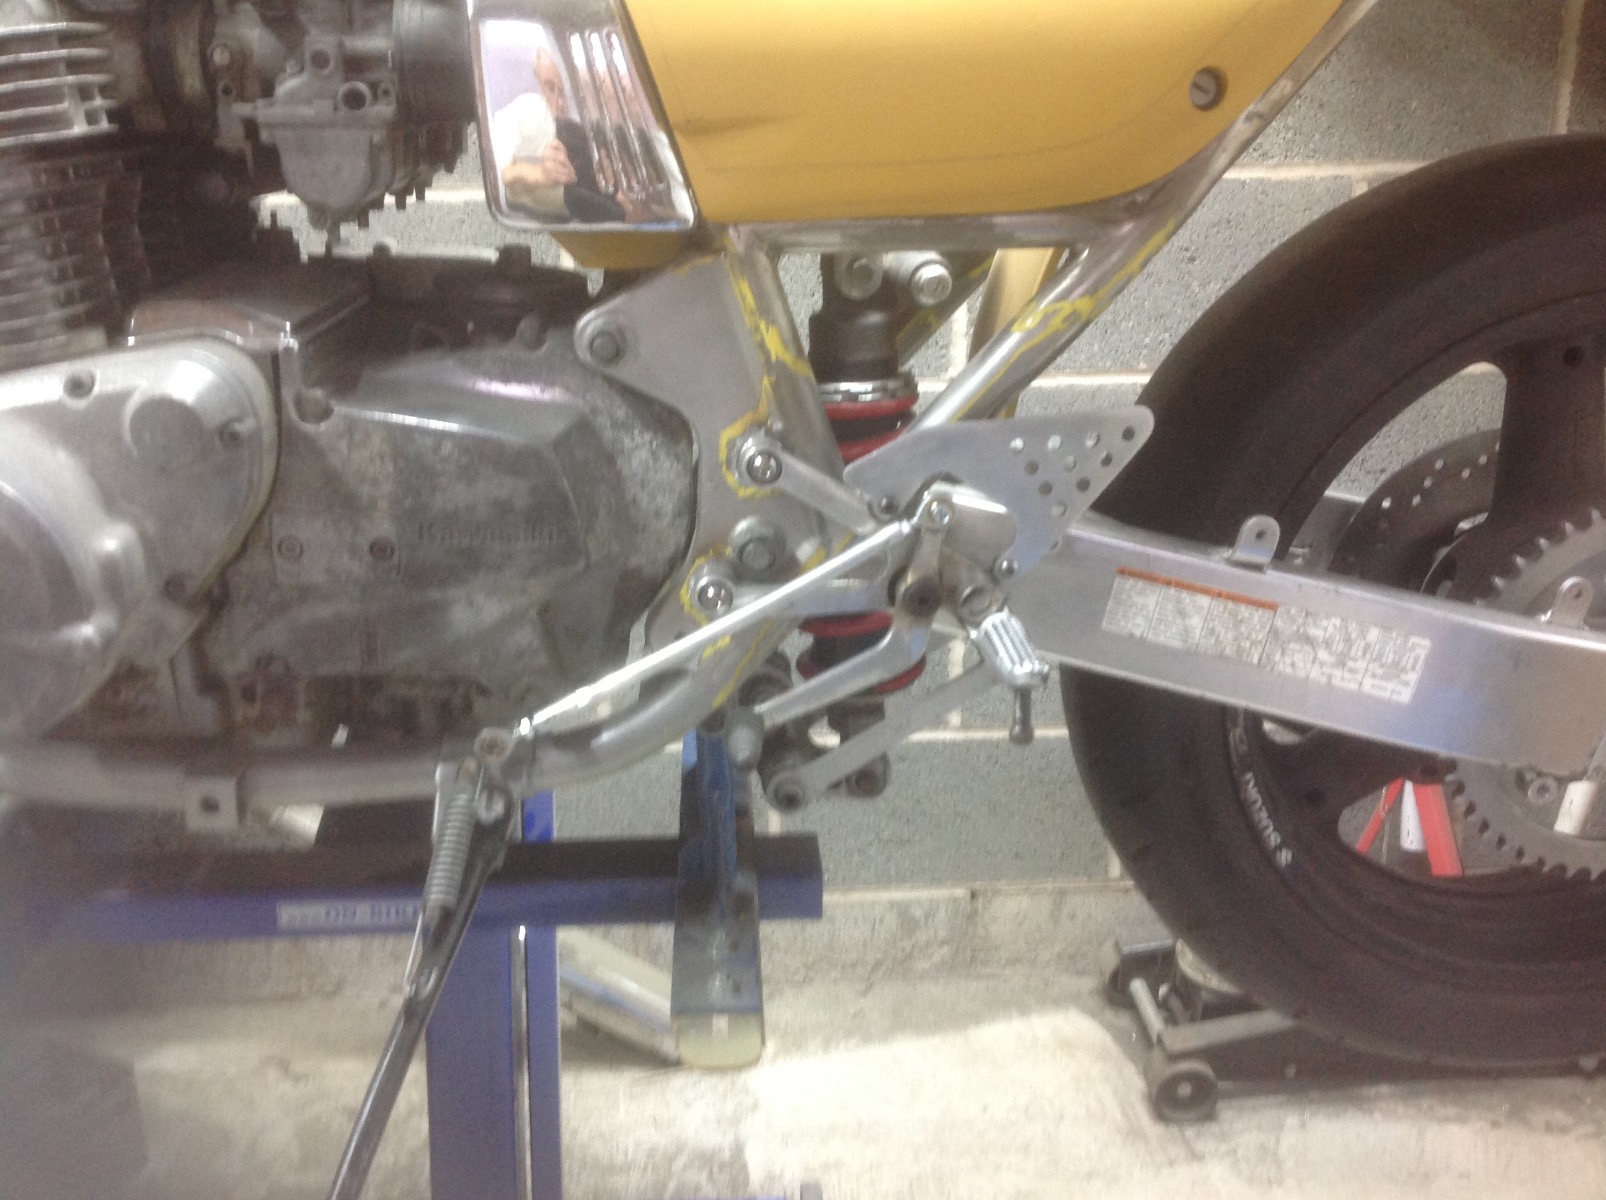
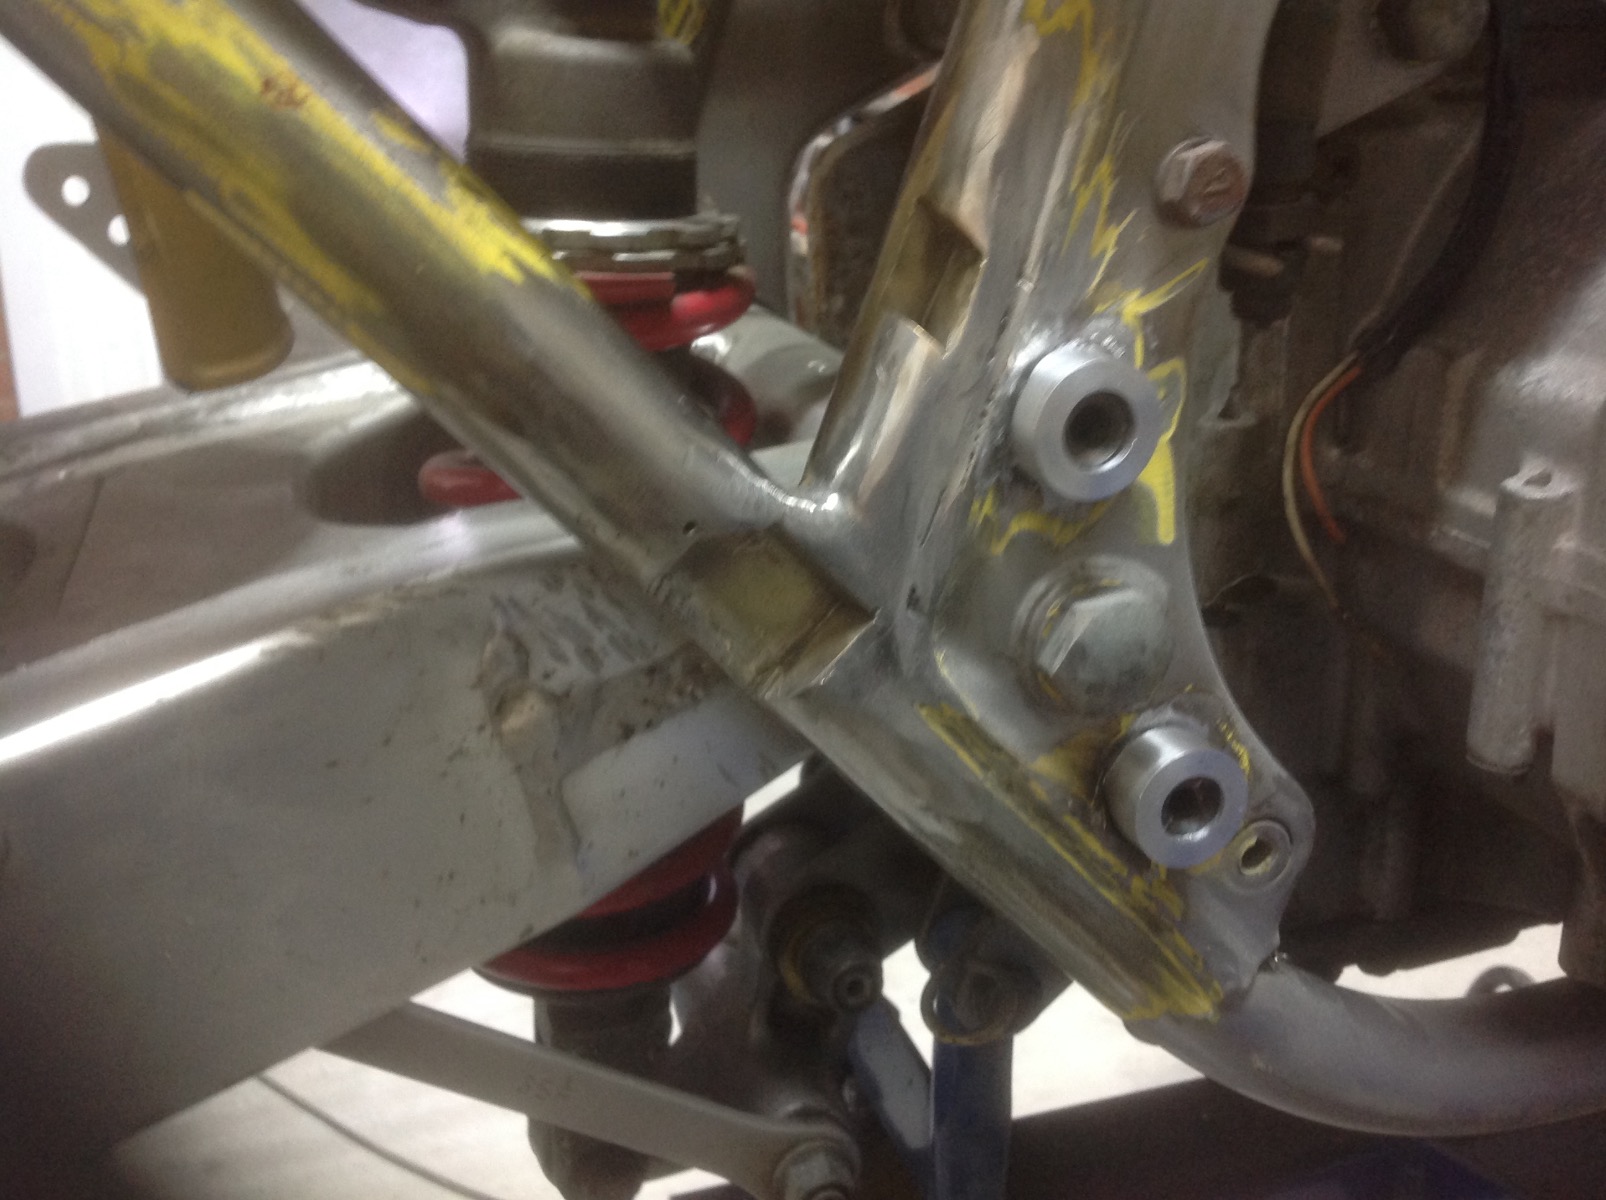
Moving to the other side things got a whole lot more complicated, because of the master cylinder fixings the hanger wouldn't fit as tightly as I wanted, the solution was to pocket the frame for clearance. Before you start screaming structural integrity the sections of 2mm tube I removed have been replaced with "pocket boxes made of 3mm plate (and don't forget there is a significant amount of additional bracing in the frame)
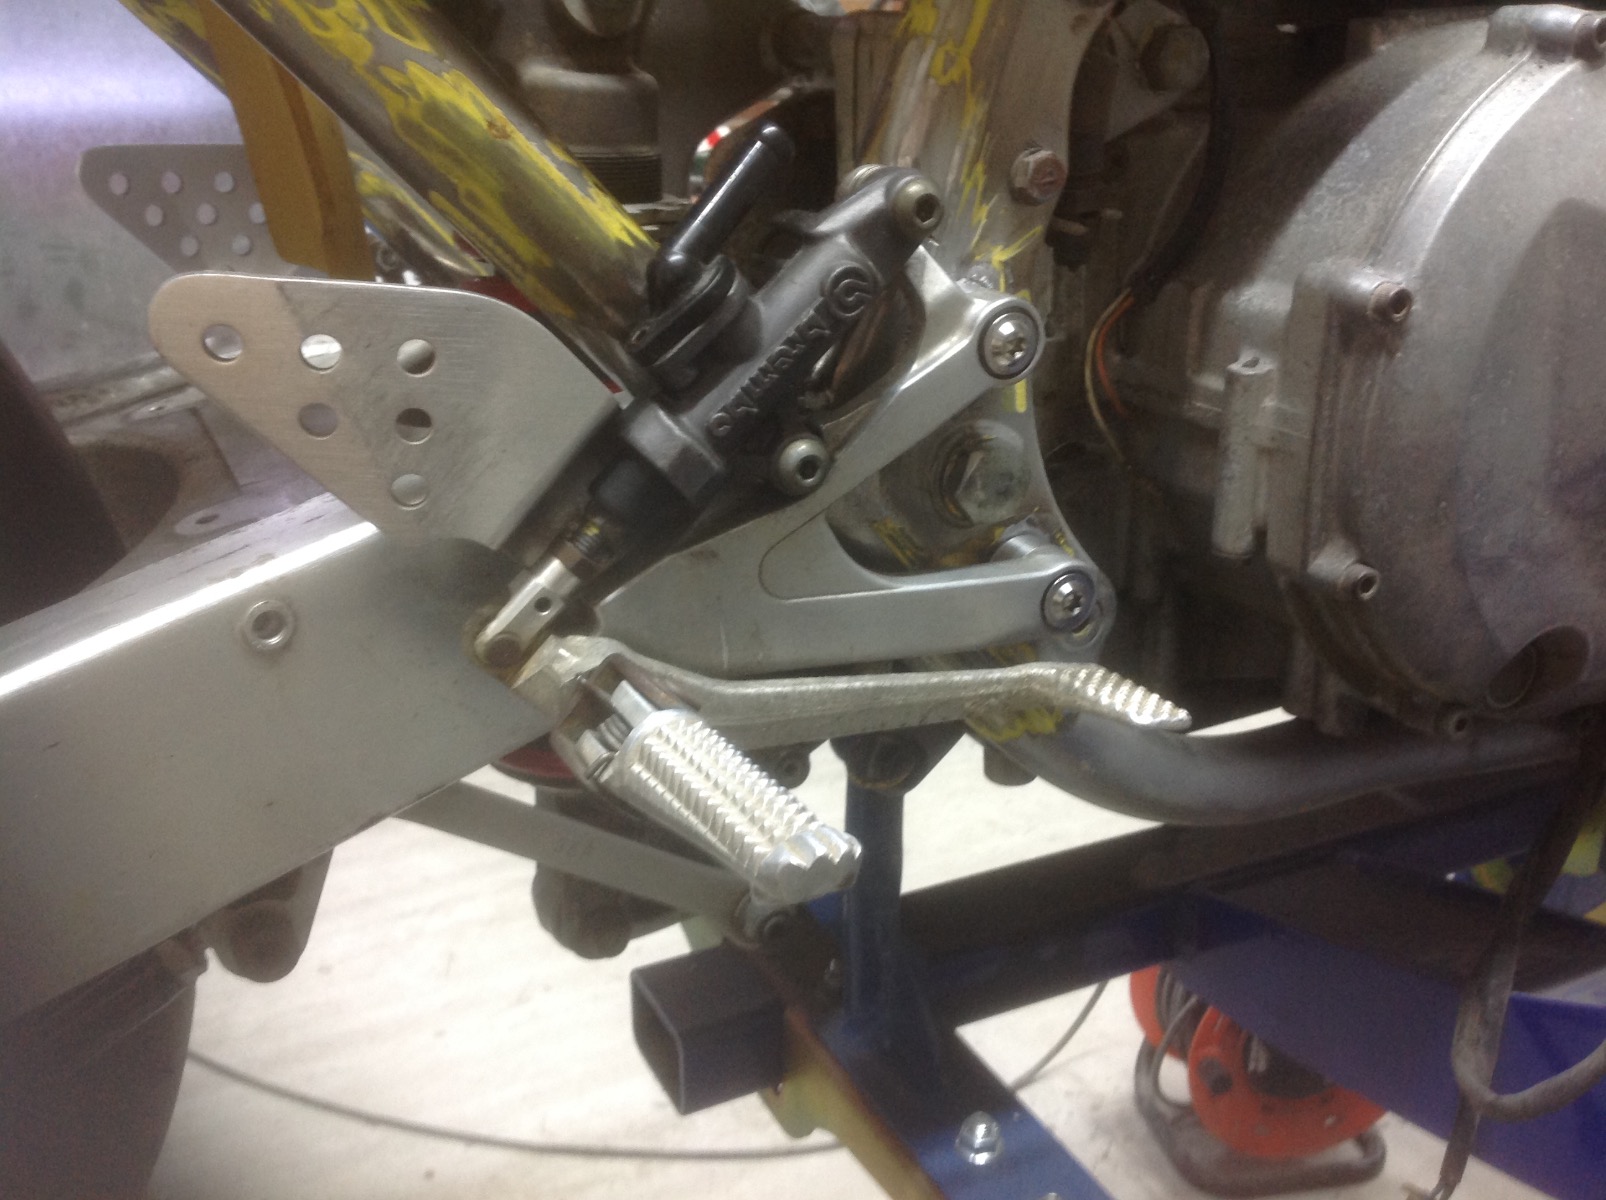
So that's it, another job done although I'm not sure about the heal guards currently as they are "only a mother could love" ugly
Firstly I turned up some threaded slugs to weld into the frame and some alloy spacers to match up to the hangers. The left side went pretty well with no surprises (I still need to finish up the shift linkage with a couple of spacers and a GPZ fitting for the gearbox shaft)
Moving to the other side things got a whole lot more complicated, because of the master cylinder fixings the hanger wouldn't fit as tightly as I wanted, the solution was to pocket the frame for clearance. Before you start screaming structural integrity the sections of 2mm tube I removed have been replaced with "pocket boxes made of 3mm plate (and don't forget there is a significant amount of additional bracing in the frame)
So that's it, another job done although I'm not sure about the heal guards currently as they are "only a mother could love" ugly
1982 KZ1000 Ltd
www.kzrider.com/forum/11-projects/617631...-82-begins?start=192
kzrider.com/filebase-alias?view=download...d-fault-diagnosis&ca
www.kzrider.com/forum/11-projects/617631...-82-begins?start=192
kzrider.com/filebase-alias?view=download...d-fault-diagnosis&ca
Last edit: 11 Sep 2023 12:37 by Wookie58.
The following user(s) said Thank You: howardhb, Rolf1976_KZ900
Please Log in or Create an account to join the conversation.
Moderators: Street Fighter LTD