Welcome, Guest
Username: Password: Remember me

TOPIC:

78 KZ1000 build (I'm learnding) 27 Jun 2012 05:15 #532046

  • DoctoRot
  • DoctoRot's Avatar Topic Author
  • Offline
  • Sustaining Member
  • Oh, the usual... I bowl, I drive around...
  • Posts: 2544
  • Thank you received: 664

531blackbanshee wrote: wow that is some real nice work.
your bike is looking really good.
i love the way the handlebars turned out.
i think i found a triple with the right leg size.it is steel tho.

leon

I found a steel one at a bike swap for real cheap, but thanks for looking out.

I got the replacement piston ring ring today, I'm going to attempt this again tomorrow, but I'm a little nervous about putting the top end together. Ive never done this before and everything I have read says that is crucial to do correctly, so Im going to put my piston ring end gap figures up here. Hopefully someone will notice any errors if i make some, and hopefully avoid an expensive mistake. (probably will anyway) :sick:

72mm / 25.4 = 2.83464567 inches

TOP RING
2.83464567 x .0045 = 0.0127559055

BOTTOM RING
2.83464567 x .0055 = 0.0155905512

this came in the Wiseco 1075 kit...

Please Log in or Create an account to join the conversation.

Last edit: by DoctoRot.

78 KZ1000 build (I'm learnding) 27 Jun 2012 13:28 #532099

  • 531blackbanshee
  • 531blackbanshee's Avatar
  • Offline
  • Vendor
  • Posts: 7447
  • Thank you received: 797
i have slways shot for around .018 end gap and have never had trouble with the rings getting hot and "butting".they always make good compression and don't smoke.

hopefully someone will chime in with some better info.

leon
skiatook,oklahoma 1980 z1r,1978 kz 1000 z1r x 3,
1976 kz 900 x 3
i make what i can,and save the rest!

billybiltit.blogspot.com/

www.kzrider.com/forum/5-chassis/325862-triple-tree-custom-work

kzrider.com/forum/5-chassis/294594-frame-bracing?limitstart=0

Please Log in or Create an account to join the conversation.

78 KZ1000 build (I'm learnding) 27 Jun 2012 14:05 #532107

  • wireman
  • wireman's Avatar
  • Offline
  • User
  • The most interesting prick in the world
  • Posts: 4761
  • Thank you received: 299

DoctoRot wrote: So i called wiseco and figured out that the silver ring is the top ring, black is the second ring. Went to put the second ring on and.... SNAP. so now i'm waiting for a new ring.

I did bring the bike home yesterday, the sub frame is mostly complete, still needs the shock mounts, and it needs the rest of the bracing finished up.


Some beautiful welds.


I put the new handlebars on. They're pretty bitchin. Need to clean up the triple clamp now.


I also put in some new steering head bearings. As per usual the old races where a real PITA to remove, but i got them out and new ones in. I love homemade tools.

Straight out of the plummen/wireman homemade tool catalog! :laugh:
Nice welding! B)
posting from deep under a non-descript barn in an undisclosed location southwest of Omaha.

Please Log in or Create an account to join the conversation.

78 KZ1000 build (I'm learnding) 31 Jul 2012 07:56 #539686

  • DoctoRot
  • DoctoRot's Avatar Topic Author
  • Offline
  • Sustaining Member
  • Oh, the usual... I bowl, I drive around...
  • Posts: 2544
  • Thank you received: 664

wireman wrote: Straight out of the plummen/wireman homemade tool catalog! :laugh:
Nice welding! B)


Yeah i saw a photo of that tool on this site and made it. I think it was either plummen's or your photo. :lol: 
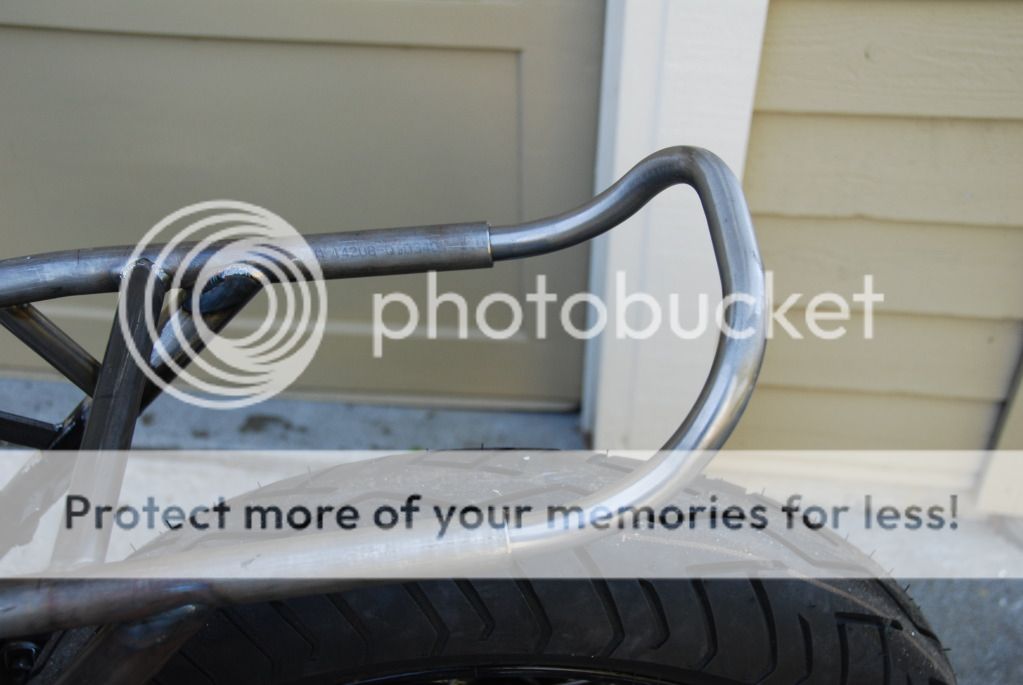
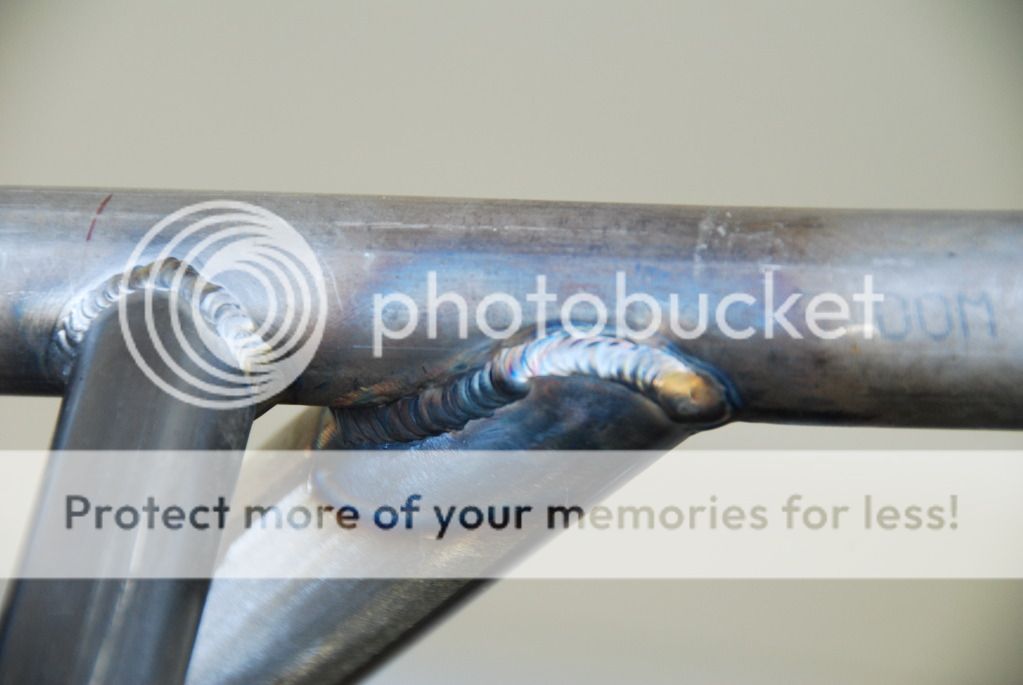
I can't take credit for the welding. that is the handy work of Eric Waunch of High Performance Welding in Bothell, WA. he has been squeezing some time in on the bike here and there for me.

So here is my carb cleaning experience with the pinesol. I used it straight and soaked each carb for a couple days, I noticed that the pinesol in two of the buckets had turned cloudy on day three, i figured it was because they had the dirtiest carbs in them or something.I kinda forgot about them, but on my way through the garage i remembered them and dumped them out of the pine sol. They looked pretty good, but still kinda dark.

This is where I screwed up. I should have immediately rinsed the pinesol off. But i didn't, and it turned into a oily film on the carbs. :pinch: Also the two buckets that got cloudy developed white deposits on the carbs.

I tried using solvent to remove it but all it did was remove the oil and left the film. I tryed soaking it in parts solvent hoping it would dissolve, all it did was rust some springs and a couple screws. :sick:

I then found this THIS and decided to try boiling them in lemon juice, because i screwed the pooch bad this time.

I boiled them in straight lemon juice outside on my camp stove. It has a strange smell that is not that great. I used the tray in a carb-dip can for the small parts. I boiled them for 30 minutes them immediately moved them to a pot of boiling water and boiled them for 30 more minutes. I then blew compressed air through all the passages.

It cleaned them right out! I had to do the ones with the white deposits on them 3 times till i was satisfied, but they are clean as a whistle.

The process turned all the parts dark grey and flat, and the pinsole stained the irregularitys in the castings. I think it may have pitted them slightly as well, but it could be like that from the factory for all I know. the lemon juice turned all the brass parts copper in color as they oxidized. The pot metal parts faired the worst. It seems as if the lemon juice removed a layer of paint from them, they are slightly pitted, just a bit rough not too bad. is this bad?


Also the lemon juice removed the rust, I was very impressed with this.


I bought a soda blaster and soda blasted the everything, and washed it down. They have a good shine on them now.

I started reassembly but forgot to buy a couple things so they are on hold for a moment.

On a different note, Turns out the frame is bent, possibly the swing-arm as well. Took it to Wasco Frame Repair in Tacoma a couple of weeks ago, he should be finishing up with it soon.

I did get the rind gaps sorted and the rings on the pistons.

I got a little derailed after my retardation with the carbs, but it all worked out and Im pretty happy with the results. I feel revitalized on this project, and I cant wait to get the frame back and re-do all the body work including some custom side covers!
The following user(s) said Thank You: Patton, BlackZ1R

Please Log in or Create an account to join the conversation.

Last edit: by DoctoRot.

78 KZ1000 build (I'm learnding) 31 Jul 2012 10:27 #539710

  • KZJOE900
  • KZJOE900's Avatar
  • Offline
  • Admin
  • Posts: 1971
  • Thank you received: 443
I don't think you should have used straight up lemon juice. I used 6 parts water and 1 part lemon juice and got very good results. As for the pitting, most likely it was already there due to moisture sitting in the carbs over the years. Or maybe do to manufacturing. But the lemon juice, especially the strength you used, will etch a little and bring out any pitting that already exists. You should be fine however. One of the main jet tubes and float towers were pitted bad on one of my carbs. Was concerned about the main jet seating properly but seems to work fine. Just as long as you didn't boil any of the rubber parts you should be good to go. I used carb cleaner and compressed air after the boiling process as well. Use Patton's pilot circuit cleaning method to spray the carb cleaner for that circuit. Also, clean the choke circuit as well with carb cleaner and compressed air. Don't forget the choke circuit passage in each of the bowls as well. Might as well go the extra mile while you have them apart. Good luck.
Current project 76 KZ900 (This was a Vetter model)
76 KZ900
81 XJ550H SECA (Current Project)
82 XJ550R SECA
Past:
86 FJ1200
74 Z1900
72 CB450

Please Log in or Create an account to join the conversation.

78 KZ1000 build (I'm learnding) 02 Aug 2012 17:56 #540308

  • DoctoRot
  • DoctoRot's Avatar Topic Author
  • Offline
  • Sustaining Member
  • Oh, the usual... I bowl, I drive around...
  • Posts: 2544
  • Thank you received: 664

KZJOE900 wrote: I don't think you should have used straight up lemon juice. I used 6 parts water and 1 part lemon juice and got very good results. As for the pitting, most likely it was already there due to moisture sitting in the carbs over the years. Or maybe do to manufacturing. But the lemon juice, especially the strength you used, will etch a little and bring out any pitting that already exists. You should be fine however. One of the main jet tubes and float towers were pitted bad on one of my carbs. Was concerned about the main jet seating properly but seems to work fine. Just as long as you didn't boil any of the rubber parts you should be good to go. I used carb cleaner and compressed air after the boiling process as well. Use Patton's pilot circuit cleaning method to spray the carb cleaner for that circuit. Also, clean the choke circuit as well with carb cleaner and compressed air. Don't forget the choke circuit passage in each of the bowls as well. Might as well go the extra mile while you have them apart. Good luck.


In retrospect the lemon juice did seem too harsh, but even then it took several times to remove the film the pinsol left. In the future i will dilute it. The pitting that is there is almost not noticeable, except on the pot metal parts. I'm going to follow your advice and clean all the circuits one more time before I put them back together, just to make sure they're good.

Please Log in or Create an account to join the conversation.

78 KZ1000 build (I'm learnding) 02 Aug 2012 23:51 #540393

  • Patton
  • Patton's Avatar
  • Offline
  • KZr Legend
  • Posts: 18640
  • Thank you received: 2098


With smoothbores, the pilot air jet is easy to miss.


Good Fortune! :)
1973 Z1
KZ900 LTD
Attachments:

Please Log in or Create an account to join the conversation.

Last edit: by Patton.

78 KZ1000 build (I'm learnding) 15 Oct 2012 21:06 #554069

  • DoctoRot
  • DoctoRot's Avatar Topic Author
  • Offline
  • Sustaining Member
  • Oh, the usual... I bowl, I drive around...
  • Posts: 2544
  • Thank you received: 664
well its been a while since i got to post some progress in here. I got my frame back from the straightener and was able to get Eric to help me out a bit yesterday. I fit all the gussets and he welded them in. It started raining on my way back home so everything rusted a bit.
We also started on the shock mounts, unfortunately we only had enough time to get one done. eric turned a new mount, and changed the design slightly. It now has a bolt going into it. cleaned up the design a bit, I think it looks good, gotta get a cool fastener for it though. I still need to fit the two cross braces and two braces for the steering head. Hopefully I will get to that this week. feels damn good to be getting some progress done after sitting idle while it was at the straighteners

Please Log in or Create an account to join the conversation.

Last edit: by DoctoRot.

78 KZ1000 build (I'm learnding) 16 Oct 2012 10:37 #554174

  • 531blackbanshee
  • 531blackbanshee's Avatar
  • Offline
  • Vendor
  • Posts: 7447
  • Thank you received: 797

DoctoRot wrote: We also started on the shock mounts, unfortunately we only had enough time to get one done. eric turned a new mount, and changed the design slightly. It now has a bolt going into it.


an aluminum washer machined out so that an allen head is countersunk in to it would look very nice.

glad you got some progress made,keep us posted.

leon

skiatook,oklahoma 1980 z1r,1978 kz 1000 z1r x 3,
1976 kz 900 x 3
i make what i can,and save the rest!

billybiltit.blogspot.com/

www.kzrider.com/forum/5-chassis/325862-triple-tree-custom-work

kzrider.com/forum/5-chassis/294594-frame-bracing?limitstart=0
Attachments:
The following user(s) said Thank You: wireman

Please Log in or Create an account to join the conversation.

78 KZ1000 build (I'm learnding) 16 Oct 2012 11:01 #554183

  • rslingshot
  • rslingshot's Avatar
  • Offline
  • User is blocked
  • Because stock SUCKS!!!!!!
  • Posts: 305
  • Thank you received: 19
The gusset work turned out good. Havent followed this build much but it is looking good so far
www.kzrider.com/forum/11-projects/390747-1977-kz1000-new-life
2000 Kawasaki ZRX1100
2004 Gsx-r 750
78 kz1000 basket case
81 yamaha xs 650 basket case

Please Log in or Create an account to join the conversation.

Last edit: by rslingshot. Reason: Wrong post

78 KZ1000 build (I'm learnding) 16 Oct 2012 14:53 #554203

  • Ederer
  • Ederer's Avatar
  • Offline
  • User
  • Posts: 68
  • Thank you received: 5
So many cool things - great work on the composites, nice details like the spedo/tach faces, and a killer job on the frame bracing! Overall excellent eye for detail! What a great build!!!

Please Log in or Create an account to join the conversation.

78 KZ1000 build (I'm learnding) 16 Oct 2012 18:46 #554234

  • Renninger
  • Renninger's Avatar
  • Offline
  • User
  • Posts: 32
  • Thank you received: 0
Where did ya get the rpm gauge? i kinda want to get me a set for my kz1000

Please Log in or Create an account to join the conversation.

Last edit: by Renninger.
Powered by Kunena Forum