
KZ650 Almost there
- Mark Wing
-
- Offline
- User
-

Registered
- Posts: 1697
- Thanks: 22
Re: KZ650 Almost there
08 Mar 2009 16:48
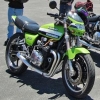
Looking good. Can't tell it's the same bike.
Mark
Mark
Jesus loves you Everyone else thinks your an ***
77 KZ650 C1 with ZX7 forks, GPZ mono rear, wider 18 police wheels and Yoshimura motor.
Yorba Linda Cal.
77 KZ650 C1 with ZX7 forks, GPZ mono rear, wider 18 police wheels and Yoshimura motor.
Yorba Linda Cal.
Please Log in or Create an account to join the conversation.
- gane
-
- Offline
- User
-
Registered
- Posts: 706
- Thanks: 1
Re: KZ650 Almost there
08 Mar 2009 21:27
convert. One of the shortcomings of th xs1100 was its' vac'advance ign, assy. actually, the unit worked quite well, but with age the wires from pick-up to harness deteriorated. they are silver core/light weigth wires, and years of movement often cause problems. oftem miss-diagnosed as carb problems. just something to be aware of, G
[img][/img] 1977 KZ1000A1
Please Log in or Create an account to join the conversation.
- KawiConvert
-
 Topic Author
- Offline
- User
-
Registered
- Posts: 739
- Thanks: 4
Re: KZ650 Almost there
08 Mar 2009 23:06
gane wrote:
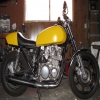
No worries, everything below the tank is stock KZ650 (excluding the clutch and the rear brake pedal). The tank is the only XS1100 part on my bike. Its most likely a carb problem as tinkering with the carbs has produced good results and everything else is behaving well.
convert. One of the shortcomings of th xs1100 was its' vac'advance ign, assy. actually, the unit worked quite well, but with age the wires from pick-up to harness deteriorated. they are silver core/light weigth wires, and years of movement often cause problems. oftem miss-diagnosed as carb problems. just something to be aware of, G
No worries, everything below the tank is stock KZ650 (excluding the clutch and the rear brake pedal). The tank is the only XS1100 part on my bike. Its most likely a carb problem as tinkering with the carbs has produced good results and everything else is behaving well.
1978 KZ650 D1 ~ Carb jetting: 107.5 & 20 & 4th groove with pods and 4-1 Exhaust
Please Log in or Create an account to join the conversation.
- KawiConvert
-
Topic Author
- Offline
- User
-
Registered
- Posts: 739
- Thanks: 4
Re: KZ650 Almost there
14 Mar 2009 20:08 - 18 Mar 2009 14:19
Spent the day finishing some machining for a project I'm on and figured while I was running the lathe I should keep the mill busy as well. Anyways, someday when I replace the chain and have the wheel off I'll get the back rotor, but for now these two will do. Originally I thought it would be pretty quick and painless. In the end I spent about 6 hours of mill time to get these finished but I like the way they turned out, and in a pinch I'll always have a bottle opener or 2 in the garage. ")

1978 KZ650 D1 ~ Carb jetting: 107.5 & 20 & 4th groove with pods and 4-1 Exhaust
Last edit: 18 Mar 2009 14:19 by KawiConvert.
Please Log in or Create an account to join the conversation.
- KawiConvert
-
Topic Author
- Offline
- User
-
Registered
- Posts: 739
- Thanks: 4
Re: KZ650 Almost there
18 Mar 2009 14:36
I have tried to find the camera and haven't had any luck. I saw it before moving and can't figure out what box/tub it ended up in. Anyways, for the clutch conversion, heres the basics of what I did.
1) measured distance between sprocket cover (SC) mounting holes and clutch actuator/rod (CA).
2) Took a air grinder/cutoff tool and cleared room for the clutch slave cyliner and new mounts
3) Cut out the cover to be welded over the outside (the one with Japanese on it)
4) Made mounts, a plate, and spacers (see #5-6)
5) The plate had holes drilled at the right location for the slave cylinder mounts and a height spacer for the slave cylinder that simulated the clutch pusher rod.
6) The spacers held the slave cylinder in place relative to the plate that was bolted to the SC.
7) I then welded (poorly) the mounts to the inside of the cover.
") Welded the Japanese writing cover over the nasty hole I made in the sprocket cover.
Welded the Japanese writing cover over the nasty hole I made in the sprocket cover.
9) Used up about 10 dremmel sanding drums
10) Powdercoated it
Issues I ran into:
1) Welding caused the case to move so the dowel pin on the bottom mount no longer aligns (pulled it, it is superfulous).
2) Cracked cover because of dowel pin, drilled stress releilving hole at end of crack, filled with JB Weld, sanded smooth.
3) Mounts also moved a little because of welding. If I did it again, I would have not shaped the mounts, rather I would make the plate, make some mounts that were close, and used a mill to make the final mounting holes and bore the inside for the SC. I ended up wobbling the mounts due to clearance issues on the inside and I would prefer not to do that.
End Result:
Nearly 300 miles with no problems, great clutch feel, and a very easy pull. I found though the SC is leaking a little and I am going to pull it and replace the seal at my next oil change.
What I would like to do for the future is to measure out the mounting holes for the stock setup and see about finding or making a SC that will fit the stock mounts and attach the hose to the outside end of the slave cylinder. This would simplify the conversion greatly and only require that the outside dress plate would need to be reworked a little to accomodate the hose and SC.
1) measured distance between sprocket cover (SC) mounting holes and clutch actuator/rod (CA).
2) Took a air grinder/cutoff tool and cleared room for the clutch slave cyliner and new mounts
3) Cut out the cover to be welded over the outside (the one with Japanese on it)
4) Made mounts, a plate, and spacers (see #5-6)
5) The plate had holes drilled at the right location for the slave cylinder mounts and a height spacer for the slave cylinder that simulated the clutch pusher rod.
6) The spacers held the slave cylinder in place relative to the plate that was bolted to the SC.
7) I then welded (poorly) the mounts to the inside of the cover.
Welded the Japanese writing cover over the nasty hole I made in the sprocket cover.9) Used up about 10 dremmel sanding drums
10) Powdercoated it
Issues I ran into:
1) Welding caused the case to move so the dowel pin on the bottom mount no longer aligns (pulled it, it is superfulous).
2) Cracked cover because of dowel pin, drilled stress releilving hole at end of crack, filled with JB Weld, sanded smooth.
3) Mounts also moved a little because of welding. If I did it again, I would have not shaped the mounts, rather I would make the plate, make some mounts that were close, and used a mill to make the final mounting holes and bore the inside for the SC. I ended up wobbling the mounts due to clearance issues on the inside and I would prefer not to do that.
End Result:
Nearly 300 miles with no problems, great clutch feel, and a very easy pull. I found though the SC is leaking a little and I am going to pull it and replace the seal at my next oil change.
What I would like to do for the future is to measure out the mounting holes for the stock setup and see about finding or making a SC that will fit the stock mounts and attach the hose to the outside end of the slave cylinder. This would simplify the conversion greatly and only require that the outside dress plate would need to be reworked a little to accomodate the hose and SC.
1978 KZ650 D1 ~ Carb jetting: 107.5 & 20 & 4th groove with pods and 4-1 Exhaust
Please Log in or Create an account to join the conversation.
- KawiConvert
-
Topic Author
- Offline
- User
-
Registered
- Posts: 739
- Thanks: 4
Re: KZ650 Almost there
26 Mar 2009 20:39
Ok, found the clutch pictures. They are of the case, plate, and mounts I had prior to welding. For the welded portion, you will just have to imagine really ugly welds yourself :laugh: .

1978 KZ650 D1 ~ Carb jetting: 107.5 & 20 & 4th groove with pods and 4-1 Exhaust
Please Log in or Create an account to join the conversation.
- KawiConvert
-
Topic Author
- Offline
- User
-
Registered
- Posts: 739
- Thanks: 4
Re: KZ650 Almost there
26 Mar 2009 20:40
Next.

1978 KZ650 D1 ~ Carb jetting: 107.5 & 20 & 4th groove with pods and 4-1 Exhaust
Please Log in or Create an account to join the conversation.
- KawiConvert
-
Topic Author
- Offline
- User
-
Registered
- Posts: 739
- Thanks: 4
Re: KZ650 Almost there
26 Mar 2009 20:41
Bolts holding the cover on and the caliper to the mounts. The plate and bolts helped keep everything lined up.

1978 KZ650 D1 ~ Carb jetting: 107.5 & 20 & 4th groove with pods and 4-1 Exhaust
Please Log in or Create an account to join the conversation.
Moderators: Street Fighter LTD