Welcome, Guest
Username: Password: Remember me

TOPIC:

CSR1000 Project Build 06 Jul 2016 05:57 #734038

  • wrenchmonkey
  • wrenchmonkey's Avatar
  • Offline
  • User
  • Posts: 568
  • Thank you received: 75
G'day David,

Ah! I found it!
The answer lay in the ignition switch legend.
Are you still using the stock or an original ignition switch?
If so, then read on. If not; more information would be needed.

Reader's Digest Answer is:
That diode prevents the fuse panel being energized, when you flip the key to the "Park" position.

Explanation if you desire:
The ignition key gets it's source power from the white wire labelled "Battery 1" in the legend.

When key switches to "ON", it powers-up the White/Black wire labelled "Ignition" in the legend which if you follow the Wht/Blk wire goes to the fuses and powers-up three of them, including the Red/White wire which turns on the tail light and forward running lights and the lights in the speedo and tach.
In this case the diode, as positioned (arrow), is allowing the current to flow in the direction of the tail light when the fuse energizes. It also happens to be energizing the ignition switch's Red wire but it's doing nothing to that wire otherwise.

Now if you were to turn the key all the way over to "Park", as shown in the legend, then a different output wire is energized - the Red wire instead of the Wht/Blk wire goes hot and following that, you'll see it goes toward the tail lights where it links into the wire which comes back toward the front of the bike
BUT
the diode is there and now it's in Negative position and stopping current flowing back. This means that the forward lights on speedo, tach and front signal lamps won't light up AND even more importantly, neither would the fuse panel which could be powered up as it would be in ignition mode but from the backside of the parking light circuit were it not for that diode...

Did that make sense?

If that diode failed-open, you would lose only your tail lights while ignition is "ON" but in "Park" the tail lights would work.
If that diode failed-short (passing current), you could essentially operate the bike in either "ON" or "Park" positions.

Fortunately, diodes (in all the years I've dealt with them) never fail by shorting, they always fail by opening (like a fuse).
Thus, I don't foresee any need to worry about fires on board the SS Davido because of that diode B)

Please Log in or Create an account to join the conversation.

CSR1000 Project Build 06 Jul 2016 11:39 #734069

  • davido
  • davido's Avatar Topic Author
  • Offline
  • User
  • Posts: 1573
  • Thank you received: 286
Wrenchmonkey. Surprisingly,I understood pretty much all of that! Which is quite a leap forward for me in the electrics department. I never thought about the 'Park' position on the ignition switch. It is never something I have ever used. (Saying that,the ignition on my Bandit is not well designed so I have 'Parked' the bike a few times,unintentionally,only to come back to a flat battery in the morning!)
So,I wont be needing the ,Park, system,though I probably wont try to disconnect it from the loom. Anyway,the 'Diode' is gone and the blue/red wire is connected directly. You reckon this isnt a danger and will only result in the loss of the 'Park' option? Have I got this right?
www.kzrider.com/forum/11-projects/594313-csr1000-project-build
CB550
(CB500/4)
(CBX750)
GSF600
KZ1000CSR
XT 600e

Please Log in or Create an account to join the conversation.

CSR1000 Project Build 06 Jul 2016 12:14 #734071

  • wrenchmonkey
  • wrenchmonkey's Avatar
  • Offline
  • User
  • Posts: 568
  • Thank you received: 75
Close but not quite.
The diode has been removed (wires connected directly)?
If so, then when you turn key to Park position, the fuse panel will become energised because diode is not there to stop current flow back up through the circuit.
If your intention is not to use the park feature, then it would be better to simply cut the wire at the switch mini loom b4 the connector so if by accident you flip key to park, nothing would happen - no tail light and no fuse panel gets energised.
Again, the diode simply stopped current coming back from the tail light wire/lead which effectively gets power from two sources.
I'm at work or i could show on your wire diagram. Later tonight when i get home, i can.

Please Log in or Create an account to join the conversation.

CSR1000 Project Build 06 Jul 2016 12:18 #734072

  • davido
  • davido's Avatar Topic Author
  • Offline
  • User
  • Posts: 1573
  • Thank you received: 286
Then I need to cut the red wire coming off the ignition?
www.kzrider.com/forum/11-projects/594313-csr1000-project-build
CB550
(CB500/4)
(CBX750)
GSF600
KZ1000CSR
XT 600e

Please Log in or Create an account to join the conversation.

CSR1000 Project Build 06 Jul 2016 19:28 #734108

  • wrenchmonkey
  • wrenchmonkey's Avatar
  • Offline
  • User
  • Posts: 568
  • Thank you received: 75
Hey David! :)

Yes. The red wire coming out of the ignition key switch is the wire to cut.
Here's the wire in question, I drew purple lines on either side of it (sorry purple was the only color I could think to use so not to confuse the actual diagram! :laugh: )


That red wire is powered when you put the ignition switch into "Park" (as per the key switch legend) and would at that point, light-up the tail light only WHEN the diode is IN PLACE as shown in this diagram. If that diode is gone, then this red wire would also energise the fuse panel and all the front "running lights" as well as the speedo/tach dial lights.

I only suggested cutting the red wire between the key switch and it's connector because it seems the easiest place to get to but in truth, you could cut it anywhere (and wrap-up both cut ends to prevent possible shorting in future! Keep in mind both sides of the cut wire can be powered depending on key position...) anywhere right up to that point where it is joined to the tail light wire at back.

Make sense? Sorry it took so long to get back to this. Looooong day here :dry:

PS: If you have the tool to extract the pin from the connector at the ignition switch, then by all means do that instead of cutting the wire. Again, make sure you wrap/insulate the cut wire or extracted pin.
Attachments:

Please Log in or Create an account to join the conversation.

Last edit: by wrenchmonkey.

CSR1000 Project Build 06 Jul 2016 23:33 #734115

  • davido
  • davido's Avatar Topic Author
  • Offline
  • User
  • Posts: 1573
  • Thank you received: 286
Wrenchmonkey, Yes it makes sense. The whole loom is unwrapped at the minute so I can disconnect the red wire at the connection block ( I made a tool for pulling the pins already) and I ll trace the wire back through the loom to where it joins the 'diode' wire and unsplice it there.
Thanks for all your help on this, I appreciate it and dont worry about the timing, Im waiting on a the bullet connection crimping set I ordered last week before going for the final reassembly. I would rather go slow and be sure,rather than rush it and have something go wrong.
Will keep you posted.
www.kzrider.com/forum/11-projects/594313-csr1000-project-build
CB550
(CB500/4)
(CBX750)
GSF600
KZ1000CSR
XT 600e

Please Log in or Create an account to join the conversation.

CSR1000 Project Build 18 Aug 2016 10:11 #739129

  • davido
  • davido's Avatar Topic Author
  • Offline
  • User
  • Posts: 1573
  • Thank you received: 286
Ok. Been away on holidays for a couple of weeks. Just got back a few days ago .Re-energized and ready to crack on with the bike and get some progress going on.
I ( Think) I got the electrics sorted.I got the new switches wired in and everything seems to work as it should.(Thanks Wrenchmonkey) ZXR switches.European model with on/off headlight switch

I layed out all the wiring to make sure its sitting right,and itll all fit in the headlight bucket.It is getting quite busy in there.

Ive been concentrating on the switches and the front end. I still need to sort out the rear before I take it all off again and wrap it

I got a new,smaller battery today,so Im busy making a new,smaller bat-box

I have some alu plate in the workshop so ,hopefully,I can get that cut and bent tomorrow.I also bought some aluminium brazing rods. I want to have a go at brazing the joints together.If that dosnt work,Ill rivet it.
There was a very sexy flush fitting,vented fuel cap waiting for me when I got back from my hols. I was very excited about it.Drill out the old hole in the tank and just bolt it in.


Unfortunately,its not going to work. For some reason its not waterproof!!! The vent that allows the air in also allows water in. So either I have to get an unvented model and weld a seperate vent into the tank somewhere,or I have to think of something else. Very frustrating as I was hoping to get the tank sorted so that I could get started on the painting. (Lucky I didnt drill out the tank already)
Any suggestions wou;ld be appreciated as Im tired of hitting walls and this is another wall. Im only home a few days and already my motivation is slipping.Bugger!
Thats it for now.
www.kzrider.com/forum/11-projects/594313-csr1000-project-build
CB550
(CB500/4)
(CBX750)
GSF600
KZ1000CSR
XT 600e

Please Log in or Create an account to join the conversation.

CSR1000 Project Build 18 Aug 2016 11:00 #739137

  • blakeem
  • blakeem's Avatar
  • Offline
  • User
  • Posts: 122
  • Thank you received: 3
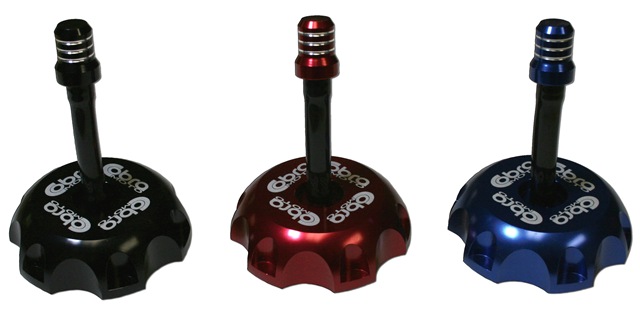
What about a gas cap vent tube?
Welding a vent would be tricky since it needs to vent above the fuel level with a tube or something. I'm not sure if the CA gas tanks had charcoal canisters for these years, if so that's another option.

Please Log in or Create an account to join the conversation.

Last edit: by blakeem.

CSR1000 Project Build 18 Aug 2016 11:54 #739140

  • davido
  • davido's Avatar Topic Author
  • Offline
  • User
  • Posts: 1573
  • Thank you received: 286
Not sure what you mean Blake. There is a vent in the cap ( the pin in the center). Problem is that it also lets in water.
www.kzrider.com/forum/11-projects/594313-csr1000-project-build
CB550
(CB500/4)
(CBX750)
GSF600
KZ1000CSR
XT 600e

Please Log in or Create an account to join the conversation.

CSR1000 Project Build 18 Aug 2016 12:04 #739142

  • blakeem
  • blakeem's Avatar
  • Offline
  • User
  • Posts: 122
  • Thank you received: 3

davido wrote: Not sure what you mean Blake. There is a vent in the cap ( the pin in the center). Problem is that it also lets in water.


Many dirt bikes and some late 80's and early 90's sports bikes have a tube running from the gas cap with either a cap to keep water out of runs the tube up into the steering stem so water can't get in.

It's very common, examples:


I'd be surprised if a tube doesn't fit or if there isn't some other mechanism to keep the water out.

Please Log in or Create an account to join the conversation.

Last edit: by blakeem.

CSR1000 Project Build 18 Aug 2016 14:16 #739156

  • davido
  • davido's Avatar Topic Author
  • Offline
  • User
  • Posts: 1573
  • Thank you received: 286
Ok,I know what you mean but that sort of defeats the purpose of a flush fitting cap.The first picture,of the Gixer, if I remember right,the breather isnt coming off the cap but from a seperate outlet on that bulge at the front of the tank. That is a possibility though its not ideal.
The whole point of buying this thing was the idea of a straight forward bolt on solution with minimum arsing about.
Dosnt look like thats going to happen!
www.kzrider.com/forum/11-projects/594313-csr1000-project-build
CB550
(CB500/4)
(CBX750)
GSF600
KZ1000CSR
XT 600e

Please Log in or Create an account to join the conversation.

CSR1000 Project Build 18 Aug 2016 15:13 #739165

  • blakeem
  • blakeem's Avatar
  • Offline
  • User
  • Posts: 122
  • Thank you received: 3

davido wrote: Ok,I know what you mean but that sort of defeats the purpose of a flush fitting cap.The first picture,of the Gixer, if I remember right,the breather isnt coming off the cap but from a seperate outlet on that bulge at the front of the tank. That is a possibility though its not ideal.
The whole point of buying this thing was the idea of a straight forward bolt on solution with minimum arsing about.
Dosnt look like thats going to happen!


I think that cap will actually be fine as it is. It's highly doubtful that water would get in, even if it does a drop or two won't hurt anything. It takes about a tablespoon per gallon of fuel to cause issues.

You could try a breathable waterproof membrane to cover the hole if you plan on being in the rain a lot.

Please Log in or Create an account to join the conversation.

Powered by Kunena Forum