Welcome, Guest
Username: Password: Remember me

TOPIC:

Testarossa's 78 KZ1000 Fighter Build 30 Jun 2010 08:25 #379203

  • 531blackbanshee
  • 531blackbanshee's Avatar
  • Offline
  • Vendor
  • Posts: 7447
  • Thank you received: 797
i thought you had turned them off so you could have your race team logo carved in there(One Hung Low Racing Team :P ) all cnc style and stuff.:laugh:
aw,just joking man.
i have turned the dohc off of 3 or 4 points covers and 2 or three alt.covers.there are some points covers that are thinner than the others.if you look at the back of the points cover and you can see the impression of the dohc boss and some strengthening ridges,those are thin.i turned one off and my buddy came by a few days later and said 'man my bike is making a wierd singin sound'i said "start it up".you could hear a high pitch ringing sound,i cocked my head(like a dog)and walked over and put my hand on the points cover and it stopped.my buddy was like what the hell.i guess we got it thin enough that the harmonics would make it sing.you don't have that problem with the thick ones tho.

leon
skiatook,oklahoma 1980 z1r,1978 kz 1000 z1r x 3,
1976 kz 900 x 3
i make what i can,and save the rest!

billybiltit.blogspot.com/

www.kzrider.com/forum/5-chassis/325862-triple-tree-custom-work

kzrider.com/forum/5-chassis/294594-frame-bracing?limitstart=0

Please Log in or Create an account to join the conversation.

Testarossa's 78 KZ1000 Fighter Build 30 Jun 2010 08:55 #379208

  • testarossa
  • testarossa's Avatar Topic Author
  • Offline
  • User
  • Attack life, it's only trying to kill you.
  • Posts: 3678
  • Thank you received: 82
ROTFLMAO! :laugh: One Hung Low Racing Team always carries their kickstand with them every where they go! So instead of DOHC it would read OHLRT. I bet that would be a conversation starter for sure.

Actually that would be cool to mill something in those covers, and I could make that happen fairly easy at work. However, I think that I would have to start by flycutting the tops. They aren't exactly flat. I was noticing that the clutch cover is like a funhouse mirror when you polish it.
1978 KZ1000 A2 Click--->Build Thread
2004 ZX-10R
2007 Harley Sportster 1200
2020 Harley Street Glide Special
Angola, IN

Please Log in or Create an account to join the conversation.

Testarossa's 78 KZ1000 Fighter Build 30 Jun 2010 11:47 #379232

  • 531blackbanshee
  • 531blackbanshee's Avatar
  • Offline
  • Vendor
  • Posts: 7447
  • Thank you received: 797
they are a compound curve.could you not just set the cutter depth and then let the depth vary with the curve?
i don't know jack about cnc.:)

leon
skiatook,oklahoma 1980 z1r,1978 kz 1000 z1r x 3,
1976 kz 900 x 3
i make what i can,and save the rest!

billybiltit.blogspot.com/

www.kzrider.com/forum/5-chassis/325862-triple-tree-custom-work

kzrider.com/forum/5-chassis/294594-frame-bracing?limitstart=0

Please Log in or Create an account to join the conversation.

Testarossa's 78 KZ1000 Fighter Build 30 Jun 2010 12:32 #379239

  • testarossa
  • testarossa's Avatar Topic Author
  • Offline
  • User
  • Attack life, it's only trying to kill you.
  • Posts: 3678
  • Thank you received: 82
531blackbanshee wrote:

they are a compound curve.could you not just set the cutter depth and then let the depth vary with the curve?
i don't know jack about cnc.:)

leon


It can certainly be done, but it's way more complicated that simply writing an engraving program for a flat surface. Following the curve involves 3-D milling where you are interpolating through all three axes at the same time. Basically you are having to use a ballnose endmill, and calculating the tangent points in all axes for every move. The amount of trig becomes staggering, and normally the 3-D programs are all written by CAM software. We have the facilities, but I usually try to keep the "Government Work" quick and easy.
1978 KZ1000 A2 Click--->Build Thread
2004 ZX-10R
2007 Harley Sportster 1200
2020 Harley Street Glide Special
Angola, IN

Please Log in or Create an account to join the conversation.

Testarossa's 78 KZ1000 Fighter Build 30 Jun 2010 19:29 #379347

  • porchev914
  • porchev914's Avatar
  • Offline
  • User
  • Whats that? Half of my swingarm is missing?!?!?
  • Posts: 2716
  • Thank you received: 19
You did a great job on the engine Josh. I am curious, did you polish the edges of the fins or sand them? On the points cover, I like the Moriwaki (or whatever) clearenced cover, but a custom CNC job would be bad ass, especially with Won Phat Hass Racing or whatever it was :laugh:
FRANKEN Z!
1978 KZ1000 A2A with 08'Speed Triple SSSA and '06 GSXR1000 front end

Please Log in or Create an account to join the conversation.

Testarossa's 78 KZ1000 Fighter Build 30 Jun 2010 19:50 #379352

  • testarossa
  • testarossa's Avatar Topic Author
  • Offline
  • User
  • Attack life, it's only trying to kill you.
  • Posts: 3678
  • Thank you received: 82
You guys are too creative with names for my race team. I like Leon's the best. Adam I just sanded the fins so far. I have them down to 320, and I'm not sure that they really need to be polished.

All I know is that if you run a clearanced point cover, then you better be able to put some scratches in it without putting the bike down.

BTW I got my exhaust valves back in tonight.

Let me take a crack at naming my race team. Phuc Loo Sing!
1978 KZ1000 A2 Click--->Build Thread
2004 ZX-10R
2007 Harley Sportster 1200
2020 Harley Street Glide Special
Angola, IN

Please Log in or Create an account to join the conversation.

Testarossa's 78 KZ1000 Fighter Build 30 Jun 2010 20:09 #379367

  • porchev914
  • porchev914's Avatar
  • Offline
  • User
  • Whats that? Half of my swingarm is missing?!?!?
  • Posts: 2716
  • Thank you received: 19
I'm sure the 320 looks great. I only asked because I have read of people "polishing" the fins, so I wondered what you had done. I would imagine that actually polishing the edges of the fins would be alot of work, but might look killer.....
FRANKEN Z!
1978 KZ1000 A2A with 08'Speed Triple SSSA and '06 GSXR1000 front end

Please Log in or Create an account to join the conversation.

Testarossa's 78 KZ1000 Fighter Build 30 Jun 2010 20:09 #379369

  • PLUMMEN
  • PLUMMEN's Avatar
  • Offline
  • User
  • Posts: 8139
  • Thank you received: 103
531blackbanshee wrote:

good job testa!
i like how you spun the dohc off the covers.
lookin good man,

leon

i give credit to my dear ol dad for coming up with the plain jane covers look origionally back in the early 80s around these parts anyway,along with the color coordinated frame/bodywork that seems so popular these days B)
Still recovering,some days are better than others.
Attachments:

Please Log in or Create an account to join the conversation.

Testarossa's 78 KZ1000 Fighter Build 01 Jul 2010 19:48 #379562

  • testarossa
  • testarossa's Avatar Topic Author
  • Offline
  • User
  • Attack life, it's only trying to kill you.
  • Posts: 3678
  • Thank you received: 82
So Plum, was that Dad's bike? That takes guts to paint your frame red, but it looks good on that bike. I think I'll stick to black for mine.

So I finished sticking the head together this evening. Almost made a classic mistake. After I had five of the valves all snug in their holes I realized that I forgot to install the valve stem seals.:angry: One quick pointer for those who have not built these heads before. Make sure that the lower spring seat is in place before you install the valve stem seal.
1978 KZ1000 A2 Click--->Build Thread
2004 ZX-10R
2007 Harley Sportster 1200
2020 Harley Street Glide Special
Angola, IN

Please Log in or Create an account to join the conversation.

Testarossa's 78 KZ1000 Fighter Build 04 Jul 2010 15:56 #380227

  • mark1122
  • mark1122's Avatar
  • Offline
  • User
  • Keep twisting it
  • Posts: 5359
  • Thank you received: 109
The motor looks great. I love the loo of the polished fins too.B)
76 KZ, frame gusset work,1200CC.Ported by Larry Cavanaugh, 1.5mm.over intakes, Carron Pipe, ZRX12 rear end, and seat,96zx9 front end.
01 CBR600F4i Track bike.
Cobourg, Ont. Can.

~ ~ ~_@
~ ~ _- \,
~ (k) / (z)

Please Log in or Create an account to join the conversation.

Testarossa's 78 KZ1000 Fighter Build 17 Jul 2010 19:33 #383486

  • testarossa
  • testarossa's Avatar Topic Author
  • Offline
  • User
  • Attack life, it's only trying to kill you.
  • Posts: 3678
  • Thank you received: 82
After nearly two weeks with no updates, I finally got back to work this weekend. I am preparing to re-assemble my engine/trans. After working to clean cases, and final prep on gasket surfaces, I remembered that I still have to deal with the broken spring in my clutch hub. So I started to tear apart the clutch basket assembly. First step is to remove the basket from the output shaft. Definitely need an impact gun for this one. That center nut was tight.

Here you can see my broken spring.


Here's what they look like after I removed them. Two were loose and you can see the broken one.


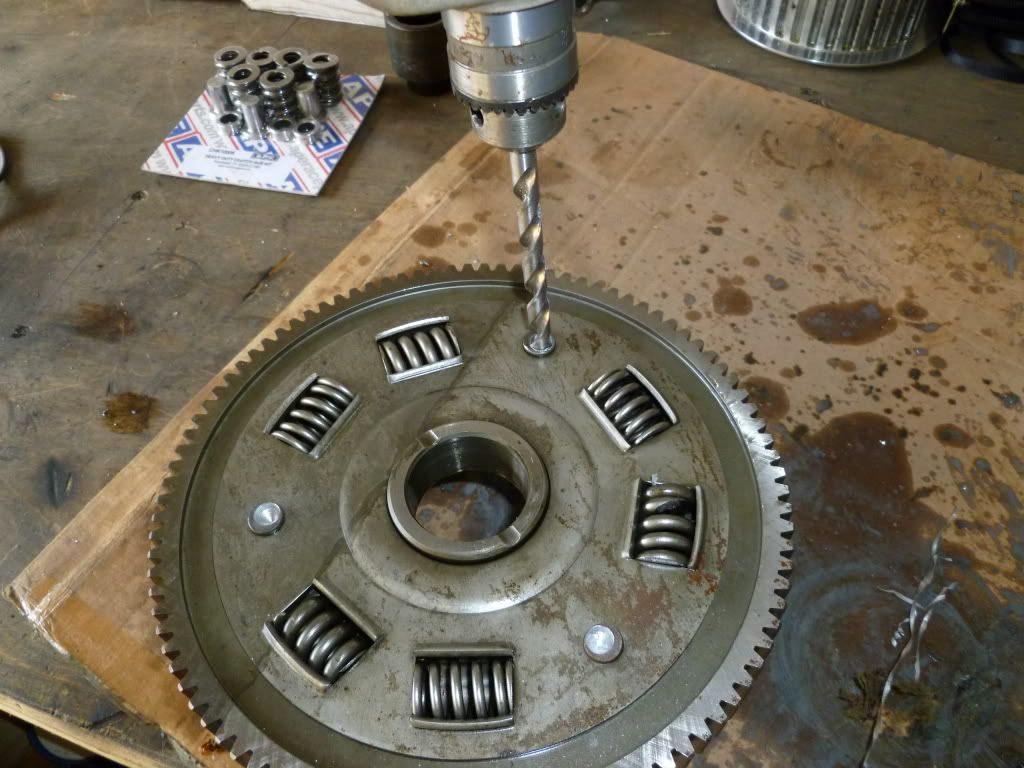
Now in order to get everything apart, you have to drill out the three rivets that hold the basket assembly together. Once you get the centers drilled out of the rivets, then you can use a punch to drive them out the other side. They are a press fit in there.


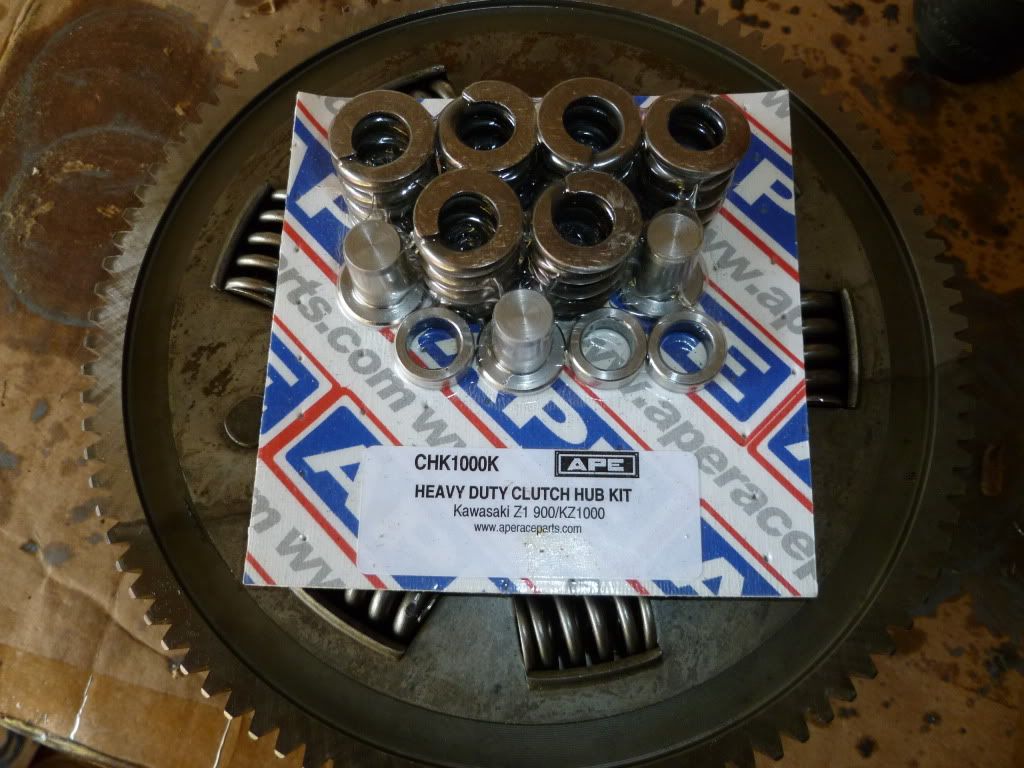
Here's what you need to fix the problem. APE heavy duty clutch hub rebuild kit. Two things to note about the APE kit. All six of the hub springs are the heavy gauge wire. Half of the stockers were heavy, and half were a lighter weight spring. Also, the new rivets in the APE kit are larger diameter (.437" vs .370") than the stock rivets. This means that you need to drill out the holes.


The steel backing plate on the back of the basket is very hard steel. I thought that my drill was cutting well since I saw steel chips coming out of the hole, but the chips were from the drill.


In the end, I had to grind the holes larger, and I used up four grinding stones on my Dremel tool.

Here it is mostly back together. I ran out of time to finish it, but should be done tomorrow.

I must say that I am pleased with the quality of the APE kit. Everything fit together well.

I also discovered another broken case bolt that I didn't know about. It is broken off inside of one of the dowel pins on the alternator cover side of the engine case. I don't think that I can weld anything to it to get it out.
1978 KZ1000 A2 Click--->Build Thread
2004 ZX-10R
2007 Harley Sportster 1200
2020 Harley Street Glide Special
Angola, IN

Please Log in or Create an account to join the conversation.

Testarossa's 78 KZ1000 Fighter Build 17 Jul 2010 19:40 #383488

  • PLUMMEN
  • PLUMMEN's Avatar
  • Offline
  • User
  • Posts: 8139
  • Thank you received: 103
testarossa wrote:

So Plum, was that Dad's bike? That takes guts to paint your frame red, but it looks good on that bike. I think I'll stick to black for mine.

So I finished sticking the head together this evening. Almost made a classic mistake. After I had five of the valves all snug in their holes I realized that I forgot to install the valve stem seals.:angry: One quick pointer for those who have not built these heads before. Make sure that the lower spring seat is in place before you install the valve stem seal.

yep still sitting in the basement wating for next phase.that bike was done that way back in 82,the covers were also milled down back then.he was ahead of the times to put it mildly! :laugh:
Still recovering,some days are better than others.

Please Log in or Create an account to join the conversation.

Testarossa's 78 KZ1000 Fighter Build 17 Jul 2010 19:55 #383489

  • mark1122
  • mark1122's Avatar
  • Offline
  • User
  • Keep twisting it
  • Posts: 5359
  • Thank you received: 109
i had no trouble drilling out he 2 baskets i did. i did have trouble fitting the ape sleeves over the ape rivits though. i didnt have a press so i was afraid i may get them 1/2 way on and get stuck. i ended up massaging some material off of the sleeves ID. so they would just slide over the rivets.
i had my friend clamp it back together and weld it for me.
i also massaged the spring cases, they get deep grooves warn in them, so i smoothed over the grooves. i had 1 balanced after the upgrade. he said it was only out 2 grams to start with.:) he said some of the new ones are out as much as 9 grams.:woohoo:
76 KZ, frame gusset work,1200CC.Ported by Larry Cavanaugh, 1.5mm.over intakes, Carron Pipe, ZRX12 rear end, and seat,96zx9 front end.
01 CBR600F4i Track bike.
Cobourg, Ont. Can.

~ ~ ~_@
~ ~ _- \,
~ (k) / (z)
Attachments:

Please Log in or Create an account to join the conversation.

Last edit: by mark1122.

Testarossa's 78 KZ1000 Fighter Build 18 Jul 2010 10:37 #383616

  • porchev914
  • porchev914's Avatar
  • Offline
  • User
  • Whats that? Half of my swingarm is missing?!?!?
  • Posts: 2716
  • Thank you received: 19
I'm glad you were able to get back to it. I need to do this at some point as well. How did the engine cleaning go, any pics of that? As far as the broken bolt, it looks like you need to find an EDM machine.
FRANKEN Z!
1978 KZ1000 A2A with 08'Speed Triple SSSA and '06 GSXR1000 front end

Please Log in or Create an account to join the conversation.

Testarossa's 78 KZ1000 Fighter Build 19 Jul 2010 20:06 #383988

  • testarossa
  • testarossa's Avatar Topic Author
  • Offline
  • User
  • Attack life, it's only trying to kill you.
  • Posts: 3678
  • Thank you received: 82
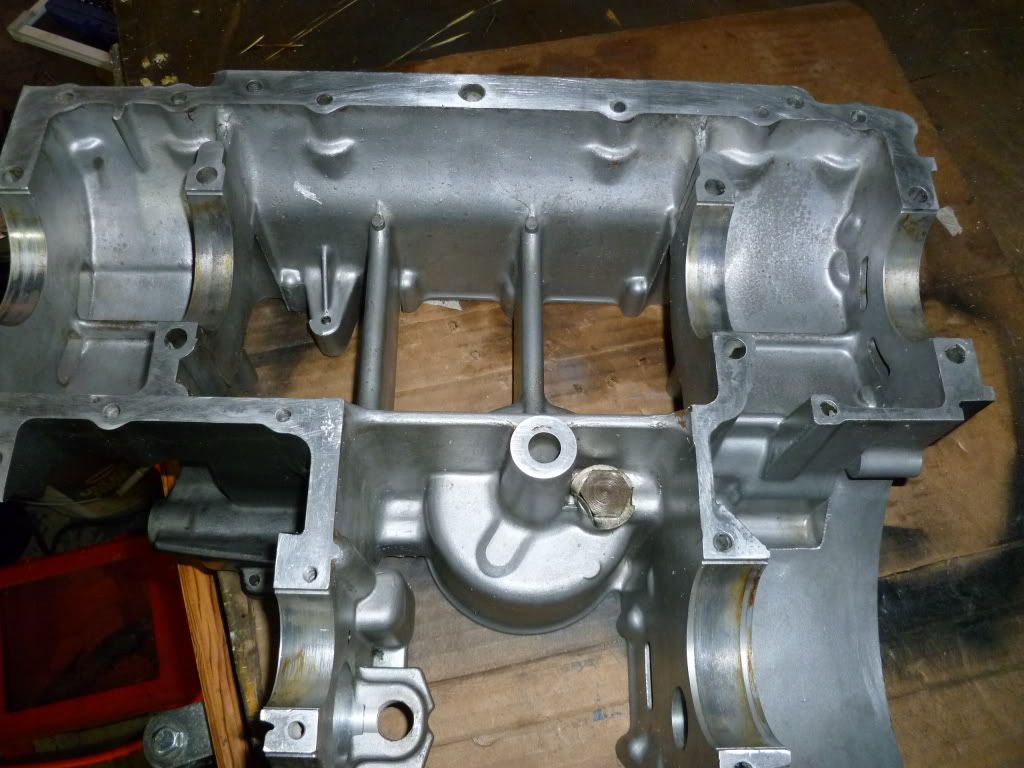
Ask and ye shall receive.


I still have a little work to do on that base gasket surface on the last picture.
1978 KZ1000 A2 Click--->Build Thread
2004 ZX-10R
2007 Harley Sportster 1200
2020 Harley Street Glide Special
Angola, IN

Please Log in or Create an account to join the conversation.

Testarossa's 78 KZ1000 Fighter Build 19 Jul 2010 20:14 #383991

  • testarossa
  • testarossa's Avatar Topic Author
  • Offline
  • User
  • Attack life, it's only trying to kill you.
  • Posts: 3678
  • Thank you received: 82
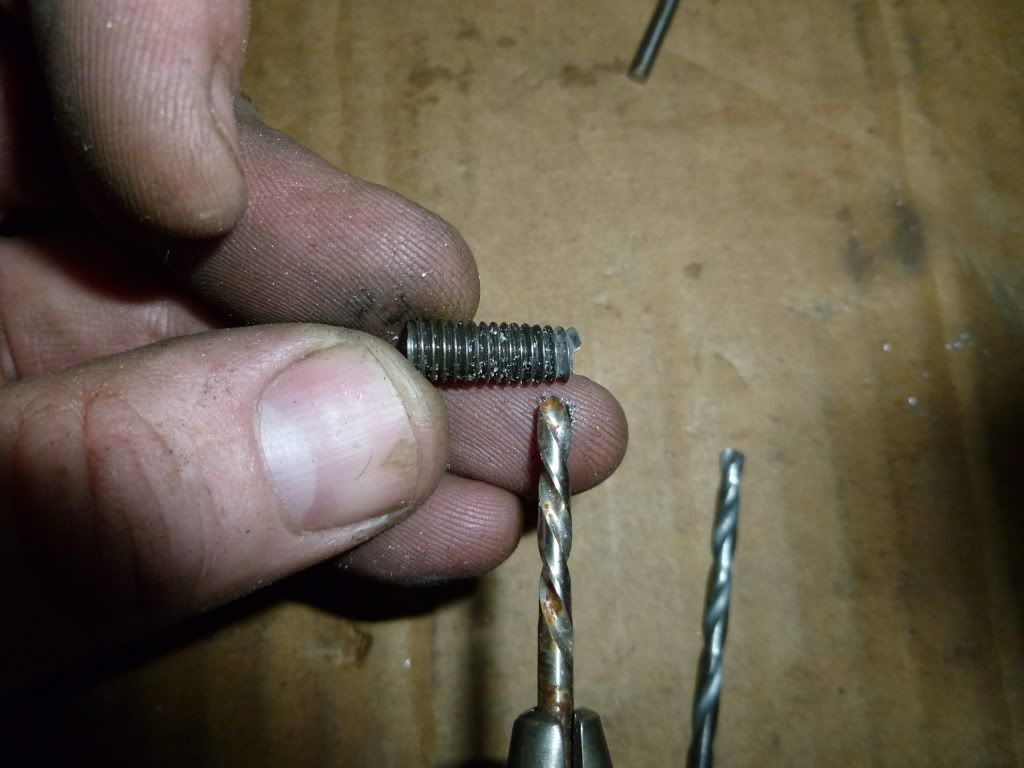
Here's that last broken bolt that I discovered the other day.


It WAS down in the bottom of that hole where the dowel pin goes.


So I need an EDM do I? How about a left handed drill bit. I bet that thing didn't drill 3/16" into that bolt before it unscrewed itself.


I also got the clutch basket back together tonight.
1978 KZ1000 A2 Click--->Build Thread
2004 ZX-10R
2007 Harley Sportster 1200
2020 Harley Street Glide Special
Angola, IN

Please Log in or Create an account to join the conversation.

Testarossa's 78 KZ1000 Fighter Build 19 Jul 2010 22:29 #384021

  • porchev914
  • porchev914's Avatar
  • Offline
  • User
  • Whats that? Half of my swingarm is missing?!?!?
  • Posts: 2716
  • Thank you received: 19
Thats great the broken bolt came out easy for you. I imagine that it did not shear during disassembly? Your clutch basket looks nice. How did you solve the drill bit eating issue? I've been eating bits gun drilling some stainless bolts on the lathe..
:unsure:
The cases look good... did you use scotchbrite disks on a die grinder on the base gasket surface?
FRANKEN Z!
1978 KZ1000 A2A with 08'Speed Triple SSSA and '06 GSXR1000 front end

Please Log in or Create an account to join the conversation.

Testarossa's 78 KZ1000 Fighter Build 20 Jul 2010 03:56 #384043

  • testarossa
  • testarossa's Avatar Topic Author
  • Offline
  • User
  • Attack life, it's only trying to kill you.
  • Posts: 3678
  • Thank you received: 82
porchev914 wrote:

Thats great the broken bolt came out easy for you. I imagine that it did not shear during disassembly? Your clutch basket looks nice. How did you solve the drill bit eating issue? I've been eating bits gun drilling some stainless bolts on the lathe..
:unsure:
The cases look good... did you use scotchbrite disks on a die grinder on the base gasket surface?


You're right, I didn't break that bolt. I guess it broke due to vibration. Heck I didn't even know that it was in there until Saturday.

As for the drill bit eating, I punted. I just used my Dremel tool with some green grinding stones and ground the holes out. I did burn up 4 stones opening 3 holes.

Not scotchbrite but close. I used one of those abrasive fibre gasket removal brushes. Think cup style wire wheel, but with plastic bristles.

Now on to your drilling problem. Of course, I have questions.
#1 what type of stainless, 304, 316, 420, 17-4, 18-8, etc? I think most off the shelf stainless bolts are 18-8.

#2 what diameter hole, and how deep?

#3 what type of drill/drills are you using? Just send me a close up picture. You are starting the hole with a spot drill, and then a short drill aren't you?

#4 how fast are you turning your spindle? Stainless is tough (wears tools fast) and it's usually gummy/stringy (chips don't break, you get long continuous chips that are good for loading up the drill.)

#5 what are you using for cutting oil or coolant?

As usual I'm happy to help, and I'm sure to have more questions, but I may start a new thread with the answers.
1978 KZ1000 A2 Click--->Build Thread
2004 ZX-10R
2007 Harley Sportster 1200
2020 Harley Street Glide Special
Angola, IN

Please Log in or Create an account to join the conversation.

Last edit: by testarossa.

Testarossa's 78 KZ1000 Fighter Build 20 Jul 2010 06:12 #384056

  • mark1122
  • mark1122's Avatar
  • Offline
  • User
  • Keep twisting it
  • Posts: 5359
  • Thank you received: 109
It's odd that i did not have to drill my basket holes out as u did? my rivets fit the existing holes.
did u find that the spacer bushings (rivet sleeves)were extremely tight to fit over the rivets? i would have needed a press if i hadn't reamed out the sleeves.
nice to here the bolt came out easily for u.
Keep up the good work.B)
76 KZ, frame gusset work,1200CC.Ported by Larry Cavanaugh, 1.5mm.over intakes, Carron Pipe, ZRX12 rear end, and seat,96zx9 front end.
01 CBR600F4i Track bike.
Cobourg, Ont. Can.

~ ~ ~_@
~ ~ _- \,
~ (k) / (z)

Please Log in or Create an account to join the conversation.

Testarossa's 78 KZ1000 Fighter Build 20 Jul 2010 07:23 #384068

  • testarossa
  • testarossa's Avatar Topic Author
  • Offline
  • User
  • Attack life, it's only trying to kill you.
  • Posts: 3678
  • Thank you received: 82
mark1122 wrote:

It's odd that i did not have to drill my basket holes out as u did? my rivets fit the existing holes.
did u find that the spacer bushings (rivet sleeves)were extremely tight to fit over the rivets? i would have needed a press if i hadn't reamed out the sleeves.
nice to here the bolt came out easily for u.
Keep up the good work.B)


Yeah Mark the new rivets were quite a bit larger in diameter than the stock ones. About 0.060" or 1.5mm larger. And yes they were a rather tight fit. I would call it a light press fit, but I'm not scared to press them in. I have a 50 ton press at work. If I screw up at the house, then I drag 'em to work and big red solves all my problems.
1978 KZ1000 A2 Click--->Build Thread
2004 ZX-10R
2007 Harley Sportster 1200
2020 Harley Street Glide Special
Angola, IN

Please Log in or Create an account to join the conversation.

Powered by Kunena Forum